Compare commits
1 Commits
| Author | SHA1 | Date | |
|---|---|---|---|
|
|
bffe2a2c63 |
2
.github/CODEOWNERS
vendored
@@ -1 +1 @@
|
||||
* @prowler-cloud/prowler-oss
|
||||
* @prowler-cloud/prowler-team
|
||||
|
||||
52
.github/ISSUE_TEMPLATE/bug_report.md
vendored
Normal file
@@ -0,0 +1,52 @@
|
||||
---
|
||||
name: Bug report
|
||||
about: Create a report to help us improve
|
||||
title: "[Bug]: "
|
||||
labels: bug, status/needs-triage
|
||||
assignees: ''
|
||||
|
||||
---
|
||||
|
||||
<!--
|
||||
Please use this template to create your bug report. By providing as much info as possible you help us understand the issue, reproduce it and resolve it for you quicker. Therefore, take a couple of extra minutes to make sure you have provided all info needed.
|
||||
|
||||
PROTIP: record your screen and attach it as a gif to showcase the issue.
|
||||
|
||||
- How to record and attach gif: https://bit.ly/2Mi8T6K
|
||||
-->
|
||||
|
||||
**What happened?**
|
||||
A clear and concise description of what the bug is or what is not working as expected
|
||||
|
||||
|
||||
**How to reproduce it**
|
||||
Steps to reproduce the behavior:
|
||||
1. What command are you running?
|
||||
2. Cloud provider you are launching
|
||||
3. Environment you have like single account, multi-account, organizations, multi or single subsctiption, etc.
|
||||
4. See error
|
||||
|
||||
|
||||
**Expected behavior**
|
||||
A clear and concise description of what you expected to happen.
|
||||
|
||||
|
||||
**Screenshots or Logs**
|
||||
If applicable, add screenshots to help explain your problem.
|
||||
Also, you can add logs (anonymize them first!). Here a command that may help to share a log
|
||||
`prowler <your arguments> --log-level DEBUG --log-file $(date +%F)_debug.log` then attach here the log file.
|
||||
|
||||
|
||||
**From where are you running Prowler?**
|
||||
Please, complete the following information:
|
||||
- Resource: (e.g. EC2 instance, Fargate task, Docker container manually, EKS, Cloud9, CodeBuild, workstation, etc.)
|
||||
- OS: [e.g. Amazon Linux 2, Mac, Alpine, Windows, etc. ]
|
||||
- Prowler Version [`prowler --version`]:
|
||||
- Python version [`python --version`]:
|
||||
- Pip version [`pip --version`]:
|
||||
- Installation method (Are you running it from pip package or cloning the github repo?):
|
||||
- Others:
|
||||
|
||||
|
||||
**Additional context**
|
||||
Add any other context about the problem here.
|
||||
97
.github/ISSUE_TEMPLATE/bug_report.yml
vendored
@@ -1,97 +0,0 @@
|
||||
name: 🐞 Bug Report
|
||||
description: Create a report to help us improve
|
||||
title: "[Bug]: "
|
||||
labels: ["bug", "status/needs-triage"]
|
||||
|
||||
body:
|
||||
- type: textarea
|
||||
id: reproduce
|
||||
attributes:
|
||||
label: Steps to Reproduce
|
||||
description: Steps to reproduce the behavior
|
||||
placeholder: |-
|
||||
1. What command are you running?
|
||||
2. Cloud provider you are launching
|
||||
3. Environment you have, like single account, multi-account, organizations, multi or single subscription, etc.
|
||||
4. See error
|
||||
validations:
|
||||
required: true
|
||||
- type: textarea
|
||||
id: expected
|
||||
attributes:
|
||||
label: Expected behavior
|
||||
description: A clear and concise description of what you expected to happen.
|
||||
validations:
|
||||
required: true
|
||||
- type: textarea
|
||||
id: actual
|
||||
attributes:
|
||||
label: Actual Result with Screenshots or Logs
|
||||
description: If applicable, add screenshots to help explain your problem. Also, you can add logs (anonymize them first!). Here a command that may help to share a log `prowler <your arguments> --log-level DEBUG --log-file $(date +%F)_debug.log` then attach here the log file.
|
||||
validations:
|
||||
required: true
|
||||
- type: dropdown
|
||||
id: type
|
||||
attributes:
|
||||
label: How did you install Prowler?
|
||||
options:
|
||||
- Cloning the repository from github.com (git clone)
|
||||
- From pip package (pip install prowler)
|
||||
- From brew (brew install prowler)
|
||||
- Docker (docker pull toniblyx/prowler)
|
||||
validations:
|
||||
required: true
|
||||
- type: textarea
|
||||
id: environment
|
||||
attributes:
|
||||
label: Environment Resource
|
||||
description: From where are you running Prowler?
|
||||
placeholder: |-
|
||||
1. EC2 instance
|
||||
2. Fargate task
|
||||
3. Docker container locally
|
||||
4. EKS
|
||||
5. Cloud9
|
||||
6. CodeBuild
|
||||
7. Workstation
|
||||
8. Other(please specify)
|
||||
validations:
|
||||
required: true
|
||||
- type: textarea
|
||||
id: os
|
||||
attributes:
|
||||
label: OS used
|
||||
description: Which OS are you using?
|
||||
placeholder: |-
|
||||
1. Amazon Linux 2
|
||||
2. MacOS
|
||||
3. Alpine Linux
|
||||
4. Windows
|
||||
5. Other(please specify)
|
||||
validations:
|
||||
required: true
|
||||
- type: input
|
||||
id: prowler-version
|
||||
attributes:
|
||||
label: Prowler version
|
||||
description: Which Prowler version are you using?
|
||||
placeholder: |-
|
||||
prowler --version
|
||||
validations:
|
||||
required: true
|
||||
- type: input
|
||||
id: pip-version
|
||||
attributes:
|
||||
label: Pip version
|
||||
description: Which pip version are you using?
|
||||
placeholder: |-
|
||||
pip --version
|
||||
validations:
|
||||
required: true
|
||||
- type: textarea
|
||||
id: additional
|
||||
attributes:
|
||||
description: Additional context
|
||||
label: Context
|
||||
validations:
|
||||
required: false
|
||||
36
.github/ISSUE_TEMPLATE/feature-request.yml
vendored
@@ -1,36 +0,0 @@
|
||||
name: 💡 Feature Request
|
||||
description: Suggest an idea for this project
|
||||
labels: ["feature-request", "status/needs-triage"]
|
||||
|
||||
|
||||
body:
|
||||
- type: textarea
|
||||
id: Problem
|
||||
attributes:
|
||||
label: New feature motivation
|
||||
description: Is your feature request related to a problem? Please describe
|
||||
placeholder: |-
|
||||
1. A clear and concise description of what the problem is. Ex. I'm always frustrated when
|
||||
validations:
|
||||
required: true
|
||||
- type: textarea
|
||||
id: Solution
|
||||
attributes:
|
||||
label: Solution Proposed
|
||||
description: A clear and concise description of what you want to happen.
|
||||
validations:
|
||||
required: true
|
||||
- type: textarea
|
||||
id: Alternatives
|
||||
attributes:
|
||||
label: Describe alternatives you've considered
|
||||
description: A clear and concise description of any alternative solutions or features you've considered.
|
||||
validations:
|
||||
required: true
|
||||
- type: textarea
|
||||
id: Context
|
||||
attributes:
|
||||
label: Additional context
|
||||
description: Add any other context or screenshots about the feature request here.
|
||||
validations:
|
||||
required: false
|
||||
20
.github/ISSUE_TEMPLATE/feature_request.md
vendored
Normal file
@@ -0,0 +1,20 @@
|
||||
---
|
||||
name: Feature request
|
||||
about: Suggest an idea for this project
|
||||
title: ''
|
||||
labels: enhancement, status/needs-triage
|
||||
assignees: ''
|
||||
|
||||
---
|
||||
|
||||
**Is your feature request related to a problem? Please describe.**
|
||||
A clear and concise description of what the problem is. Ex. I'm always frustrated when [...]
|
||||
|
||||
**Describe the solution you'd like**
|
||||
A clear and concise description of what you want to happen.
|
||||
|
||||
**Describe alternatives you've considered**
|
||||
A clear and concise description of any alternative solutions or features you've considered.
|
||||
|
||||
**Additional context**
|
||||
Add any other context or screenshots about the feature request here.
|
||||
7
.github/dependabot.yml
vendored
@@ -8,13 +8,8 @@ updates:
|
||||
- package-ecosystem: "pip" # See documentation for possible values
|
||||
directory: "/" # Location of package manifests
|
||||
schedule:
|
||||
interval: "weekly"
|
||||
interval: "daily"
|
||||
target-branch: master
|
||||
labels:
|
||||
- "dependencies"
|
||||
- "pip"
|
||||
- package-ecosystem: "github-actions"
|
||||
directory: "/"
|
||||
schedule:
|
||||
interval: "weekly"
|
||||
target-branch: master
|
||||
|
||||
27
.github/labeler.yml
vendored
@@ -1,27 +0,0 @@
|
||||
documentation:
|
||||
- changed-files:
|
||||
- any-glob-to-any-file: "docs/**"
|
||||
|
||||
provider/aws:
|
||||
- changed-files:
|
||||
- any-glob-to-any-file: "prowler/providers/aws/**"
|
||||
- any-glob-to-any-file: "tests/providers/aws/**"
|
||||
|
||||
provider/azure:
|
||||
- changed-files:
|
||||
- any-glob-to-any-file: "prowler/providers/azure/**"
|
||||
- any-glob-to-any-file: "tests/providers/azure/**"
|
||||
|
||||
provider/gcp:
|
||||
- changed-files:
|
||||
- any-glob-to-any-file: "prowler/providers/gcp/**"
|
||||
- any-glob-to-any-file: "tests/providers/gcp/**"
|
||||
|
||||
provider/kubernetes:
|
||||
- changed-files:
|
||||
- any-glob-to-any-file: "prowler/providers/kubernetes/**"
|
||||
- any-glob-to-any-file: "tests/providers/kubernetes/**"
|
||||
|
||||
github_actions:
|
||||
- changed-files:
|
||||
- any-glob-to-any-file: ".github/workflows/*"
|
||||
24
.github/workflows/build-documentation-on-pr.yml
vendored
@@ -1,24 +0,0 @@
|
||||
name: Pull Request Documentation Link
|
||||
|
||||
on:
|
||||
pull_request:
|
||||
branches:
|
||||
- 'master'
|
||||
- 'prowler-4.0-dev'
|
||||
paths:
|
||||
- 'docs/**'
|
||||
|
||||
env:
|
||||
PR_NUMBER: ${{ github.event.pull_request.number }}
|
||||
|
||||
jobs:
|
||||
documentation-link:
|
||||
name: Documentation Link
|
||||
runs-on: ubuntu-latest
|
||||
steps:
|
||||
- name: Leave PR comment with the SaaS Documentation URI
|
||||
uses: peter-evans/create-or-update-comment@v4
|
||||
with:
|
||||
issue-number: ${{ env.PR_NUMBER }}
|
||||
body: |
|
||||
You can check the documentation for this PR here -> [SaaS Documentation](https://prowler-prowler-docs--${{ env.PR_NUMBER }}.com.readthedocs.build/projects/prowler-open-source/en/${{ env.PR_NUMBER }}/)
|
||||
186
.github/workflows/build-lint-push-containers.yml
vendored
@@ -15,102 +15,180 @@ on:
|
||||
env:
|
||||
AWS_REGION_STG: eu-west-1
|
||||
AWS_REGION_PLATFORM: eu-west-1
|
||||
AWS_REGION: us-east-1
|
||||
AWS_REGION_PRO: us-east-1
|
||||
IMAGE_NAME: prowler
|
||||
LATEST_TAG: latest
|
||||
STABLE_TAG: stable
|
||||
TEMPORARY_TAG: temporary
|
||||
DOCKERFILE_PATH: ./Dockerfile
|
||||
PYTHON_VERSION: 3.9
|
||||
|
||||
jobs:
|
||||
# Lint Dockerfile using Hadolint
|
||||
# dockerfile-linter:
|
||||
# runs-on: ubuntu-latest
|
||||
# steps:
|
||||
# -
|
||||
# name: Checkout
|
||||
# uses: actions/checkout@v3
|
||||
# -
|
||||
# name: Install Hadolint
|
||||
# run: |
|
||||
# VERSION=$(curl --silent "https://api.github.com/repos/hadolint/hadolint/releases/latest" | \
|
||||
# grep '"tag_name":' | \
|
||||
# sed -E 's/.*"v([^"]+)".*/\1/' \
|
||||
# ) && curl -L -o /tmp/hadolint https://github.com/hadolint/hadolint/releases/download/v${VERSION}/hadolint-Linux-x86_64 \
|
||||
# && chmod +x /tmp/hadolint
|
||||
# -
|
||||
# name: Run Hadolint
|
||||
# run: |
|
||||
# /tmp/hadolint util/Dockerfile
|
||||
|
||||
# Build Prowler OSS container
|
||||
container-build-push:
|
||||
container-build:
|
||||
# needs: dockerfile-linter
|
||||
runs-on: ubuntu-latest
|
||||
env:
|
||||
POETRY_VIRTUALENVS_CREATE: "false"
|
||||
steps:
|
||||
- name: Checkout
|
||||
uses: actions/checkout@v4
|
||||
|
||||
- name: Setup python (release)
|
||||
uses: actions/checkout@v3
|
||||
- name: setup python (release)
|
||||
if: github.event_name == 'release'
|
||||
uses: actions/setup-python@v5
|
||||
uses: actions/setup-python@v2
|
||||
with:
|
||||
python-version: ${{ env.PYTHON_VERSION }}
|
||||
|
||||
python-version: 3.9 #install the python needed
|
||||
- name: Install dependencies (release)
|
||||
if: github.event_name == 'release'
|
||||
run: |
|
||||
pipx install poetry
|
||||
pipx inject poetry poetry-bumpversion
|
||||
|
||||
- name: Update Prowler version (release)
|
||||
if: github.event_name == 'release'
|
||||
run: |
|
||||
poetry version ${{ github.event.release.tag_name }}
|
||||
- name: Set up Docker Buildx
|
||||
uses: docker/setup-buildx-action@v2
|
||||
- name: Build
|
||||
uses: docker/build-push-action@v2
|
||||
with:
|
||||
# Without pushing to registries
|
||||
push: false
|
||||
tags: ${{ env.IMAGE_NAME }}:${{ env.TEMPORARY_TAG }}
|
||||
file: ${{ env.DOCKERFILE_PATH }}
|
||||
outputs: type=docker,dest=/tmp/${{ env.IMAGE_NAME }}.tar
|
||||
- name: Share image between jobs
|
||||
uses: actions/upload-artifact@v2
|
||||
with:
|
||||
name: ${{ env.IMAGE_NAME }}.tar
|
||||
path: /tmp/${{ env.IMAGE_NAME }}.tar
|
||||
|
||||
# Lint Prowler OSS container using Dockle
|
||||
# container-linter:
|
||||
# needs: container-build
|
||||
# runs-on: ubuntu-latest
|
||||
# steps:
|
||||
# -
|
||||
# name: Get container image from shared
|
||||
# uses: actions/download-artifact@v2
|
||||
# with:
|
||||
# name: ${{ env.IMAGE_NAME }}.tar
|
||||
# path: /tmp
|
||||
# -
|
||||
# name: Load Docker image
|
||||
# run: |
|
||||
# docker load --input /tmp/${{ env.IMAGE_NAME }}.tar
|
||||
# docker image ls -a
|
||||
# -
|
||||
# name: Install Dockle
|
||||
# run: |
|
||||
# VERSION=$(curl --silent "https://api.github.com/repos/goodwithtech/dockle/releases/latest" | \
|
||||
# grep '"tag_name":' | \
|
||||
# sed -E 's/.*"v([^"]+)".*/\1/' \
|
||||
# ) && curl -L -o dockle.deb https://github.com/goodwithtech/dockle/releases/download/v${VERSION}/dockle_${VERSION}_Linux-64bit.deb \
|
||||
# && sudo dpkg -i dockle.deb && rm dockle.deb
|
||||
# -
|
||||
# name: Run Dockle
|
||||
# run: dockle ${{ env.IMAGE_NAME }}:${{ env.TEMPORARY_TAG }}
|
||||
|
||||
# Push Prowler OSS container to registries
|
||||
container-push:
|
||||
# needs: container-linter
|
||||
needs: container-build
|
||||
runs-on: ubuntu-latest
|
||||
permissions:
|
||||
id-token: write
|
||||
contents: read # This is required for actions/checkout
|
||||
steps:
|
||||
- name: Get container image from shared
|
||||
uses: actions/download-artifact@v2
|
||||
with:
|
||||
name: ${{ env.IMAGE_NAME }}.tar
|
||||
path: /tmp
|
||||
- name: Load Docker image
|
||||
run: |
|
||||
docker load --input /tmp/${{ env.IMAGE_NAME }}.tar
|
||||
docker image ls -a
|
||||
- name: Login to DockerHub
|
||||
uses: docker/login-action@v3
|
||||
uses: docker/login-action@v2
|
||||
with:
|
||||
username: ${{ secrets.DOCKERHUB_USERNAME }}
|
||||
password: ${{ secrets.DOCKERHUB_TOKEN }}
|
||||
|
||||
- name: Login to Public ECR
|
||||
uses: docker/login-action@v3
|
||||
uses: docker/login-action@v2
|
||||
with:
|
||||
registry: public.ecr.aws
|
||||
username: ${{ secrets.PUBLIC_ECR_AWS_ACCESS_KEY_ID }}
|
||||
password: ${{ secrets.PUBLIC_ECR_AWS_SECRET_ACCESS_KEY }}
|
||||
env:
|
||||
AWS_REGION: ${{ env.AWS_REGION }}
|
||||
AWS_REGION: ${{ env.AWS_REGION_PRO }}
|
||||
|
||||
- name: Set up Docker Buildx
|
||||
uses: docker/setup-buildx-action@v3
|
||||
|
||||
- name: Build and push container image (latest)
|
||||
if: github.event_name == 'push'
|
||||
uses: docker/build-push-action@v5
|
||||
with:
|
||||
push: true
|
||||
tags: |
|
||||
${{ secrets.DOCKER_HUB_REPOSITORY }}/${{ env.IMAGE_NAME }}:${{ env.LATEST_TAG }}
|
||||
${{ secrets.PUBLIC_ECR_REPOSITORY }}/${{ env.IMAGE_NAME }}:${{ env.LATEST_TAG }}
|
||||
file: ${{ env.DOCKERFILE_PATH }}
|
||||
cache-from: type=gha
|
||||
cache-to: type=gha,mode=max
|
||||
|
||||
- name: Build and push container image (release)
|
||||
if: github.event_name == 'release'
|
||||
uses: docker/build-push-action@v5
|
||||
with:
|
||||
# Use local context to get changes
|
||||
# https://github.com/docker/build-push-action#path-context
|
||||
context: .
|
||||
push: true
|
||||
tags: |
|
||||
${{ secrets.DOCKER_HUB_REPOSITORY }}/${{ env.IMAGE_NAME }}:${{ github.event.release.tag_name }}
|
||||
${{ secrets.DOCKER_HUB_REPOSITORY }}/${{ env.IMAGE_NAME }}:${{ env.STABLE_TAG }}
|
||||
${{ secrets.PUBLIC_ECR_REPOSITORY }}/${{ env.IMAGE_NAME }}:${{ github.event.release.tag_name }}
|
||||
${{ secrets.PUBLIC_ECR_REPOSITORY }}/${{ env.IMAGE_NAME }}:${{ env.STABLE_TAG }}
|
||||
file: ${{ env.DOCKERFILE_PATH }}
|
||||
cache-from: type=gha
|
||||
cache-to: type=gha,mode=max
|
||||
|
||||
dispatch-action:
|
||||
needs: container-build-push
|
||||
runs-on: ubuntu-latest
|
||||
steps:
|
||||
- name: Get latest commit info
|
||||
- name: Tag (latest)
|
||||
if: github.event_name == 'push'
|
||||
run: |
|
||||
LATEST_COMMIT_HASH=$(echo ${{ github.event.after }} | cut -b -7)
|
||||
echo "LATEST_COMMIT_HASH=${LATEST_COMMIT_HASH}" >> $GITHUB_ENV
|
||||
docker tag ${{ env.IMAGE_NAME }}:${{ env.TEMPORARY_TAG }} ${{ secrets.DOCKER_HUB_REPOSITORY }}/${{ env.IMAGE_NAME }}:${{ env.LATEST_TAG }}
|
||||
docker tag ${{ env.IMAGE_NAME }}:${{ env.TEMPORARY_TAG }} ${{ secrets.PUBLIC_ECR_REPOSITORY }}/${{ env.IMAGE_NAME }}:${{ env.LATEST_TAG }}
|
||||
|
||||
- # Push to master branch - push "latest" tag
|
||||
name: Push (latest)
|
||||
if: github.event_name == 'push'
|
||||
run: |
|
||||
docker push ${{ secrets.DOCKER_HUB_REPOSITORY }}/${{ env.IMAGE_NAME }}:${{ env.LATEST_TAG }}
|
||||
docker push ${{ secrets.PUBLIC_ECR_REPOSITORY }}/${{ env.IMAGE_NAME }}:${{ env.LATEST_TAG }}
|
||||
|
||||
- # Tag the new release (stable and release tag)
|
||||
name: Tag (release)
|
||||
if: github.event_name == 'release'
|
||||
run: |
|
||||
docker tag ${{ env.IMAGE_NAME }}:${{ env.TEMPORARY_TAG }} ${{ secrets.DOCKER_HUB_REPOSITORY }}/${{ env.IMAGE_NAME }}:${{ github.event.release.tag_name }}
|
||||
docker tag ${{ env.IMAGE_NAME }}:${{ env.TEMPORARY_TAG }} ${{ secrets.PUBLIC_ECR_REPOSITORY }}/${{ env.IMAGE_NAME }}:${{ github.event.release.tag_name }}
|
||||
|
||||
docker tag ${{ env.IMAGE_NAME }}:${{ env.TEMPORARY_TAG }} ${{ secrets.DOCKER_HUB_REPOSITORY }}/${{ env.IMAGE_NAME }}:${{ env.STABLE_TAG }}
|
||||
docker tag ${{ env.IMAGE_NAME }}:${{ env.TEMPORARY_TAG }} ${{ secrets.PUBLIC_ECR_REPOSITORY }}/${{ env.IMAGE_NAME }}:${{ env.STABLE_TAG }}
|
||||
|
||||
- # Push the new release (stable and release tag)
|
||||
name: Push (release)
|
||||
if: github.event_name == 'release'
|
||||
run: |
|
||||
docker push ${{ secrets.DOCKER_HUB_REPOSITORY }}/${{ env.IMAGE_NAME }}:${{ github.event.release.tag_name }}
|
||||
docker push ${{ secrets.PUBLIC_ECR_REPOSITORY }}/${{ env.IMAGE_NAME }}:${{ github.event.release.tag_name }}
|
||||
|
||||
docker push ${{ secrets.DOCKER_HUB_REPOSITORY }}/${{ env.IMAGE_NAME }}:${{ env.STABLE_TAG }}
|
||||
docker push ${{ secrets.PUBLIC_ECR_REPOSITORY }}/${{ env.IMAGE_NAME }}:${{ env.STABLE_TAG }}
|
||||
|
||||
- name: Delete artifacts
|
||||
if: always()
|
||||
uses: geekyeggo/delete-artifact@v1
|
||||
with:
|
||||
name: ${{ env.IMAGE_NAME }}.tar
|
||||
|
||||
dispatch-action:
|
||||
needs: container-push
|
||||
runs-on: ubuntu-latest
|
||||
steps:
|
||||
- name: Dispatch event for latest
|
||||
if: github.event_name == 'push'
|
||||
run: |
|
||||
curl https://api.github.com/repos/${{ secrets.DISPATCH_OWNER }}/${{ secrets.DISPATCH_REPO }}/dispatches -H "Accept: application/vnd.github+json" -H "Authorization: Bearer ${{ secrets.ACCESS_TOKEN }}" -H "X-GitHub-Api-Version: 2022-11-28" --data '{"event_type":"dispatch","client_payload":{"version":"latest", "tag": "${{ env.LATEST_COMMIT_HASH }}"}}'
|
||||
curl https://api.github.com/repos/${{ secrets.DISPATCH_OWNER }}/${{ secrets.DISPATCH_REPO }}/dispatches -H "Accept: application/vnd.github+json" -H "Authorization: Bearer ${{ secrets.ACCESS_TOKEN }}" -H "X-GitHub-Api-Version: 2022-11-28" --data '{"event_type":"dispatch","client_payload":{"version":"latest"}'
|
||||
- name: Dispatch event for release
|
||||
if: github.event_name == 'release'
|
||||
run: |
|
||||
|
||||
10
.github/workflows/codeql.yml
vendored
@@ -13,10 +13,10 @@ name: "CodeQL"
|
||||
|
||||
on:
|
||||
push:
|
||||
branches: [ "master", "prowler-4.0-dev" ]
|
||||
branches: [ "master", prowler-2, prowler-3.0-dev ]
|
||||
pull_request:
|
||||
# The branches below must be a subset of the branches above
|
||||
branches: [ "master", "prowler-4.0-dev" ]
|
||||
branches: [ "master" ]
|
||||
schedule:
|
||||
- cron: '00 12 * * *'
|
||||
|
||||
@@ -37,11 +37,11 @@ jobs:
|
||||
|
||||
steps:
|
||||
- name: Checkout repository
|
||||
uses: actions/checkout@v4
|
||||
uses: actions/checkout@v3
|
||||
|
||||
# Initializes the CodeQL tools for scanning.
|
||||
- name: Initialize CodeQL
|
||||
uses: github/codeql-action/init@v3
|
||||
uses: github/codeql-action/init@v2
|
||||
with:
|
||||
languages: ${{ matrix.language }}
|
||||
# If you wish to specify custom queries, you can do so here or in a config file.
|
||||
@@ -52,6 +52,6 @@ jobs:
|
||||
# queries: security-extended,security-and-quality
|
||||
|
||||
- name: Perform CodeQL Analysis
|
||||
uses: github/codeql-action/analyze@v3
|
||||
uses: github/codeql-action/analyze@v2
|
||||
with:
|
||||
category: "/language:${{matrix.language}}"
|
||||
|
||||
4
.github/workflows/find-secrets.yml
vendored
@@ -7,11 +7,11 @@ jobs:
|
||||
runs-on: ubuntu-latest
|
||||
steps:
|
||||
- name: Checkout
|
||||
uses: actions/checkout@v4
|
||||
uses: actions/checkout@v3
|
||||
with:
|
||||
fetch-depth: 0
|
||||
- name: TruffleHog OSS
|
||||
uses: trufflesecurity/trufflehog@v3.70.2
|
||||
uses: trufflesecurity/trufflehog@v3.4.4
|
||||
with:
|
||||
path: ./
|
||||
base: ${{ github.event.repository.default_branch }}
|
||||
|
||||
16
.github/workflows/labeler.yml
vendored
@@ -1,16 +0,0 @@
|
||||
name: "Pull Request Labeler"
|
||||
|
||||
on:
|
||||
pull_request_target:
|
||||
branches:
|
||||
- "master"
|
||||
- "prowler-4.0-dev"
|
||||
|
||||
jobs:
|
||||
labeler:
|
||||
permissions:
|
||||
contents: read
|
||||
pull-requests: write
|
||||
runs-on: ubuntu-latest
|
||||
steps:
|
||||
- uses: actions/labeler@v5
|
||||
49
.github/workflows/pull-request.yml
vendored
@@ -4,45 +4,27 @@ on:
|
||||
push:
|
||||
branches:
|
||||
- "master"
|
||||
- "prowler-4.0-dev"
|
||||
pull_request:
|
||||
branches:
|
||||
- "master"
|
||||
- "prowler-4.0-dev"
|
||||
|
||||
jobs:
|
||||
build:
|
||||
runs-on: ubuntu-latest
|
||||
strategy:
|
||||
matrix:
|
||||
python-version: ["3.9", "3.10", "3.11", "3.12"]
|
||||
python-version: ["3.9"]
|
||||
|
||||
steps:
|
||||
- uses: actions/checkout@v4
|
||||
- name: Test if changes are in not ignored paths
|
||||
id: are-non-ignored-files-changed
|
||||
uses: tj-actions/changed-files@v43
|
||||
with:
|
||||
files: ./**
|
||||
files_ignore: |
|
||||
.github/**
|
||||
README.md
|
||||
docs/**
|
||||
permissions/**
|
||||
mkdocs.yml
|
||||
- name: Install poetry
|
||||
if: steps.are-non-ignored-files-changed.outputs.any_changed == 'true'
|
||||
run: |
|
||||
python -m pip install --upgrade pip
|
||||
pipx install poetry
|
||||
- uses: actions/checkout@v3
|
||||
- name: Set up Python ${{ matrix.python-version }}
|
||||
if: steps.are-non-ignored-files-changed.outputs.any_changed == 'true'
|
||||
uses: actions/setup-python@v5
|
||||
uses: actions/setup-python@v4
|
||||
with:
|
||||
python-version: ${{ matrix.python-version }}
|
||||
cache: "poetry"
|
||||
- name: Install dependencies
|
||||
if: steps.are-non-ignored-files-changed.outputs.any_changed == 'true'
|
||||
run: |
|
||||
python -m pip install --upgrade pip
|
||||
pip install poetry
|
||||
poetry install
|
||||
poetry run pip list
|
||||
VERSION=$(curl --silent "https://api.github.com/repos/hadolint/hadolint/releases/latest" | \
|
||||
@@ -50,44 +32,27 @@ jobs:
|
||||
sed -E 's/.*"v([^"]+)".*/\1/' \
|
||||
) && curl -L -o /tmp/hadolint "https://github.com/hadolint/hadolint/releases/download/v${VERSION}/hadolint-Linux-x86_64" \
|
||||
&& chmod +x /tmp/hadolint
|
||||
- name: Poetry check
|
||||
if: steps.are-non-ignored-files-changed.outputs.any_changed == 'true'
|
||||
run: |
|
||||
poetry lock --check
|
||||
- name: Lint with flake8
|
||||
if: steps.are-non-ignored-files-changed.outputs.any_changed == 'true'
|
||||
run: |
|
||||
poetry run flake8 . --ignore=E266,W503,E203,E501,W605,E128 --exclude contrib
|
||||
- name: Checking format with black
|
||||
if: steps.are-non-ignored-files-changed.outputs.any_changed == 'true'
|
||||
run: |
|
||||
poetry run black --check .
|
||||
- name: Lint with pylint
|
||||
if: steps.are-non-ignored-files-changed.outputs.any_changed == 'true'
|
||||
run: |
|
||||
poetry run pylint --disable=W,C,R,E -j 0 -rn -sn prowler/
|
||||
- name: Bandit
|
||||
if: steps.are-non-ignored-files-changed.outputs.any_changed == 'true'
|
||||
run: |
|
||||
poetry run bandit -q -lll -x '*_test.py,./contrib/' -r .
|
||||
- name: Safety
|
||||
if: steps.are-non-ignored-files-changed.outputs.any_changed == 'true'
|
||||
run: |
|
||||
poetry run safety check
|
||||
- name: Vulture
|
||||
if: steps.are-non-ignored-files-changed.outputs.any_changed == 'true'
|
||||
run: |
|
||||
poetry run vulture --exclude "contrib" --min-confidence 100 .
|
||||
- name: Hadolint
|
||||
if: steps.are-non-ignored-files-changed.outputs.any_changed == 'true'
|
||||
run: |
|
||||
/tmp/hadolint Dockerfile --ignore=DL3013
|
||||
- name: Test with pytest
|
||||
if: steps.are-non-ignored-files-changed.outputs.any_changed == 'true'
|
||||
run: |
|
||||
poetry run pytest -n auto --cov=./prowler --cov-report=xml tests
|
||||
- name: Upload coverage reports to Codecov
|
||||
if: steps.are-non-ignored-files-changed.outputs.any_changed == 'true'
|
||||
uses: codecov/codecov-action@v4
|
||||
env:
|
||||
CODECOV_TOKEN: ${{ secrets.CODECOV_TOKEN }}
|
||||
poetry run pytest tests -n auto
|
||||
|
||||
102
.github/workflows/pypi-release.yml
vendored
@@ -6,13 +6,7 @@ on:
|
||||
|
||||
env:
|
||||
RELEASE_TAG: ${{ github.event.release.tag_name }}
|
||||
PYTHON_VERSION: 3.11
|
||||
CACHE: "poetry"
|
||||
# This base branch is used to create a PR with the updated version
|
||||
# We'd need to handle the base branch for v4 and v3, since they will be
|
||||
# `master` and `3.0-dev`, respectively
|
||||
GITHUB_BASE_BRANCH: "master"
|
||||
GIT_COMMITTER_EMAIL: "sergio@prowler.com"
|
||||
GITHUB_BRANCH: master
|
||||
|
||||
jobs:
|
||||
release-prowler-job:
|
||||
@@ -21,87 +15,55 @@ jobs:
|
||||
POETRY_VIRTUALENVS_CREATE: "false"
|
||||
name: Release Prowler to PyPI
|
||||
steps:
|
||||
- uses: actions/checkout@v4
|
||||
|
||||
# Checks-out your repository under $GITHUB_WORKSPACE, so your job can access it
|
||||
- uses: actions/checkout@v3
|
||||
with:
|
||||
ref: ${{ env.GITHUB_BRANCH }}
|
||||
- name: setup python
|
||||
uses: actions/setup-python@v2
|
||||
with:
|
||||
python-version: 3.9 #install the python needed
|
||||
- name: Install dependencies
|
||||
run: |
|
||||
pipx install poetry
|
||||
pipx inject poetry poetry-bumpversion
|
||||
|
||||
- name: Setup Python
|
||||
uses: actions/setup-python@v5
|
||||
with:
|
||||
python-version: ${{ env.PYTHON_VERSION }}
|
||||
cache: ${{ env.CACHE }}
|
||||
|
||||
- name: Update Poetry and config version
|
||||
- name: Change version and Build package
|
||||
run: |
|
||||
poetry version ${{ env.RELEASE_TAG }}
|
||||
|
||||
- name: Import GPG key
|
||||
uses: crazy-max/ghaction-import-gpg@v4
|
||||
with:
|
||||
gpg_private_key: ${{ secrets.GPG_PRIVATE_KEY }}
|
||||
passphrase: ${{ secrets.GPG_PASSPHRASE }}
|
||||
git_user_signingkey: true
|
||||
git_commit_gpgsign: true
|
||||
|
||||
- name: Push updated version to the release tag
|
||||
run: |
|
||||
# Configure Git
|
||||
git config user.name "github-actions"
|
||||
git config user.email "${{ env.GIT_COMMITTER_EMAIL }}"
|
||||
|
||||
# Add the files with the version changed
|
||||
git config user.email "<noreply@github.com>"
|
||||
git add prowler/config/config.py pyproject.toml
|
||||
git commit -m "chore(release): ${{ env.RELEASE_TAG }}" --no-verify -S
|
||||
|
||||
# Replace the tag with the version updated
|
||||
git tag -fa ${{ env.RELEASE_TAG }} -m "chore(release): ${{ env.RELEASE_TAG }}" --sign
|
||||
|
||||
# Push the tag
|
||||
git commit -m "chore(release): ${{ env.RELEASE_TAG }}" --no-verify
|
||||
git tag -fa ${{ env.RELEASE_TAG }} -m "chore(release): ${{ env.RELEASE_TAG }}"
|
||||
git push -f origin ${{ env.RELEASE_TAG }}
|
||||
|
||||
|
||||
- name: Create new branch for the version update
|
||||
run: |
|
||||
git switch -c release-${{ env.RELEASE_TAG }}
|
||||
git push --set-upstream origin release-${{ env.RELEASE_TAG }}
|
||||
|
||||
- name: Build Prowler package
|
||||
run: |
|
||||
poetry build
|
||||
|
||||
- name: Publish Prowler package to PyPI
|
||||
- name: Publish prowler package to PyPI
|
||||
run: |
|
||||
poetry config pypi-token.pypi ${{ secrets.PYPI_API_TOKEN }}
|
||||
poetry publish
|
||||
|
||||
- name: Create PR to update version in the branch
|
||||
run: |
|
||||
echo "### Description
|
||||
|
||||
This PR updates Prowler Version to ${{ env.RELEASE_TAG }}.
|
||||
|
||||
### License
|
||||
|
||||
By submitting this pull request, I confirm that my contribution is made under the terms of the Apache 2.0 license." |\
|
||||
gh pr create \
|
||||
--base ${{ env.GITHUB_BASE_BRANCH }} \
|
||||
--head release-${{ env.RELEASE_TAG }} \
|
||||
--title "chore(release): update Prowler Version to ${{ env.RELEASE_TAG }}." \
|
||||
--body-file -
|
||||
env:
|
||||
GH_TOKEN: ${{ secrets.PROWLER_ACCESS_TOKEN }}
|
||||
|
||||
- name: Replicate PyPI package
|
||||
- name: Replicate PyPi Package
|
||||
run: |
|
||||
rm -rf ./dist && rm -rf ./build && rm -rf prowler.egg-info
|
||||
pip install toml
|
||||
python util/replicate_pypi_package.py
|
||||
poetry build
|
||||
|
||||
- name: Publish prowler-cloud package to PyPI
|
||||
run: |
|
||||
poetry config pypi-token.pypi ${{ secrets.PYPI_API_TOKEN }}
|
||||
poetry publish
|
||||
# Create pull request with new version
|
||||
- name: Create Pull Request
|
||||
uses: peter-evans/create-pull-request@v4
|
||||
with:
|
||||
token: ${{ secrets.GITHUB_TOKEN }}
|
||||
commit-message: "chore(release): update Prowler Version to ${{ env.RELEASE_TAG }}."
|
||||
branch: release-${{ env.RELEASE_TAG }}
|
||||
labels: "status/waiting-for-revision, severity/low"
|
||||
title: "chore(release): update Prowler Version to ${{ env.RELEASE_TAG }}"
|
||||
body: |
|
||||
### Description
|
||||
|
||||
This PR updates Prowler Version to ${{ env.RELEASE_TAG }}.
|
||||
|
||||
### License
|
||||
|
||||
By submitting this pull request, I confirm that my contribution is made under the terms of the Apache 2.0 license.
|
||||
|
||||
@@ -23,12 +23,12 @@ jobs:
|
||||
# Steps represent a sequence of tasks that will be executed as part of the job
|
||||
steps:
|
||||
# Checks-out your repository under $GITHUB_WORKSPACE, so your job can access it
|
||||
- uses: actions/checkout@v4
|
||||
- uses: actions/checkout@v3
|
||||
with:
|
||||
ref: ${{ env.GITHUB_BRANCH }}
|
||||
|
||||
- name: setup python
|
||||
uses: actions/setup-python@v5
|
||||
uses: actions/setup-python@v2
|
||||
with:
|
||||
python-version: 3.9 #install the python needed
|
||||
|
||||
@@ -38,7 +38,7 @@ jobs:
|
||||
pip install boto3
|
||||
|
||||
- name: Configure AWS Credentials -- DEV
|
||||
uses: aws-actions/configure-aws-credentials@v4
|
||||
uses: aws-actions/configure-aws-credentials@v1
|
||||
with:
|
||||
aws-region: ${{ env.AWS_REGION_DEV }}
|
||||
role-to-assume: ${{ secrets.DEV_IAM_ROLE_ARN }}
|
||||
@@ -50,12 +50,12 @@ jobs:
|
||||
|
||||
# Create pull request
|
||||
- name: Create Pull Request
|
||||
uses: peter-evans/create-pull-request@v6
|
||||
uses: peter-evans/create-pull-request@v4
|
||||
with:
|
||||
token: ${{ secrets.PROWLER_ACCESS_TOKEN }}
|
||||
commit-message: "feat(regions_update): Update regions for AWS services."
|
||||
branch: "aws-services-regions-updated-${{ github.sha }}"
|
||||
labels: "status/waiting-for-revision, severity/low, provider/aws"
|
||||
labels: "status/waiting-for-revision, severity/low"
|
||||
title: "chore(regions_update): Changes in regions for AWS services."
|
||||
body: |
|
||||
### Description
|
||||
|
||||
5
.gitignore
vendored
@@ -46,8 +46,3 @@ junit-reports/
|
||||
|
||||
# .env
|
||||
.env*
|
||||
|
||||
# Coverage
|
||||
.coverage*
|
||||
.coverage
|
||||
coverage*
|
||||
|
||||
@@ -1,7 +1,7 @@
|
||||
repos:
|
||||
## GENERAL
|
||||
- repo: https://github.com/pre-commit/pre-commit-hooks
|
||||
rev: v4.5.0
|
||||
rev: v4.4.0
|
||||
hooks:
|
||||
- id: check-merge-conflict
|
||||
- id: check-yaml
|
||||
@@ -15,11 +15,10 @@ repos:
|
||||
|
||||
## TOML
|
||||
- repo: https://github.com/macisamuele/language-formatters-pre-commit-hooks
|
||||
rev: v2.12.0
|
||||
rev: v2.7.0
|
||||
hooks:
|
||||
- id: pretty-format-toml
|
||||
args: [--autofix]
|
||||
files: pyproject.toml
|
||||
|
||||
## BASH
|
||||
- repo: https://github.com/koalaman/shellcheck-precommit
|
||||
@@ -28,7 +27,7 @@ repos:
|
||||
- id: shellcheck
|
||||
## PYTHON
|
||||
- repo: https://github.com/myint/autoflake
|
||||
rev: v2.2.1
|
||||
rev: v2.0.1
|
||||
hooks:
|
||||
- id: autoflake
|
||||
args:
|
||||
@@ -39,29 +38,27 @@ repos:
|
||||
]
|
||||
|
||||
- repo: https://github.com/timothycrosley/isort
|
||||
rev: 5.13.2
|
||||
rev: 5.12.0
|
||||
hooks:
|
||||
- id: isort
|
||||
args: ["--profile", "black"]
|
||||
|
||||
- repo: https://github.com/psf/black
|
||||
rev: 24.1.1
|
||||
rev: 23.1.0
|
||||
hooks:
|
||||
- id: black
|
||||
|
||||
- repo: https://github.com/pycqa/flake8
|
||||
rev: 7.0.0
|
||||
rev: 6.0.0
|
||||
hooks:
|
||||
- id: flake8
|
||||
exclude: contrib
|
||||
args: ["--ignore=E266,W503,E203,E501,W605"]
|
||||
|
||||
- repo: https://github.com/python-poetry/poetry
|
||||
rev: 1.7.0
|
||||
- repo: https://github.com/haizaar/check-pipfile-lock
|
||||
rev: v0.0.5
|
||||
hooks:
|
||||
- id: poetry-check
|
||||
- id: poetry-lock
|
||||
args: ["--no-update"]
|
||||
- id: check-pipfile-lock
|
||||
|
||||
- repo: https://github.com/hadolint/hadolint
|
||||
rev: v2.12.1-beta
|
||||
@@ -75,23 +72,17 @@ repos:
|
||||
name: pylint
|
||||
entry: bash -c 'pylint --disable=W,C,R,E -j 0 -rn -sn prowler/'
|
||||
language: system
|
||||
files: '.*\.py'
|
||||
|
||||
- id: trufflehog
|
||||
name: TruffleHog
|
||||
description: Detect secrets in your data.
|
||||
entry: bash -c 'trufflehog --no-update git file://. --only-verified --fail'
|
||||
# For running trufflehog in docker, use the following entry instead:
|
||||
# entry: bash -c 'docker run -v "$(pwd):/workdir" -i --rm trufflesecurity/trufflehog:latest git file:///workdir --only-verified --fail'
|
||||
- id: pytest-check
|
||||
name: pytest-check
|
||||
entry: bash -c 'pytest tests -n auto'
|
||||
language: system
|
||||
stages: ["commit", "push"]
|
||||
|
||||
- id: bandit
|
||||
name: bandit
|
||||
description: "Bandit is a tool for finding common security issues in Python code"
|
||||
entry: bash -c 'bandit -q -lll -x '*_test.py,./contrib/' -r .'
|
||||
language: system
|
||||
files: '.*\.py'
|
||||
|
||||
- id: safety
|
||||
name: safety
|
||||
@@ -104,4 +95,3 @@ repos:
|
||||
description: "Vulture finds unused code in Python programs."
|
||||
entry: bash -c 'vulture --exclude "contrib" --min-confidence 100 .'
|
||||
language: system
|
||||
files: '.*\.py'
|
||||
|
||||
@@ -8,18 +8,16 @@ version: 2
|
||||
build:
|
||||
os: "ubuntu-22.04"
|
||||
tools:
|
||||
python: "3.11"
|
||||
python: "3.9"
|
||||
jobs:
|
||||
post_create_environment:
|
||||
# Install poetry
|
||||
# https://python-poetry.org/docs/#installing-manually
|
||||
- python -m pip install poetry
|
||||
- pip install poetry
|
||||
# Tell poetry to not use a virtual environment
|
||||
- poetry config virtualenvs.create false
|
||||
post_install:
|
||||
# Install dependencies with 'docs' dependency group
|
||||
# https://python-poetry.org/docs/managing-dependencies/#dependency-groups
|
||||
# VIRTUAL_ENV needs to be set manually for now.
|
||||
# See https://github.com/readthedocs/readthedocs.org/pull/11152/
|
||||
- VIRTUAL_ENV=${READTHEDOCS_VIRTUALENV_PATH} python -m poetry install --only=docs
|
||||
- poetry install -E docs
|
||||
|
||||
mkdocs:
|
||||
configuration: mkdocs.yml
|
||||
|
||||
@@ -55,7 +55,7 @@ further defined and clarified by project maintainers.
|
||||
## Enforcement
|
||||
|
||||
Instances of abusive, harassing, or otherwise unacceptable behavior may be
|
||||
reported by contacting the project team at [support.prowler.com](https://customer.support.prowler.com/servicedesk/customer/portals). All
|
||||
reported by contacting the project team at community@prowler.cloud. All
|
||||
complaints will be reviewed and investigated and will result in a response that
|
||||
is deemed necessary and appropriate to the circumstances. The project team is
|
||||
obligated to maintain confidentiality with regard to the reporter of an incident.
|
||||
|
||||
@@ -1,13 +0,0 @@
|
||||
# Do you want to learn on how to...
|
||||
|
||||
- Contribute with your code or fixes to Prowler
|
||||
- Create a new check for a provider
|
||||
- Create a new security compliance framework
|
||||
- Add a custom output format
|
||||
- Add a new integration
|
||||
- Contribute with documentation
|
||||
|
||||
Want some swag as appreciation for your contribution?
|
||||
|
||||
# Prowler Developer Guide
|
||||
https://docs.prowler.cloud/en/latest/tutorials/developer-guide/
|
||||
@@ -1,10 +1,9 @@
|
||||
FROM python:3.11-alpine
|
||||
FROM python:3.9-alpine
|
||||
|
||||
LABEL maintainer="https://github.com/prowler-cloud/prowler"
|
||||
|
||||
# Update system dependencies
|
||||
#hadolint ignore=DL3018
|
||||
RUN apk --no-cache upgrade && apk --no-cache add curl
|
||||
RUN apk --no-cache upgrade
|
||||
|
||||
# Create nonroot user
|
||||
RUN mkdir -p /home/prowler && \
|
||||
|
||||
2
LICENSE
@@ -186,7 +186,7 @@
|
||||
same "printed page" as the copyright notice for easier
|
||||
identification within third-party archives.
|
||||
|
||||
Copyright @ 2024 Toni de la Fuente
|
||||
Copyright 2018 Netflix, Inc.
|
||||
|
||||
Licensed under the Apache License, Version 2.0 (the "License");
|
||||
you may not use this file except in compliance with the License.
|
||||
|
||||
11
Makefile
@@ -2,19 +2,12 @@
|
||||
|
||||
##@ Testing
|
||||
test: ## Test with pytest
|
||||
rm -rf .coverage && \
|
||||
pytest -n auto -vvv -s --cov=./prowler --cov-report=xml tests
|
||||
pytest -n auto -vvv -s -x
|
||||
|
||||
coverage: ## Show Test Coverage
|
||||
coverage run --skip-covered -m pytest -v && \
|
||||
coverage report -m && \
|
||||
rm -rf .coverage && \
|
||||
coverage report -m
|
||||
|
||||
coverage-html: ## Show Test Coverage
|
||||
rm -rf ./htmlcov && \
|
||||
coverage html && \
|
||||
open htmlcov/index.html
|
||||
rm -rf .coverage
|
||||
|
||||
##@ Linting
|
||||
format: ## Format Code
|
||||
|
||||
92
README.md
@@ -1,31 +1,24 @@
|
||||
<p align="center">
|
||||
<img align="center" src="https://github.com/prowler-cloud/prowler/blob/master/docs/img/prowler-logo-black.png?raw=True#gh-light-mode-only" width="350" height="115">
|
||||
<img align="center" src="https://github.com/prowler-cloud/prowler/blob/master/docs/img/prowler-logo-white.png?raw=True#gh-dark-mode-only" width="350" height="115">
|
||||
<img align="center" src="https://github.com/prowler-cloud/prowler/blob/62c1ce73bbcdd6b9e5ba03dfcae26dfd165defd9/docs/img/prowler-pro-dark.png?raw=True#gh-dark-mode-only" width="150" height="36">
|
||||
<img align="center" src="https://github.com/prowler-cloud/prowler/blob/62c1ce73bbcdd6b9e5ba03dfcae26dfd165defd9/docs/img/prowler-pro-light.png?raw=True#gh-light-mode-only" width="15%" height="15%">
|
||||
</p>
|
||||
<p align="center">
|
||||
<b><i>Prowler SaaS </b> and <b>Prowler Open Source</b> are as dynamic and adaptable as the environment they’re meant to protect. Trusted by the leaders in security.
|
||||
<b><i>See all the things you and your team can do with ProwlerPro at <a href="https://prowler.pro">prowler.pro</a></i></b>
|
||||
</p>
|
||||
<p align="center">
|
||||
<b>Learn more at <a href="https://prowler.com">prowler.com</i></b>
|
||||
</p>
|
||||
|
||||
<p align="center">
|
||||
<a href="https://join.slack.com/t/prowler-workspace/shared_invite/zt-1hix76xsl-2uq222JIXrC7Q8It~9ZNog"><img width="30" height="30" alt="Prowler community on Slack" src="https://github.com/prowler-cloud/prowler/assets/3985464/3617e470-670c-47c9-9794-ce895ebdb627"></a>
|
||||
<br>
|
||||
<a href="https://join.slack.com/t/prowler-workspace/shared_invite/zt-1hix76xsl-2uq222JIXrC7Q8It~9ZNog">Join our Prowler community!</a>
|
||||
</p>
|
||||
|
||||
<hr>
|
||||
<p align="center">
|
||||
<img src="https://user-images.githubusercontent.com/3985464/113734260-7ba06900-96fb-11eb-82bc-d4f68a1e2710.png" />
|
||||
</p>
|
||||
<p align="center">
|
||||
<a href="https://join.slack.com/t/prowler-workspace/shared_invite/zt-1hix76xsl-2uq222JIXrC7Q8It~9ZNog"><img alt="Slack Shield" src="https://img.shields.io/badge/slack-prowler-brightgreen.svg?logo=slack"></a>
|
||||
<a href="https://pypi.org/project/prowler/"><img alt="Python Version" src="https://img.shields.io/pypi/v/prowler.svg"></a>
|
||||
<a href="https://pypi.python.org/pypi/prowler/"><img alt="Python Version" src="https://img.shields.io/pypi/pyversions/prowler.svg"></a>
|
||||
<a href="https://pypistats.org/packages/prowler"><img alt="PyPI Prowler Downloads" src="https://img.shields.io/pypi/dw/prowler.svg?label=prowler%20downloads"></a>
|
||||
<a href="https://pypi.org/project/prowler-cloud/"><img alt="Python Version" src="https://img.shields.io/pypi/v/prowler.svg"></a>
|
||||
<a href="https://pypi.python.org/pypi/prowler-cloud/"><img alt="Python Version" src="https://img.shields.io/pypi/pyversions/prowler.svg"></a>
|
||||
<a href="https://pypistats.org/packages/prowler"><img alt="PyPI Prowler Downloads" src="https://img.shields.io/pypi/dw/prowler.svg"></a>
|
||||
<a href="https://pypistats.org/packages/prowler-cloud"><img alt="PyPI Prowler-Cloud Downloads" src="https://img.shields.io/pypi/dw/prowler-cloud.svg"></a>
|
||||
<a href="https://hub.docker.com/r/toniblyx/prowler"><img alt="Docker Pulls" src="https://img.shields.io/docker/pulls/toniblyx/prowler"></a>
|
||||
<a href="https://hub.docker.com/r/toniblyx/prowler"><img alt="Docker" src="https://img.shields.io/docker/cloud/build/toniblyx/prowler"></a>
|
||||
<a href="https://hub.docker.com/r/toniblyx/prowler"><img alt="Docker" src="https://img.shields.io/docker/image-size/toniblyx/prowler"></a>
|
||||
<a href="https://gallery.ecr.aws/prowler-cloud/prowler"><img width="120" height=19" alt="AWS ECR Gallery" src="https://user-images.githubusercontent.com/3985464/151531396-b6535a68-c907-44eb-95a1-a09508178616.png"></a>
|
||||
<a href="https://codecov.io/gh/prowler-cloud/prowler"><img src="https://codecov.io/gh/prowler-cloud/prowler/graph/badge.svg?token=OflBGsdpDl"/></a>
|
||||
<a href="https://gallery.ecr.aws/o4g1s5r6/prowler"><img width="120" height=19" alt="AWS ECR Gallery" src="https://user-images.githubusercontent.com/3985464/151531396-b6535a68-c907-44eb-95a1-a09508178616.png"></a>
|
||||
</p>
|
||||
<p align="center">
|
||||
<a href="https://github.com/prowler-cloud/prowler"><img alt="Repo size" src="https://img.shields.io/github/repo-size/prowler-cloud/prowler"></a>
|
||||
@@ -37,38 +30,24 @@
|
||||
<a href="https://twitter.com/ToniBlyx"><img alt="Twitter" src="https://img.shields.io/twitter/follow/toniblyx?style=social"></a>
|
||||
<a href="https://twitter.com/prowlercloud"><img alt="Twitter" src="https://img.shields.io/twitter/follow/prowlercloud?style=social"></a>
|
||||
</p>
|
||||
<hr>
|
||||
|
||||
# Description
|
||||
|
||||
`Prowler` is an Open Source security tool to perform AWS, GCP and Azure security best practices assessments, audits, incident response, continuous monitoring, hardening and forensics readiness.
|
||||
`Prowler` is an Open Source security tool to perform AWS and Azure security best practices assessments, audits, incident response, continuous monitoring, hardening and forensics readiness.
|
||||
|
||||
It contains hundreds of controls covering CIS, NIST 800, NIST CSF, CISA, RBI, FedRAMP, PCI-DSS, GDPR, HIPAA, FFIEC, SOC2, GXP, AWS Well-Architected Framework Security Pillar, AWS Foundational Technical Review (FTR), ENS (Spanish National Security Scheme) and your custom security frameworks.
|
||||
|
||||
| Provider | Checks | Services | [Compliance Frameworks](https://docs.prowler.com/projects/prowler-open-source/en/latest/tutorials/compliance/) | [Categories](https://docs.prowler.com/projects/prowler-open-source/en/latest/tutorials/misc/#categories) |
|
||||
|---|---|---|---|---|
|
||||
| AWS | 304 | 61 -> `prowler aws --list-services` | 28 -> `prowler aws --list-compliance` | 6 -> `prowler aws --list-categories` |
|
||||
| GCP | 75 | 11 -> `prowler gcp --list-services` | 1 -> `prowler gcp --list-compliance` | 2 -> `prowler gcp --list-categories`|
|
||||
| Azure | 109 | 16 -> `prowler azure --list-services` | CIS soon | 2 -> `prowler azure --list-categories` |
|
||||
| Kubernetes | Work In Progress | - | CIS soon | - |
|
||||
|
||||
# 📖 Documentation
|
||||
|
||||
The full documentation can now be found at [https://docs.prowler.com](https://docs.prowler.com/projects/prowler-open-source/en/latest/)
|
||||
It contains hundreds of controls covering CIS, PCI-DSS, ISO27001, GDPR, HIPAA, FFIEC, SOC2, AWS FTR, ENS and custom security frameworks.
|
||||
|
||||
## Looking for Prowler v2 documentation?
|
||||
For Prowler v2 Documentation, please go to https://github.com/prowler-cloud/prowler/tree/2.12.1.
|
||||
|
||||
# ⚙️ Install
|
||||
|
||||
## Pip package
|
||||
Prowler is available as a project in [PyPI](https://pypi.org/project/prowler-cloud/), thus can be installed using pip with Python >= 3.9, < 3.13:
|
||||
Prowler is available as a project in [PyPI](https://pypi.org/project/prowler-cloud/), thus can be installed using pip with Python >= 3.9:
|
||||
|
||||
```console
|
||||
pip install prowler
|
||||
prowler -v
|
||||
```
|
||||
More details at [https://docs.prowler.com](https://docs.prowler.com/projects/prowler-open-source/en/latest/)
|
||||
|
||||
## Containers
|
||||
|
||||
@@ -81,11 +60,11 @@ The available versions of Prowler are the following:
|
||||
The container images are available here:
|
||||
|
||||
- [DockerHub](https://hub.docker.com/r/toniblyx/prowler/tags)
|
||||
- [AWS Public ECR](https://gallery.ecr.aws/prowler-cloud/prowler)
|
||||
- [AWS Public ECR](https://gallery.ecr.aws/o4g1s5r6/prowler)
|
||||
|
||||
## From Github
|
||||
|
||||
Python >= 3.9, < 3.13 is required with pip and poetry:
|
||||
Python >= 3.9 is required with pip and poetry:
|
||||
|
||||
```
|
||||
git clone https://github.com/prowler-cloud/prowler
|
||||
@@ -95,15 +74,20 @@ poetry install
|
||||
python prowler.py -v
|
||||
```
|
||||
|
||||
# 📖 Documentation
|
||||
|
||||
The full documentation can now be found at [https://docs.prowler.cloud](https://docs.prowler.cloud)
|
||||
|
||||
|
||||
# 📐✏️ High level architecture
|
||||
|
||||
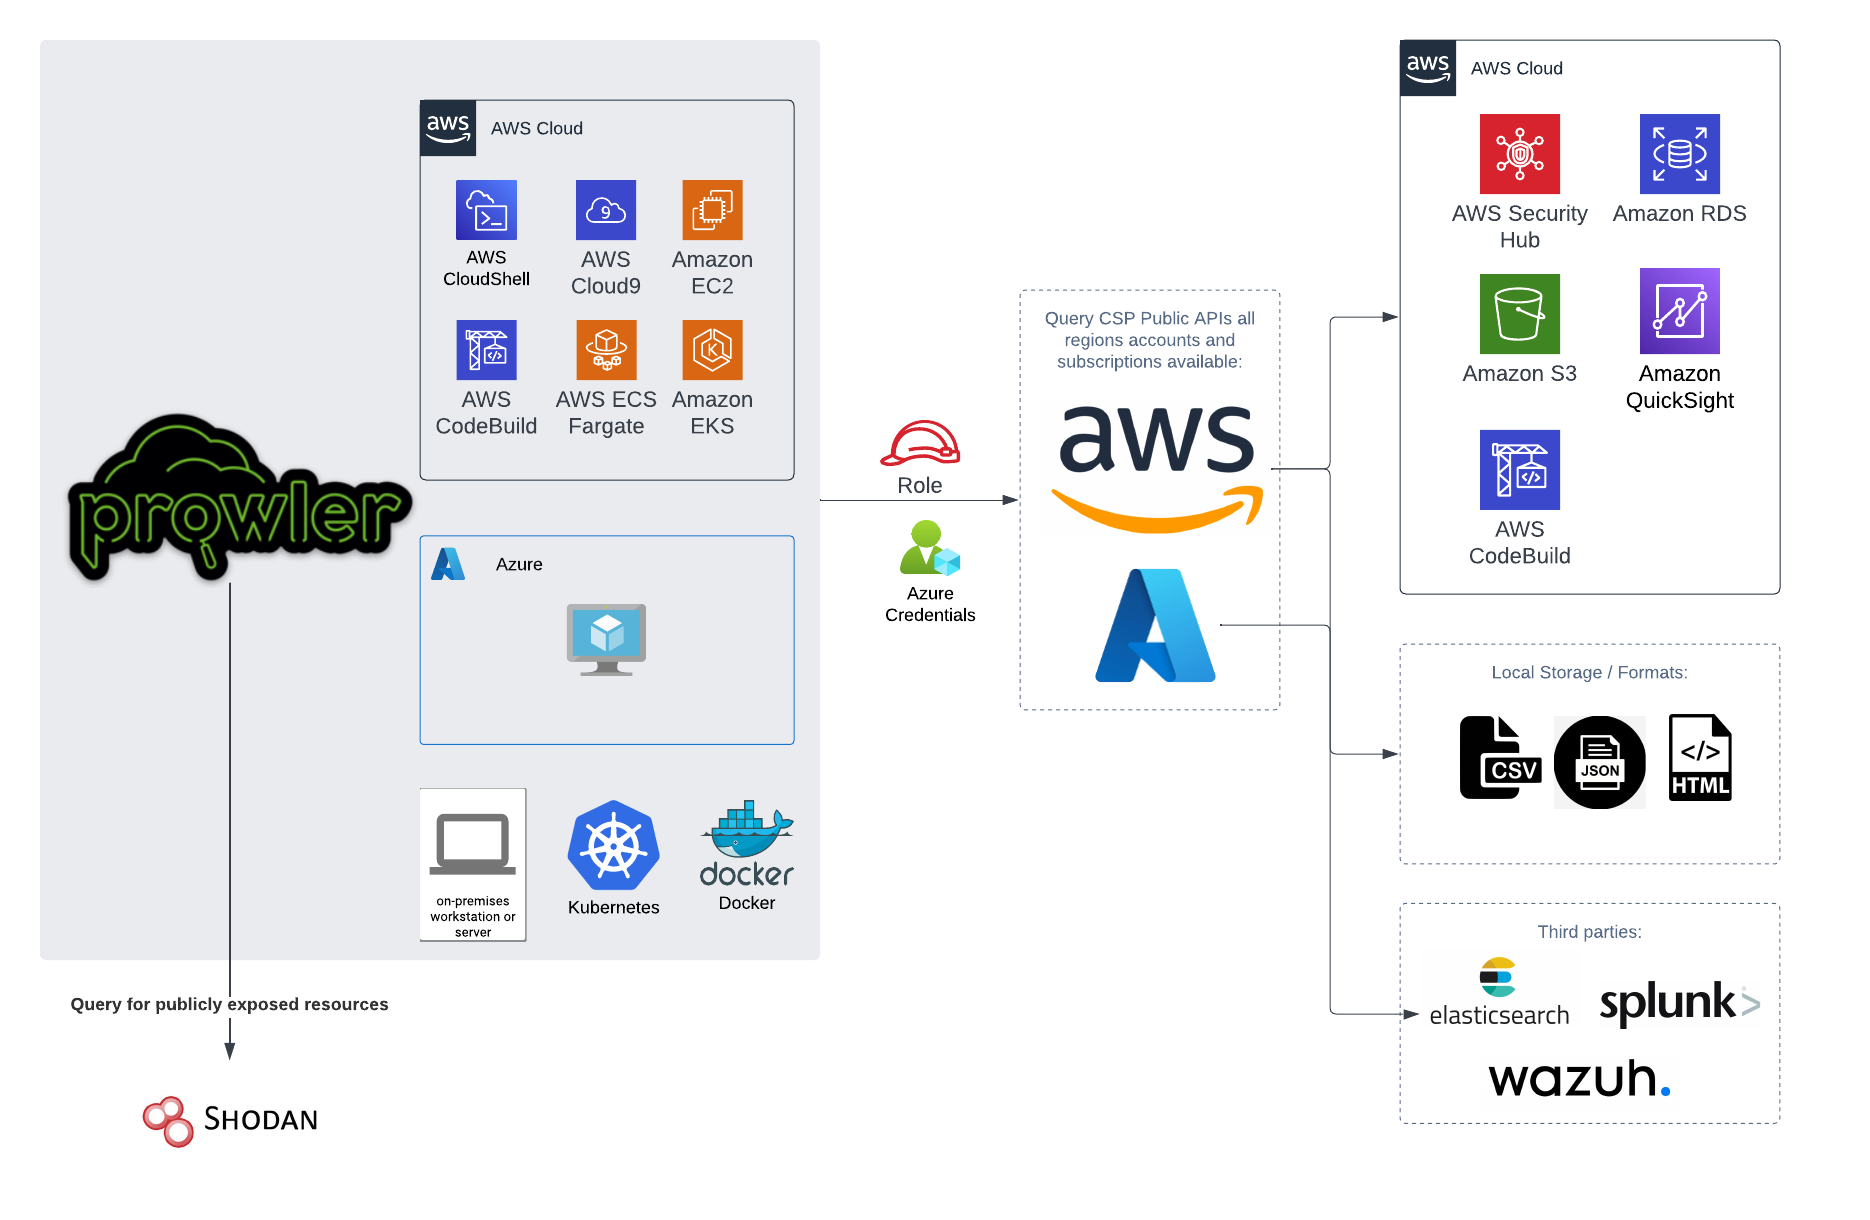
You can run Prowler from your workstation, an EC2 instance, Fargate or any other container, Codebuild, CloudShell and Cloud9.
|
||||
|
||||

|
||||
|
||||
|
||||
# 📝 Requirements
|
||||
|
||||
Prowler has been written in Python using the [AWS SDK (Boto3)](https://boto3.amazonaws.com/v1/documentation/api/latest/index.html#), [Azure SDK](https://azure.github.io/azure-sdk-for-python/) and [GCP API Python Client](https://github.com/googleapis/google-api-python-client/).
|
||||
Prowler has been written in Python using the [AWS SDK (Boto3)](https://boto3.amazonaws.com/v1/documentation/api/latest/index.html#) and [Azure SDK](https://azure.github.io/azure-sdk-for-python/).
|
||||
## AWS
|
||||
|
||||
Since Prowler uses AWS Credentials under the hood, you can follow any authentication method as described [here](https://docs.aws.amazon.com/cli/latest/userguide/cli-configure-quickstart.html#cli-configure-quickstart-precedence).
|
||||
@@ -123,8 +107,8 @@ Make sure you have properly configured your AWS-CLI with a valid Access Key and
|
||||
|
||||
Those credentials must be associated to a user or role with proper permissions to do all checks. To make sure, add the following AWS managed policies to the user or role being used:
|
||||
|
||||
- `arn:aws:iam::aws:policy/SecurityAudit`
|
||||
- `arn:aws:iam::aws:policy/job-function/ViewOnlyAccess`
|
||||
- arn:aws:iam::aws:policy/SecurityAudit
|
||||
- arn:aws:iam::aws:policy/job-function/ViewOnlyAccess
|
||||
|
||||
> Moreover, some read-only additional permissions are needed for several checks, make sure you attach also the custom policy [prowler-additions-policy.json](https://github.com/prowler-cloud/prowler/blob/master/permissions/prowler-additions-policy.json) to the role you are using.
|
||||
|
||||
@@ -152,7 +136,7 @@ export AZURE_CLIENT_SECRET="XXXXXXX"
|
||||
If you try to execute Prowler with the `--sp-env-auth` flag and those variables are empty or not exported, the execution is going to fail.
|
||||
### AZ CLI / Browser / Managed Identity authentication
|
||||
|
||||
The other three cases do not need additional configuration, `--az-cli-auth` and `--managed-identity-auth` are automated options, `--browser-auth` needs the user to authenticate using the default browser to start the scan. Also `--browser-auth` needs the tenant id to be specified with `--tenant-id`.
|
||||
The other three cases do not need additional configuration, `--az-cli-auth` and `--managed-identity-auth` are automated options, `--browser-auth` needs the user to authenticate using the default browser to start the scan.
|
||||
|
||||
### Permissions
|
||||
|
||||
@@ -178,18 +162,6 @@ Regarding the subscription scope, Prowler by default scans all the subscriptions
|
||||
- `Reader`
|
||||
|
||||
|
||||
## Google Cloud Platform
|
||||
|
||||
Prowler will follow the same credentials search as [Google authentication libraries](https://cloud.google.com/docs/authentication/application-default-credentials#search_order):
|
||||
|
||||
1. [GOOGLE_APPLICATION_CREDENTIALS environment variable](https://cloud.google.com/docs/authentication/application-default-credentials#GAC)
|
||||
2. [User credentials set up by using the Google Cloud CLI](https://cloud.google.com/docs/authentication/application-default-credentials#personal)
|
||||
3. [The attached service account, returned by the metadata server](https://cloud.google.com/docs/authentication/application-default-credentials#attached-sa)
|
||||
|
||||
Those credentials must be associated to a user or service account with proper permissions to do all checks. To make sure, add the `Viewer` role to the member associated with the credentials.
|
||||
|
||||
> By default, `prowler` will scan all accessible GCP Projects, use flag `--project-ids` to specify the projects to be scanned.
|
||||
|
||||
# 💻 Basic Usage
|
||||
|
||||
To run prowler, you will need to specify the provider (e.g aws or azure):
|
||||
@@ -264,14 +236,12 @@ prowler azure [--sp-env-auth, --az-cli-auth, --browser-auth, --managed-identity-
|
||||
```
|
||||
> By default, `prowler` will scan all Azure subscriptions.
|
||||
|
||||
## Google Cloud Platform
|
||||
# 🎉 New Features
|
||||
|
||||
Optionally, you can provide the location of an application credential JSON file with the following argument:
|
||||
|
||||
```console
|
||||
prowler gcp --credentials-file path
|
||||
```
|
||||
> By default, `prowler` will scan all accessible GCP Projects, use flag `--project-ids` to specify the projects to be scanned.
|
||||
- Python: we got rid of all bash and it is now all in Python.
|
||||
- Faster: huge performance improvements (same account from 2.5 hours to 4 minutes).
|
||||
- Developers and community: we have made it easier to contribute with new checks and new compliance frameworks. We also included unit tests.
|
||||
- Multi-cloud: in addition to AWS, we have added Azure, we plan to include GCP and OCI soon, let us know if you want to contribute!
|
||||
|
||||
# 📃 License
|
||||
|
||||
|
||||
@@ -14,7 +14,7 @@ As an **AWS Partner** and we have passed the [AWS Foundation Technical Review (F
|
||||
|
||||
If you would like to report a vulnerability or have a security concern regarding Prowler Open Source or ProwlerPro service, please submit the information by contacting to help@prowler.pro.
|
||||
|
||||
The information you share with ProwlerPro as part of this process is kept confidential within ProwlerPro. We will only share this information with a third party if the vulnerability you report is found to affect a third-party product, in which case we will share this information with the third-party product's author or manufacturer. Otherwise, we will only share this information as permitted by you.
|
||||
The information you share with Verica as part of this process is kept confidential within Verica and the Prowler team. We will only share this information with a third party if the vulnerability you report is found to affect a third-party product, in which case we will share this information with the third-party product's author or manufacturer. Otherwise, we will only share this information as permitted by you.
|
||||
|
||||
We will review the submitted report, and assign it a tracking number. We will then respond to you, acknowledging receipt of the report, and outline the next steps in the process.
|
||||
|
||||
|
||||
@@ -1,24 +1,45 @@
|
||||
# Build command
|
||||
# docker build --platform=linux/amd64 --no-cache -t prowler:latest .
|
||||
|
||||
ARG PROWLER_VERSION=latest
|
||||
FROM public.ecr.aws/amazonlinux/amazonlinux:2022
|
||||
|
||||
FROM toniblyx/prowler:${PROWLER_VERSION}
|
||||
ARG PROWLERVER=2.9.0
|
||||
ARG USERNAME=prowler
|
||||
ARG USERID=34000
|
||||
|
||||
USER 0
|
||||
# hadolint ignore=DL3018
|
||||
RUN apk --no-cache add bash aws-cli jq
|
||||
# Install Dependencies
|
||||
RUN \
|
||||
dnf update -y && \
|
||||
dnf install -y bash file findutils git jq python3 python3-pip \
|
||||
python3-setuptools python3-wheel shadow-utils tar unzip which && \
|
||||
dnf remove -y awscli && \
|
||||
dnf clean all && \
|
||||
useradd -l -s /bin/sh -U -u ${USERID} ${USERNAME} && \
|
||||
curl "https://awscli.amazonaws.com/awscli-exe-linux-x86_64.zip" -o "awscliv2.zip" && \
|
||||
unzip awscliv2.zip && \
|
||||
./aws/install && \
|
||||
pip3 install --no-cache-dir --upgrade pip && \
|
||||
pip3 install --no-cache-dir "git+https://github.com/ibm/detect-secrets.git@master#egg=detect-secrets" && \
|
||||
rm -rf aws awscliv2.zip /var/cache/dnf
|
||||
|
||||
ARG MULTI_ACCOUNT_SECURITY_HUB_PATH=/home/prowler/multi-account-securityhub
|
||||
# Place script and env vars
|
||||
COPY .awsvariables run-prowler-securityhub.sh /
|
||||
|
||||
USER prowler
|
||||
# Installs prowler and change permissions
|
||||
RUN \
|
||||
curl -L "https://github.com/prowler-cloud/prowler/archive/refs/tags/${PROWLERVER}.tar.gz" -o "prowler.tar.gz" && \
|
||||
tar xvzf prowler.tar.gz && \
|
||||
rm -f prowler.tar.gz && \
|
||||
mv prowler-${PROWLERVER} prowler && \
|
||||
chown ${USERNAME}:${USERNAME} /run-prowler-securityhub.sh && \
|
||||
chmod 500 /run-prowler-securityhub.sh && \
|
||||
chown ${USERNAME}:${USERNAME} /.awsvariables && \
|
||||
chmod 400 /.awsvariables && \
|
||||
chown ${USERNAME}:${USERNAME} -R /prowler && \
|
||||
chmod +x /prowler/prowler
|
||||
|
||||
# Move script and environment variables
|
||||
RUN mkdir "${MULTI_ACCOUNT_SECURITY_HUB_PATH}"
|
||||
COPY --chown=prowler:prowler .awsvariables run-prowler-securityhub.sh "${MULTI_ACCOUNT_SECURITY_HUB_PATH}"/
|
||||
RUN chmod 500 "${MULTI_ACCOUNT_SECURITY_HUB_PATH}"/run-prowler-securityhub.sh & \
|
||||
chmod 400 "${MULTI_ACCOUNT_SECURITY_HUB_PATH}"/.awsvariables
|
||||
# Drop to user
|
||||
USER ${USERNAME}
|
||||
|
||||
WORKDIR ${MULTI_ACCOUNT_SECURITY_HUB_PATH}
|
||||
|
||||
ENTRYPOINT ["./run-prowler-securityhub.sh"]
|
||||
# Run script
|
||||
ENTRYPOINT ["/run-prowler-securityhub.sh"]
|
||||
|
||||
51
contrib/multi-account-securityhub/run-prowler-securityhub.sh
Executable file → Normal file
@@ -1,17 +1,20 @@
|
||||
#!/bin/bash
|
||||
# Run Prowler against All AWS Accounts in an AWS Organization
|
||||
|
||||
# Change Directory (rest of the script, assumes you're in the root directory)
|
||||
cd / || exit
|
||||
|
||||
# Show Prowler Version
|
||||
prowler -v
|
||||
./prowler/prowler -V
|
||||
|
||||
# Source .awsvariables
|
||||
# shellcheck disable=SC1091
|
||||
source .awsvariables
|
||||
|
||||
# Get Values from Environment Variables
|
||||
echo "ROLE: ${ROLE}"
|
||||
echo "PARALLEL_ACCOUNTS: ${PARALLEL_ACCOUNTS}"
|
||||
echo "REGION: ${REGION}"
|
||||
echo "ROLE: $ROLE"
|
||||
echo "PARALLEL_ACCOUNTS: $PARALLEL_ACCOUNTS"
|
||||
echo "REGION: $REGION"
|
||||
|
||||
# Function to unset AWS Profile Variables
|
||||
unset_aws() {
|
||||
@@ -21,33 +24,33 @@ unset_aws
|
||||
|
||||
# Find THIS Account AWS Number
|
||||
CALLER_ARN=$(aws sts get-caller-identity --output text --query "Arn")
|
||||
PARTITION=$(echo "${CALLER_ARN}" | cut -d: -f2)
|
||||
THISACCOUNT=$(echo "${CALLER_ARN}" | cut -d: -f5)
|
||||
echo "THISACCOUNT: ${THISACCOUNT}"
|
||||
echo "PARTITION: ${PARTITION}"
|
||||
PARTITION=$(echo "$CALLER_ARN" | cut -d: -f2)
|
||||
THISACCOUNT=$(echo "$CALLER_ARN" | cut -d: -f5)
|
||||
echo "THISACCOUNT: $THISACCOUNT"
|
||||
echo "PARTITION: $PARTITION"
|
||||
|
||||
# Function to Assume Role to THIS Account & Create Session
|
||||
this_account_session() {
|
||||
unset_aws
|
||||
role_credentials=$(aws sts assume-role --role-arn arn:"${PARTITION}":iam::"${THISACCOUNT}":role/"${ROLE}" --role-session-name ProwlerRun --output json)
|
||||
AWS_ACCESS_KEY_ID=$(echo "${role_credentials}" | jq -r .Credentials.AccessKeyId)
|
||||
AWS_SECRET_ACCESS_KEY=$(echo "${role_credentials}" | jq -r .Credentials.SecretAccessKey)
|
||||
AWS_SESSION_TOKEN=$(echo "${role_credentials}" | jq -r .Credentials.SessionToken)
|
||||
role_credentials=$(aws sts assume-role --role-arn arn:"$PARTITION":iam::"$THISACCOUNT":role/"$ROLE" --role-session-name ProwlerRun --output json)
|
||||
AWS_ACCESS_KEY_ID=$(echo "$role_credentials" | jq -r .Credentials.AccessKeyId)
|
||||
AWS_SECRET_ACCESS_KEY=$(echo "$role_credentials" | jq -r .Credentials.SecretAccessKey)
|
||||
AWS_SESSION_TOKEN=$(echo "$role_credentials" | jq -r .Credentials.SessionToken)
|
||||
export AWS_ACCESS_KEY_ID AWS_SECRET_ACCESS_KEY AWS_SESSION_TOKEN
|
||||
}
|
||||
|
||||
# Find AWS Master Account
|
||||
this_account_session
|
||||
AWSMASTER=$(aws organizations describe-organization --query Organization.MasterAccountId --output text)
|
||||
echo "AWSMASTER: ${AWSMASTER}"
|
||||
echo "AWSMASTER: $AWSMASTER"
|
||||
|
||||
# Function to Assume Role to Master Account & Create Session
|
||||
master_account_session() {
|
||||
unset_aws
|
||||
role_credentials=$(aws sts assume-role --role-arn arn:"${PARTITION}":iam::"${AWSMASTER}":role/"${ROLE}" --role-session-name ProwlerRun --output json)
|
||||
AWS_ACCESS_KEY_ID=$(echo "${role_credentials}" | jq -r .Credentials.AccessKeyId)
|
||||
AWS_SECRET_ACCESS_KEY=$(echo "${role_credentials}" | jq -r .Credentials.SecretAccessKey)
|
||||
AWS_SESSION_TOKEN=$(echo "${role_credentials}" | jq -r .Credentials.SessionToken)
|
||||
role_credentials=$(aws sts assume-role --role-arn arn:"$PARTITION":iam::"$AWSMASTER":role/"$ROLE" --role-session-name ProwlerRun --output json)
|
||||
AWS_ACCESS_KEY_ID=$(echo "$role_credentials" | jq -r .Credentials.AccessKeyId)
|
||||
AWS_SECRET_ACCESS_KEY=$(echo "$role_credentials" | jq -r .Credentials.SecretAccessKey)
|
||||
AWS_SESSION_TOKEN=$(echo "$role_credentials" | jq -r .Credentials.SessionToken)
|
||||
export AWS_ACCESS_KEY_ID AWS_SECRET_ACCESS_KEY AWS_SESSION_TOKEN
|
||||
}
|
||||
|
||||
@@ -57,20 +60,20 @@ ACCOUNTS_IN_ORGS=$(aws organizations list-accounts --query Accounts[*].Id --outp
|
||||
|
||||
# Run Prowler against Accounts in AWS Organization
|
||||
echo "AWS Accounts in Organization"
|
||||
echo "${ACCOUNTS_IN_ORGS}"
|
||||
for accountId in ${ACCOUNTS_IN_ORGS}; do
|
||||
echo "$ACCOUNTS_IN_ORGS"
|
||||
for accountId in $ACCOUNTS_IN_ORGS; do
|
||||
# shellcheck disable=SC2015
|
||||
test "$(jobs | wc -l)" -ge "${PARALLEL_ACCOUNTS}" && wait -n || true
|
||||
test "$(jobs | wc -l)" -ge $PARALLEL_ACCOUNTS && wait -n || true
|
||||
{
|
||||
START_TIME=${SECONDS}
|
||||
START_TIME=$SECONDS
|
||||
# Unset AWS Profile Variables
|
||||
unset_aws
|
||||
# Run Prowler
|
||||
echo -e "Assessing AWS Account: ${accountId}, using Role: ${ROLE} on $(date)"
|
||||
echo -e "Assessing AWS Account: $accountId, using Role: $ROLE on $(date)"
|
||||
# Pipe stdout to /dev/null to reduce unnecessary Cloudwatch logs
|
||||
prowler aws -R arn:"${PARTITION}":iam::"${accountId}":role/"${ROLE}" -q -S -f "${REGION}" > /dev/null
|
||||
./prowler/prowler -R "$ROLE" -A "$accountId" -M json-asff -q -S -f "$REGION" > /dev/null
|
||||
TOTAL_SEC=$((SECONDS - START_TIME))
|
||||
printf "Completed AWS Account: ${accountId} in %02dh:%02dm:%02ds" $((TOTAL_SEC / 3600)) $((TOTAL_SEC % 3600 / 60)) $((TOTAL_SEC % 60))
|
||||
printf "Completed AWS Account: $accountId in %02dh:%02dm:%02ds" $((TOTAL_SEC / 3600)) $((TOTAL_SEC % 3600 / 60)) $((TOTAL_SEC % 60))
|
||||
echo ""
|
||||
} &
|
||||
done
|
||||
|
||||
@@ -1,6 +1,6 @@
|
||||
# Organizational Prowler with Serverless
|
||||
|
||||
Language: [Korean](README_kr.md)
|
||||
Langage: [Korean](README_kr.md)
|
||||
|
||||
This project is created to apply prowler in a multi-account environment within AWS Organizations.
|
||||
CloudWatch triggers CodeBuild every fixed time.
|
||||
@@ -18,12 +18,12 @@ For more information on how to use prowler, see [here](https://github.com/prowle
|
||||
2. **Master Account**
|
||||
1. Deploy [ProwlerRole.yaml](templates/ProwlerRole.yaml) stack to CloudFormation in a bid to create resources to master account itself.
|
||||
(The template will be also deployed for other member accounts as a StackSet)
|
||||
- ProwlerCodeBuildAccount : Audit Account ID where CodeBuild resides. (preferably Audit/Security account)
|
||||
- ProwlerCodeBuildAccount : Audit Acccount ID where CodeBuild resides. (preferably Audit/Security account)
|
||||
- ProwlerCodeBuildRole : Role name to use in CodeBuild service
|
||||
- ProwlerCrossAccountRole : Role name to assume for Cross account
|
||||
- ProwlerS3 : The S3 bucket name where reports will be put
|
||||
1. Create **StackSet** with [ProwlerRole.yaml](templates/ProwlerRole.yaml) to deploy Role into member accounts in AWS Organizations.
|
||||
- ProwlerCodeBuildAccount : Audit Account ID where CodeBuild resides. (preferably Audit/Security account)
|
||||
- ProwlerCodeBuildAccount : Audit Acccount ID where CodeBuild resides. (preferably Audit/Security account)
|
||||
- ProwlerCodeBuildRole : Role name to use in CodeBuild service
|
||||
- ProwlerCrossAccountRole : Role name to assume for Cross account
|
||||
- ProwlerS3 : The S3 bucket name where reports will be put
|
||||
@@ -45,4 +45,4 @@ For more information on how to use prowler, see [here](https://github.com/prowle
|
||||
- ProwlerReportS3Account : The account where the report S3 bucket resides.
|
||||
1. If you'd like to change the scheduled time,
|
||||
1. You can change the cron expression of ScheduleExpression within [ProwlerCodeBuildStack.yaml](templates/ProwlerCodeBuildStack.yaml).
|
||||
2. Alternatively, you can make changes directly from Events > Rules > ProwlerExecuteRule > Actions > Edit in CloudWatch console.
|
||||
2. Alternatively, you can make changes directrly from Events > Rules > ProwlerExecuteRule > Actions > Edit in CloudWatch console.
|
||||
|
||||
@@ -1,6 +1,6 @@
|
||||
# Organizational Prowler with Serverless
|
||||
|
||||
Language: [English](README.md)
|
||||
Langage: [English](README.md)
|
||||
|
||||
이 문서는 AWS Organization 내의 multi account 환경에서 prowler 를 적용하기 위해 작성된 문서입니다.
|
||||
일정 시간마다 CloudWatch는 CodeBuild 를 트리거합니다.
|
||||
@@ -22,7 +22,7 @@ prowler 의 자세한 사용방법은 [이 곳](https://github.com/prowler-cloud
|
||||
|
||||
[ProwlerRole.yaml](templates/ProwlerRole.yaml)
|
||||
|
||||
- ProwlerCodeBuildAccount : CodeBuild 가 있는 Audit Account ID
|
||||
- ProwlerCodeBuildAccount : CodeBuild 가 있는 Audit Acccount ID
|
||||
- ProwlerCodeBuildRole : CodeBuild의 생성될 Role 이름
|
||||
- ProwlerCrossAccountRole : Cross account 용 Assume할 Role 이름
|
||||
- ProwlerS3 : report 가 저장될 S3 bucket 명
|
||||
@@ -30,7 +30,7 @@ prowler 의 자세한 사용방법은 [이 곳](https://github.com/prowler-cloud
|
||||
|
||||
[ProwlerRole.yaml](templates/ProwlerRole.yaml)
|
||||
|
||||
- ProwlerCodeBuildAccount : CodeBuild 가 있는 Audit Account
|
||||
- ProwlerCodeBuildAccount : CodeBuild 가 있는 Audit Acccount
|
||||
- ProwlerCodeBuildRole : CodeBuild에서 사용할 Role 이름
|
||||
- ProwlerCrossAccountRole : Cross account 용 Assume할 Role 이름
|
||||
- ProwlerS3 : report 가 저장될 S3 bucket 명
|
||||
|
||||
@@ -2,7 +2,7 @@
|
||||
|
||||
## Introduction
|
||||
|
||||
The following demonstrates how to quickly install the resources necessary to perform a security baseline using Prowler. The speed is based on the prebuilt terraform module that can configure all the resources necessary to run Prowler with the findings being sent to AWS Security Hub.
|
||||
The following demonstartes how to quickly install the resources necessary to perform a security baseline using Prowler. The speed is based on the prebuilt terraform module that can configure all the resources necessuary to run Prowler with the findings being sent to AWS Security Hub.
|
||||
|
||||
## Install
|
||||
|
||||
@@ -24,7 +24,7 @@ Installing Prowler with Terraform is simple and can be completed in under 1 minu
|
||||
|
||||

|
||||
|
||||
- It is likely an error will return related to the SecurityHub subscription. This appears to be Terraform related and you can validate the configuration by navigating to the SecurityHub console. Click Integrations and search for Prowler. Take note of the green check where it says *Accepting findings*
|
||||
- It is likely an error will return related to the SecurityHub subscription. This appears to be Terraform related and you can validate the configuration by navigating to the SecurityHub console. Click Integreations and search for Prowler. Take note of the green check where it says *Accepting findings*
|
||||
|
||||

|
||||
|
||||
|
||||
@@ -92,7 +92,7 @@ To make sure rules are working fine, run `/var/ossec/bin/ossec-logtest` and copy
|
||||
```
|
||||
You must see 3 phases goin on.
|
||||
|
||||
To check if there is any error you can enable the debug mode of `modulesd` setting the `wazuh_modules.debug=0` variable to 2 in `/var/ossec/etc/internal_options.conf` file. Restart wazuh-manager and errors should appear in the `/var/ossec/logs/ossec.log` file.
|
||||
To check if there is any error you can enable the debug mode of `modulesd` setting the `wazuh_modules.debug=0` variable to 2 in `/var/ossec/etc/internal_options.conf` file. Restart wazun-manager and errors should appear in the `/var/ossec/logs/ossec.log` file.
|
||||
|
||||
## Thanks
|
||||
|
||||
|
||||
@@ -1,9 +0,0 @@
|
||||
# Audit Info
|
||||
|
||||
In each Prowler provider we have a Python object called `audit_info` which is in charge of keeping the credentials, the configuration and the state of each audit, and it's passed to each service during the `__init__`.
|
||||
|
||||
- AWS: https://github.com/prowler-cloud/prowler/blob/master/prowler/providers/aws/lib/audit_info/models.py#L34-L54
|
||||
- GCP: https://github.com/prowler-cloud/prowler/blob/master/prowler/providers/aws/lib/audit_info/models.py#L7-L30
|
||||
- Azure: https://github.com/prowler-cloud/prowler/blob/master/prowler/providers/azure/lib/audit_info/models.py#L17-L31
|
||||
|
||||
This `audit_info` object is shared during the Prowler execution and for that reason is important to mock it in each test to isolate them. See the [testing guide](./unit-testing.md) for more information.
|
||||
@@ -1,319 +0,0 @@
|
||||
# Create a new Check for a Provider
|
||||
|
||||
Here you can find how to create new checks for Prowler.
|
||||
|
||||
**To create a check is required to have a Prowler provider service already created, so if the service is not present or the attribute you want to audit is not retrieved by the service, please refer to the [Service](./services.md) documentation.**
|
||||
|
||||
## Introduction
|
||||
To create a new check for a supported Prowler provider, you will need to create a folder with the check name inside the specific service for the selected provider.
|
||||
|
||||
We are going to use the `ec2_ami_public` check form the `AWS` provider as an example. So the folder name will `prowler/providers/aws/services/ec2/ec2_ami_public` (following the format `prowler/providers/<provider>/services/<service>/<check_name>`), with the name of check following the pattern: `service_subservice/resource_action`.
|
||||
|
||||
Inside that folder, we need to create three files:
|
||||
|
||||
- An empty `__init__.py`: to make Python treat this check folder as a package.
|
||||
- A `check_name.py` with the above format containing the check's logic. Refer to the [check](./checks.md#check)
|
||||
- A `check_name.metadata.json` containing the check's metadata. Refer to the [check metadata](./checks.md#check-metadata)
|
||||
|
||||
## Check
|
||||
|
||||
The Prowler's check structure is very simple and following it there is nothing more to do to include a check in a provider's service because the load is done dynamically based on the paths.
|
||||
|
||||
The following is the code for the `ec2_ami_public` check:
|
||||
```python title="Check Class"
|
||||
# At the top of the file we need to import the following:
|
||||
# - Check class which is in charge of the following:
|
||||
# - Retrieve the check metadata and expose the `metadata()`
|
||||
# to return a JSON representation of the metadata,
|
||||
# read more at Check Metadata Model down below.
|
||||
# - Enforce that each check requires to have the `execute()` function
|
||||
from prowler.lib.check.models import Check, Check_Report_AWS
|
||||
|
||||
# Then you have to import the provider service client
|
||||
# read more at the Service documentation.
|
||||
from prowler.providers.aws.services.ec2.ec2_client import ec2_client
|
||||
|
||||
# For each check we need to create a python class called the same as the
|
||||
# file which inherits from the Check class.
|
||||
class ec2_ami_public(Check):
|
||||
"""ec2_ami_public verifies if an EC2 AMI is publicly shared"""
|
||||
|
||||
# Then, within the check's class we need to create the "execute(self)"
|
||||
# function, which is enforce by the "Check" class to implement
|
||||
# the Check's interface and let Prowler to run this check.
|
||||
def execute(self):
|
||||
|
||||
# Inside the execute(self) function we need to create
|
||||
# the list of findings initialised to an empty list []
|
||||
findings = []
|
||||
|
||||
# Then, using the service client we need to iterate by the resource we
|
||||
# want to check, in this case EC2 AMIs stored in the
|
||||
# "ec2_client.images" object.
|
||||
for image in ec2_client.images:
|
||||
|
||||
# Once iterating for the images, we have to intialise
|
||||
# the Check_Report_AWS class passing the check's metadata
|
||||
# using the "metadata" function explained above.
|
||||
report = Check_Report_AWS(self.metadata())
|
||||
|
||||
# For each Prowler check we MUST fill the following
|
||||
# Check_Report_AWS fields:
|
||||
# - region
|
||||
# - resource_id
|
||||
# - resource_arn
|
||||
# - resource_tags
|
||||
# - status
|
||||
# - status_extended
|
||||
report.region = image.region
|
||||
report.resource_id = image.id
|
||||
report.resource_arn = image.arn
|
||||
# The resource_tags should be filled if the resource has the ability
|
||||
# of having tags, please check the service first.
|
||||
report.resource_tags = image.tags
|
||||
|
||||
# Then we need to create the business logic for the check
|
||||
# which always should be simple because the Prowler service
|
||||
# must do the heavy lifting and the check should be in charge
|
||||
# of parsing the data provided
|
||||
report.status = "PASS"
|
||||
report.status_extended = f"EC2 AMI {image.id} is not public."
|
||||
|
||||
# In this example each "image" object has a boolean attribute
|
||||
# called "public" to set if the AMI is publicly shared
|
||||
if image.public:
|
||||
report.status = "FAIL"
|
||||
report.status_extended = (
|
||||
f"EC2 AMI {image.id} is currently public."
|
||||
)
|
||||
|
||||
# Then at the same level as the "report"
|
||||
# object we need to append it to the findings list.
|
||||
findings.append(report)
|
||||
|
||||
# Last thing to do is to return the findings list to Prowler
|
||||
return findings
|
||||
```
|
||||
|
||||
### Check Status
|
||||
|
||||
All the checks MUST fill the `report.status` and `report.status_extended` with the following criteria:
|
||||
|
||||
- Status -- `report.status`
|
||||
- `PASS` --> If the check is passing against the configured value.
|
||||
- `FAIL` --> If the check is failing against the configured value.
|
||||
- `INFO` --> This value cannot be used unless a manual operation is required in order to determine if the `report.status` is whether `PASS` or `FAIL`.
|
||||
- Status Extended -- `report.status_extended`
|
||||
- MUST end in a dot `.`
|
||||
- MUST include the service audited with the resource and a brief explanation of the result generated, e.g.: `EC2 AMI ami-0123456789 is not public.`
|
||||
|
||||
### Check Region
|
||||
|
||||
All the checks MUST fill the `report.region` with the following criteria:
|
||||
|
||||
- If the audited resource is regional use the `region` attribute within the resource object.
|
||||
- If the audited resource is global use the `service_client.region` within the service client object.
|
||||
|
||||
### Resource ID, Name and ARN
|
||||
All the checks MUST fill the `report.resource_id` and `report.resource_arn` with the following criteria:
|
||||
|
||||
- AWS
|
||||
- Resource ID -- `report.resource_id`
|
||||
- AWS Account --> Account Number `123456789012`
|
||||
- AWS Resource --> Resource ID / Name
|
||||
- Root resource --> `<root_account>`
|
||||
- Resource ARN -- `report.resource_arn`
|
||||
- AWS Account --> Root ARN `arn:aws:iam::123456789012:root`
|
||||
- AWS Resource --> Resource ARN
|
||||
- Root resource --> Resource Type ARN `f"arn:{service_client.audited_partition}:<service_name>:{service_client.region}:{service_client.audited_account}:<resource_type>"`
|
||||
- GCP
|
||||
- Resource ID -- `report.resource_id`
|
||||
- GCP Resource --> Resource ID
|
||||
- Resource Name -- `report.resource_name`
|
||||
- GCP Resource --> Resource Name
|
||||
- Azure
|
||||
- Resource ID -- `report.resource_id`
|
||||
- Azure Resource --> Resource ID
|
||||
- Resource Name -- `report.resource_name`
|
||||
- Azure Resource --> Resource Name
|
||||
|
||||
### Python Model
|
||||
The following is the Python model for the check's class.
|
||||
|
||||
As per August 5th 2023 the `Check_Metadata_Model` can be found [here](https://github.com/prowler-cloud/prowler/blob/master/prowler/lib/check/models.py#L59-L80).
|
||||
|
||||
```python
|
||||
class Check(ABC, Check_Metadata_Model):
|
||||
"""Prowler Check"""
|
||||
|
||||
def __init__(self, **data):
|
||||
"""Check's init function. Calls the CheckMetadataModel init."""
|
||||
# Parse the Check's metadata file
|
||||
metadata_file = (
|
||||
os.path.abspath(sys.modules[self.__module__].__file__)[:-3]
|
||||
+ ".metadata.json"
|
||||
)
|
||||
# Store it to validate them with Pydantic
|
||||
data = Check_Metadata_Model.parse_file(metadata_file).dict()
|
||||
# Calls parents init function
|
||||
super().__init__(**data)
|
||||
|
||||
def metadata(self) -> dict:
|
||||
"""Return the JSON representation of the check's metadata"""
|
||||
return self.json()
|
||||
|
||||
@abstractmethod
|
||||
def execute(self):
|
||||
"""Execute the check's logic"""
|
||||
```
|
||||
|
||||
### Using the audit config
|
||||
|
||||
Prowler has a [configuration file](../tutorials/configuration_file.md) which is used to pass certain configuration values to the checks, like the following:
|
||||
|
||||
```python title="ec2_securitygroup_with_many_ingress_egress_rules.py"
|
||||
class ec2_securitygroup_with_many_ingress_egress_rules(Check):
|
||||
def execute(self):
|
||||
findings = []
|
||||
|
||||
# max_security_group_rules, default: 50
|
||||
max_security_group_rules = ec2_client.audit_config.get(
|
||||
"max_security_group_rules", 50
|
||||
)
|
||||
for security_group in ec2_client.security_groups:
|
||||
```
|
||||
|
||||
```yaml title="config.yaml"
|
||||
# AWS Configuration
|
||||
aws:
|
||||
# AWS EC2 Configuration
|
||||
|
||||
# aws.ec2_securitygroup_with_many_ingress_egress_rules
|
||||
# The default value is 50 rules
|
||||
max_security_group_rules: 50
|
||||
```
|
||||
|
||||
As you can see in the above code, within the service client, in this case the `ec2_client`, there is an object called `audit_config` which is a Python dictionary containing the values read from the configuration file.
|
||||
|
||||
In order to use it, you have to check first if the value is present in the configuration file. If the value is not present, you can create it in the `config.yaml` file and then, read it from the check.
|
||||
|
||||
???+ note
|
||||
It is mandatory to always use the `dictionary.get(value, default)` syntax to set a default value in the case the configuration value is not present.
|
||||
|
||||
|
||||
## Check Metadata
|
||||
|
||||
Each Prowler check has metadata associated which is stored at the same level of the check's folder in a file called A `check_name.metadata.json` containing the check's metadata.
|
||||
|
||||
???+ note
|
||||
We are going to include comments in this example metadata JSON but they cannot be included because the JSON format does not allow comments.
|
||||
|
||||
```json
|
||||
{
|
||||
# Provider holds the Prowler provider which the checks belongs to
|
||||
"Provider": "aws",
|
||||
# CheckID holds check name
|
||||
"CheckID": "ec2_ami_public",
|
||||
# CheckTitle holds the title of the check
|
||||
"CheckTitle": "Ensure there are no EC2 AMIs set as Public.",
|
||||
# CheckType holds Software and Configuration Checks, check more here
|
||||
# https://docs.aws.amazon.com/securityhub/latest/userguide/asff-required-attributes.html#Types
|
||||
"CheckType": [
|
||||
"Infrastructure Security"
|
||||
],
|
||||
# ServiceName holds the provider service name
|
||||
"ServiceName": "ec2",
|
||||
# SubServiceName holds the service's subservice or resource used by the check
|
||||
"SubServiceName": "ami",
|
||||
# ResourceIdTemplate holds the unique ID for the resource used by the check
|
||||
"ResourceIdTemplate": "arn:partition:service:region:account-id:resource-id",
|
||||
# Severity holds the check's severity, always in lowercase (critical, high, medium, low or informational)
|
||||
"Severity": "critical",
|
||||
# ResourceType only for AWS, holds the type from here
|
||||
# https://docs.aws.amazon.com/AWSCloudFormation/latest/UserGuide/aws-template-resource-type-ref.html
|
||||
"ResourceType": "Other",
|
||||
# Description holds the title of the check, for now is the same as CheckTitle
|
||||
"Description": "Ensure there are no EC2 AMIs set as Public.",
|
||||
# Risk holds the check risk if the result is FAIL
|
||||
"Risk": "When your AMIs are publicly accessible, they are available in the Community AMIs where everyone with an AWS account can use them to launch EC2 instances. Your AMIs could contain snapshots of your applications (including their data), therefore exposing your snapshots in this manner is not advised.",
|
||||
# RelatedUrl holds an URL with more information about the check purpose
|
||||
"RelatedUrl": "",
|
||||
# Remediation holds the information to help the practitioner to fix the issue in the case of the check raise a FAIL
|
||||
"Remediation": {
|
||||
# Code holds different methods to remediate the FAIL finding
|
||||
"Code": {
|
||||
# CLI holds the command in the provider native CLI to remediate it
|
||||
"CLI": "https://docs.bridgecrew.io/docs/public_8#cli-command",
|
||||
# NativeIaC holds the native IaC code to remediate it, use "https://docs.bridgecrew.io/docs"
|
||||
"NativeIaC": "",
|
||||
# Other holds the other commands, scripts or code to remediate it, use "https://www.trendmicro.com/cloudoneconformity"
|
||||
"Other": "https://docs.bridgecrew.io/docs/public_8#aws-console",
|
||||
# Terraform holds the Terraform code to remediate it, use "https://docs.bridgecrew.io/docs"
|
||||
"Terraform": ""
|
||||
},
|
||||
# Recommendation holds the recommendation for this check with a description and a related URL
|
||||
"Recommendation": {
|
||||
"Text": "We recommend your EC2 AMIs are not publicly accessible, or generally available in the Community AMIs.",
|
||||
"Url": "https://docs.aws.amazon.com/AWSEC2/latest/UserGuide/cancel-sharing-an-AMI.html"
|
||||
}
|
||||
},
|
||||
# Categories holds the category or categories where the check can be included, if applied
|
||||
"Categories": [
|
||||
"internet-exposed"
|
||||
],
|
||||
# DependsOn is not actively used for the moment but it will hold other
|
||||
# checks wich this check is dependant to
|
||||
"DependsOn": [],
|
||||
# RelatedTo is not actively used for the moment but it will hold other
|
||||
# checks wich this check is related to
|
||||
"RelatedTo": [],
|
||||
# Notes holds additional information not covered in this file
|
||||
"Notes": ""
|
||||
}
|
||||
```
|
||||
|
||||
### Remediation Code
|
||||
|
||||
For the Remediation Code we use the following knowledge base to fill it:
|
||||
|
||||
- Official documentation for the provider
|
||||
- https://docs.bridgecrew.io
|
||||
- https://www.trendmicro.com/cloudoneconformity
|
||||
- https://github.com/cloudmatos/matos/tree/master/remediations
|
||||
|
||||
### RelatedURL and Recommendation
|
||||
|
||||
The RelatedURL field must be filled with an URL from the provider's official documentation like https://docs.aws.amazon.com/AWSEC2/latest/UserGuide/sharingamis-intro.html
|
||||
|
||||
Also, if not present you can use the Risk and Recommendation texts from the TrendMicro [CloudConformity](https://www.trendmicro.com/cloudoneconformity) guide.
|
||||
|
||||
|
||||
### Python Model
|
||||
The following is the Python model for the check's metadata model. We use the Pydantic's [BaseModel](https://docs.pydantic.dev/latest/api/base_model/#pydantic.BaseModel) as the parent class.
|
||||
|
||||
As per August 5th 2023 the `Check_Metadata_Model` can be found [here](https://github.com/prowler-cloud/prowler/blob/master/prowler/lib/check/models.py#L34-L56).
|
||||
```python
|
||||
class Check_Metadata_Model(BaseModel):
|
||||
"""Check Metadata Model"""
|
||||
|
||||
Provider: str
|
||||
CheckID: str
|
||||
CheckTitle: str
|
||||
CheckType: list[str]
|
||||
ServiceName: str
|
||||
SubServiceName: str
|
||||
ResourceIdTemplate: str
|
||||
Severity: str
|
||||
ResourceType: str
|
||||
Description: str
|
||||
Risk: str
|
||||
RelatedUrl: str
|
||||
Remediation: Remediation
|
||||
Categories: list[str]
|
||||
DependsOn: list[str]
|
||||
RelatedTo: list[str]
|
||||
Notes: str
|
||||
# We set the compliance to None to
|
||||
# store the compliance later if supplied
|
||||
Compliance: list = None
|
||||
```
|
||||
@@ -1,45 +0,0 @@
|
||||
# Debugging
|
||||
|
||||
Debugging in Prowler make things easier!
|
||||
If you are developing Prowler, it's possible that you will encounter some situations where you have to inspect the code in depth to fix some unexpected issues during the execution. To do that, if you are using VSCode you can run the code using the integrated debugger. Please, refer to this [documentation](https://code.visualstudio.com/docs/editor/debugging) for guidance about the debugger in VSCode.
|
||||
The following file is an example of the [debugging configuration](https://code.visualstudio.com/docs/editor/debugging#_launch-configurations) file that you can add to [Virtual Studio Code](https://code.visualstudio.com/).
|
||||
|
||||
This file should inside the *.vscode* folder and its name has to be *launch.json*:
|
||||
|
||||
```json
|
||||
{
|
||||
"version": "0.2.0",
|
||||
"configurations": [
|
||||
{
|
||||
"name": "Python: Current File",
|
||||
"type": "python",
|
||||
"request": "launch",
|
||||
"program": "prowler.py",
|
||||
"args": [
|
||||
"aws",
|
||||
"-f",
|
||||
"eu-west-1",
|
||||
"--service",
|
||||
"cloudwatch",
|
||||
"--log-level",
|
||||
"ERROR",
|
||||
"-p",
|
||||
"dev",
|
||||
],
|
||||
"console": "integratedTerminal",
|
||||
"justMyCode": false
|
||||
},
|
||||
{
|
||||
"name": "Python: Debug Tests",
|
||||
"type": "python",
|
||||
"request": "launch",
|
||||
"program": "${file}",
|
||||
"purpose": [
|
||||
"debug-test"
|
||||
],
|
||||
"console": "integratedTerminal",
|
||||
"justMyCode": false
|
||||
}
|
||||
]
|
||||
}
|
||||
```
|
||||
@@ -1,8 +0,0 @@
|
||||
## Contribute with documentation
|
||||
|
||||
We use `mkdocs` to build this Prowler documentation site so you can easily contribute back with new docs or improving them.
|
||||
|
||||
1. Install `mkdocs` with your favorite package manager.
|
||||
2. Inside the `prowler` repository folder run `mkdocs serve` and point your browser to `http://localhost:8000` and you will see live changes to your local copy of this documentation site.
|
||||
3. Make all needed changes to docs or add new documents. To do so just edit existing md files inside `prowler/docs` and if you are adding a new section or file please make sure you add it to `mkdocs.yaml` file in the root folder of the Prowler repo.
|
||||
4. Once you are done with changes, please send a pull request to us for review and merge. Thank you in advance!
|
||||
@@ -1,3 +0,0 @@
|
||||
# Integration Tests
|
||||
|
||||
Coming soon ...
|
||||
@@ -1,3 +0,0 @@
|
||||
# Create a new integration
|
||||
|
||||
Coming soon ...
|
||||
@@ -1,61 +0,0 @@
|
||||
# Developer Guide
|
||||
|
||||
You can extend Prowler Open Source in many different ways, in most cases you will want to create your own checks and compliance security frameworks, here is where you can learn about how to get started with it. We also include how to create custom outputs, integrations and more.
|
||||
|
||||
## Get the code and install all dependencies
|
||||
|
||||
First of all, you need a version of Python 3.9 or higher and also pip installed to be able to install all dependencies required. Once that is satisfied go a head and clone the repo:
|
||||
|
||||
```
|
||||
git clone https://github.com/prowler-cloud/prowler
|
||||
cd prowler
|
||||
```
|
||||
For isolation and avoid conflicts with other environments, we recommend usage of `poetry`:
|
||||
```
|
||||
pip install poetry
|
||||
```
|
||||
Then install all dependencies including the ones for developers:
|
||||
```
|
||||
poetry install --with dev
|
||||
poetry shell
|
||||
```
|
||||
|
||||
## Contributing with your code or fixes to Prowler
|
||||
|
||||
This repo has git pre-commit hooks managed via the [pre-commit](https://pre-commit.com/) tool. [Install](https://pre-commit.com/#install) it how ever you like, then in the root of this repo run:
|
||||
```shell
|
||||
pre-commit install
|
||||
```
|
||||
You should get an output like the following:
|
||||
```shell
|
||||
pre-commit installed at .git/hooks/pre-commit
|
||||
```
|
||||
|
||||
Before we merge any of your pull requests we pass checks to the code, we use the following tools and automation to make sure the code is secure and dependencies up-to-dated:
|
||||
???+ note
|
||||
These should have been already installed if you ran `poetry install --with dev`
|
||||
|
||||
- [`bandit`](https://pypi.org/project/bandit/) for code security review.
|
||||
- [`safety`](https://pypi.org/project/safety/) and [`dependabot`](https://github.com/features/security) for dependencies.
|
||||
- [`hadolint`](https://github.com/hadolint/hadolint) and [`dockle`](https://github.com/goodwithtech/dockle) for our containers security.
|
||||
- [`Snyk`](https://docs.snyk.io/integrations/snyk-container-integrations/container-security-with-docker-hub-integration) in Docker Hub.
|
||||
- [`clair`](https://github.com/quay/clair) in Amazon ECR.
|
||||
- [`vulture`](https://pypi.org/project/vulture/), [`flake8`](https://pypi.org/project/flake8/), [`black`](https://pypi.org/project/black/) and [`pylint`](https://pypi.org/project/pylint/) for formatting and best practices.
|
||||
|
||||
You can see all dependencies in file `pyproject.toml`.
|
||||
|
||||
## Pull Request Checklist
|
||||
|
||||
If you create or review a PR in https://github.com/prowler-cloud/prowler please follow this checklist:
|
||||
|
||||
- [ ] Make sure you've read the Prowler Developer Guide at https://docs.prowler.cloud/en/latest/developer-guide/introduction/
|
||||
- [ ] Are we following the style guide, hence installed all the linters and formatters? Please check https://docs.prowler.cloud/en/latest/developer-guide/introduction/#contributing-with-your-code-or-fixes-to-prowler
|
||||
- [ ] Are we increasing/decreasing the test coverage? Please, review if we need to include/modify tests for the new code.
|
||||
- [ ] Are we modifying outputs? Please review it carefully.
|
||||
- [ ] Do we need to modify the Prowler documentation to reflect the changes introduced?
|
||||
- [ ] Are we introducing possible breaking changes? Are we modifying a core feature?
|
||||
|
||||
|
||||
## Want some swag as appreciation for your contribution?
|
||||
|
||||
If you are like us and you love swag, we are happy to thank you for your contribution with some laptop stickers or whatever other swag we may have at that time. Please, tell us more details and your pull request link in our [Slack workspace here](https://join.slack.com/t/prowler-workspace/shared_invite/zt-1hix76xsl-2uq222JIXrC7Q8It~9ZNog). You can also reach out to Toni de la Fuente on Twitter [here](https://twitter.com/ToniBlyx), his DMs are open.
|
||||
@@ -1,3 +0,0 @@
|
||||
# Create a custom output format
|
||||
|
||||
Coming soon ...
|
||||
@@ -1,41 +0,0 @@
|
||||
# Create a new security compliance framework
|
||||
|
||||
|
||||
## Introduction
|
||||
If you want to create or contribute with your own security frameworks or add public ones to Prowler you need to make sure the checks are available if not you have to create your own. Then create a compliance file per provider like in `prowler/compliance/<provider>/` and name it as `<framework>_<version>_<provider>.json` then follow the following format to create yours.
|
||||
|
||||
## Compliance Framework
|
||||
Each file version of a framework will have the following structure at high level with the case that each framework needs to be generally identified, one requirement can be also called one control but one requirement can be linked to multiple prowler checks.:
|
||||
|
||||
- `Framework`: string. Distinguish name of the framework, like CIS
|
||||
- `Provider`: string. Provider where the framework applies, such as AWS, Azure, OCI,...
|
||||
- `Version`: string. Version of the framework itself, like 1.4 for CIS.
|
||||
- `Requirements`: array of objects. Include all requirements or controls with the mapping to Prowler.
|
||||
- `Requirements_Id`: string. Unique identifier per each requirement in the specific framework
|
||||
- `Requirements_Description`: string. Description as in the framework.
|
||||
- `Requirements_Attributes`: array of objects. Includes all needed attributes per each requirement, like levels, sections, etc. Whatever helps to create a dedicated report with the result of the findings. Attributes would be taken as closely as possible from the framework's own terminology directly.
|
||||
- `Requirements_Checks`: array. Prowler checks that are needed to prove this requirement. It can be one or multiple checks. In case of no automation possible this can be empty.
|
||||
|
||||
```
|
||||
{
|
||||
"Framework": "<framework>-<provider>",
|
||||
"Version": "<version>",
|
||||
"Requirements": [
|
||||
{
|
||||
"Id": "<unique-id>",
|
||||
"Description": "Requirement full description",
|
||||
"Checks": [
|
||||
"Here is the prowler check or checks that is going to be executed"
|
||||
],
|
||||
"Attributes": [
|
||||
{
|
||||
<Add here your custom attributes.>
|
||||
}
|
||||
]
|
||||
},
|
||||
...
|
||||
]
|
||||
}
|
||||
```
|
||||
|
||||
Finally, to have a proper output file for your reports, your framework data model has to be created in `prowler/lib/outputs/models.py` and also the CLI table output in `prowler/lib/outputs/compliance.py`. Also, you need to add a new conditional in `prowler/lib/outputs/file_descriptors.py` if you create a new CSV model.
|
||||
@@ -1,235 +0,0 @@
|
||||
# Create a new Provider Service
|
||||
|
||||
Here you can find how to create a new service, or to complement an existing one, for a Prowler Provider.
|
||||
|
||||
## Introduction
|
||||
|
||||
To create a new service, you will need to create a folder inside the specific provider, i.e. `prowler/providers/<provider>/services/<service>/`.
|
||||
|
||||
Inside that folder, you MUST create the following files:
|
||||
|
||||
- An empty `__init__.py`: to make Python treat this service folder as a package.
|
||||
- A `<service>_service.py`, containing all the service's logic and API calls.
|
||||
- A `<service>_client_.py`, containing the initialization of the service's class we have just created so the checks's checks can use it.
|
||||
|
||||
## Service
|
||||
|
||||
The Prowler's service structure is the following and the way to initialise it is just by importing the service client in a check.
|
||||
|
||||
## Service Base Class
|
||||
|
||||
All the Prowler provider's services inherits from a base class depending on the provider used.
|
||||
|
||||
- [AWS Service Base Class](https://github.com/prowler-cloud/prowler/blob/22f8855ad7dad2e976dabff78611b643e234beaf/prowler/providers/aws/lib/service/service.py)
|
||||
- [GCP Service Base Class](https://github.com/prowler-cloud/prowler/blob/22f8855ad7dad2e976dabff78611b643e234beaf/prowler/providers/gcp/lib/service/service.py)
|
||||
- [Azure Service Base Class](https://github.com/prowler-cloud/prowler/blob/22f8855ad7dad2e976dabff78611b643e234beaf/prowler/providers/azure/lib/service/service.py)
|
||||
|
||||
Each class is used to initialize the credentials and the API's clients to be used in the service. If some threading is used it must be coded there.
|
||||
|
||||
## Service Class
|
||||
|
||||
Due to the complexity and differencies of each provider API we are going to use an example service to guide you in how can it be created.
|
||||
|
||||
The following is the `<service>_service.py` file:
|
||||
|
||||
```python title="Service Class"
|
||||
from datetime import datetime
|
||||
from typing import Optional
|
||||
|
||||
# The following is just for the AWS provider
|
||||
from botocore.client import ClientError
|
||||
|
||||
# To use the Pydantic's BaseModel
|
||||
from pydantic import BaseModel
|
||||
|
||||
# Prowler logging library
|
||||
from prowler.lib.logger import logger
|
||||
|
||||
# Prowler resource filter, only for the AWS provider
|
||||
from prowler.lib.scan_filters.scan_filters import is_resource_filtered
|
||||
|
||||
# Provider parent class
|
||||
from prowler.providers.<provider>.lib.service.service import ServiceParentClass
|
||||
|
||||
|
||||
# Create a class for the Service
|
||||
################## <Service>
|
||||
class <Service>(ServiceParentClass):
|
||||
def __init__(self, audit_info):
|
||||
# Call Service Parent Class __init__
|
||||
# We use the __class__.__name__ to get it automatically
|
||||
# from the Service Class name but you can pass a custom
|
||||
# string if the provider's API service name is different
|
||||
super().__init__(__class__.__name__, audit_info)
|
||||
|
||||
# Create an empty dictionary of items to be gathered,
|
||||
# using the unique ID as the dictionary key
|
||||
# e.g., instances
|
||||
self.<items> = {}
|
||||
|
||||
# If you can parallelize by regions or locations
|
||||
# you can use the __threading_call__ function
|
||||
# available in the Service Parent Class
|
||||
self.__threading_call__(self.__describe_<items>__)
|
||||
|
||||
# Optionally you can create another function to retrieve
|
||||
# more data about each item without parallel
|
||||
self.__describe_<item>__()
|
||||
|
||||
def __describe_<items>__(self, regional_client):
|
||||
"""Get ALL <Service> <Items>"""
|
||||
logger.info("<Service> - Describing <Items>...")
|
||||
|
||||
# We MUST include a try/except block in each function
|
||||
try:
|
||||
|
||||
# Call to the provider API to retrieve the data we want
|
||||
describe_<items>_paginator = regional_client.get_paginator("describe_<items>")
|
||||
|
||||
# Paginator to get every item
|
||||
for page in describe_<items>_paginator.paginate():
|
||||
|
||||
# Another try/except within the loop for to continue looping
|
||||
# if something unexpected happens
|
||||
try:
|
||||
|
||||
for <item> in page["<Items>"]:
|
||||
|
||||
# For the AWS provider we MUST include the following lines to retrieve
|
||||
# or not data for the resource passed as argument using the --resource-arn
|
||||
if not self.audit_resources or (
|
||||
is_resource_filtered(<item>["<item_arn>"], self.audit_resources)
|
||||
):
|
||||
# Then we have to include the retrieved resource in the object
|
||||
# previously created
|
||||
self.<items>[<item_unique_id>] =
|
||||
<Item>(
|
||||
arn=stack["<item_arn>"],
|
||||
name=stack["<item_name>"],
|
||||
tags=stack.get("Tags", []),
|
||||
region=regional_client.region,
|
||||
)
|
||||
|
||||
except Exception as error:
|
||||
logger.error(
|
||||
f"{<provider_specific_field>} -- {error.__class__.__name__}[{error.__traceback__.tb_lineno}]: {error}"
|
||||
)
|
||||
|
||||
# In the except part we have to use the following code to log the errors
|
||||
except Exception as error:
|
||||
# Depending on each provider we can use the following fields in the logger:
|
||||
# - AWS: regional_client.region or self.region
|
||||
# - GCP: project_id and location
|
||||
# - Azure: subscription
|
||||
|
||||
logger.error(
|
||||
f"{<provider_specific_field>} -- {error.__class__.__name__}[{error.__traceback__.tb_lineno}]: {error}"
|
||||
)
|
||||
|
||||
def __describe_<item>__(self):
|
||||
"""Get Details for a <Service> <Item>"""
|
||||
logger.info("<Service> - Describing <Item> to get specific details...")
|
||||
|
||||
# We MUST include a try/except block in each function
|
||||
try:
|
||||
|
||||
# Loop over the items retrieved in the previous function
|
||||
for <item> in self.<items>:
|
||||
|
||||
# When we perform calls to the Provider API within a for loop we have
|
||||
# to include another try/except block because in the cloud there are
|
||||
# ephemeral resources that can be deleted at the time we are checking them
|
||||
try:
|
||||
<item>_details = self.regional_clients[<item>.region].describe_<item>(
|
||||
<Attribute>=<item>.name
|
||||
)
|
||||
|
||||
# For example, check if item is Public. Here is important if we are
|
||||
# getting values from a dictionary we have to use the "dict.get()"
|
||||
# function with a default value in the case this value is not present
|
||||
<item>.public = <item>_details.get("Public", False)
|
||||
|
||||
|
||||
# In this except block, for example for the AWS Provider we can use
|
||||
# the botocore.ClientError exception and check for a specific error code
|
||||
# to raise a WARNING instead of an ERROR if some resource is not present.
|
||||
except ClientError as error:
|
||||
if error.response["Error"]["Code"] == "InvalidInstanceID.NotFound":
|
||||
logger.warning(
|
||||
f"{error.__class__.__name__}[{error.__traceback__.tb_lineno}]: {error}"
|
||||
)
|
||||
else:
|
||||
logger.error(
|
||||
f"{<provider_specific_field>} -- {error.__class__.__name__}[{error.__traceback__.tb_lineno}]: {error}"
|
||||
)
|
||||
continue
|
||||
|
||||
# In the except part we have to use the following code to log the errors
|
||||
except Exception as error:
|
||||
# Depending on each provider we can use the following fields in the logger:
|
||||
# - AWS: regional_client.region or self.region
|
||||
# - GCP: project_id and location
|
||||
# - Azure: subscription
|
||||
|
||||
logger.error(
|
||||
f"{<item>.region} -- {error.__class__.__name__}[{error.__traceback__.tb_lineno}]: {error}"
|
||||
)
|
||||
```
|
||||
|
||||
### Service Models
|
||||
|
||||
For each class object we need to model we use the Pydantic's [BaseModel](https://docs.pydantic.dev/latest/api/base_model/#pydantic.BaseModel) to take advantage of the data validation.
|
||||
|
||||
```python title="Service Model"
|
||||
# In each service class we have to create some classes using
|
||||
# the Pydantic's Basemodel for the resources we want to audit.
|
||||
class <Item>(BaseModel):
|
||||
"""<Item> holds a <Service> <Item>"""
|
||||
|
||||
arn: str
|
||||
"""<Items>[].arn"""
|
||||
|
||||
name: str
|
||||
"""<Items>[].name"""
|
||||
|
||||
region: str
|
||||
"""<Items>[].region"""
|
||||
|
||||
public: bool
|
||||
"""<Items>[].public"""
|
||||
|
||||
# We can create Optional attributes set to None by default
|
||||
tags: Optional[list]
|
||||
"""<Items>[].tags"""
|
||||
```
|
||||
### Service Objects
|
||||
In the service each group of resources should be created as a Python [dictionary](https://docs.python.org/3/tutorial/datastructures.html#dictionaries). This is because we are performing lookups all the time and the Python dictionary lookup has [O(1) complexity](https://en.wikipedia.org/wiki/Big_O_notation#Orders_of_common_functions).
|
||||
|
||||
We MUST set as the dictionary key a unique ID, like the resource Unique ID or ARN.
|
||||
|
||||
Example:
|
||||
```python
|
||||
self.vpcs = {}
|
||||
self.vpcs["vpc-01234567890abcdef"] = VPC_Object_Class()
|
||||
```
|
||||
|
||||
## Service Client
|
||||
|
||||
Each Prowler service requires a service client to use the service in the checks.
|
||||
|
||||
The following is the `<service>_client.py` containing the initialization of the service's class we have just created so the service's checks can use them:
|
||||
|
||||
```python
|
||||
from prowler.providers.<provider>.lib.audit_info.audit_info import audit_info
|
||||
from prowler.providers.<provider>.services.<service>.<service>_service import <Service>
|
||||
|
||||
<service>_client = <Service>(audit_info)
|
||||
```
|
||||
|
||||
## Permissions
|
||||
|
||||
It is really important to check if the current Prowler's permissions for each provider are enough to implement a new service. If we need to include more please refer to the following documentaion and update it:
|
||||
|
||||
- AWS: https://docs.prowler.cloud/en/latest/getting-started/requirements/#aws-authentication
|
||||
- Azure: https://docs.prowler.cloud/en/latest/getting-started/requirements/#permissions
|
||||
- GCP: https://docs.prowler.cloud/en/latest/getting-started/requirements/#gcp-authentication
|
||||
@@ -1,596 +0,0 @@
|
||||
# Unit Tests
|
||||
|
||||
The unit tests for the Prowler checks varies between each provider supported.
|
||||
|
||||
Here we left some good reads about unit testing and things we've learnt through all the process.
|
||||
|
||||
**Python Testing**
|
||||
|
||||
- https://docs.python-guide.org/writing/tests/
|
||||
|
||||
**Where to patch**
|
||||
|
||||
- https://docs.python.org/3/library/unittest.mock.html#where-to-patch
|
||||
- https://stackoverflow.com/questions/893333/multiple-variables-in-a-with-statement
|
||||
- https://docs.python.org/3/reference/compound_stmts.html#the-with-statement
|
||||
|
||||
**Utils to trace mocking and test execution**
|
||||
|
||||
- https://news.ycombinator.com/item?id=36054868
|
||||
- https://docs.python.org/3/library/sys.html#sys.settrace
|
||||
- https://github.com/kunalb/panopticon
|
||||
|
||||
## General Recommendations
|
||||
|
||||
When creating tests for some provider's checks we follow these guidelines trying to cover as much test scenarios as possible:
|
||||
|
||||
1. Create a test without resource to generate 0 findings, because Prowler will generate 0 findings if a service does not contain the resources the check is looking for audit.
|
||||
2. Create test to generate both a `PASS` and a `FAIL` result.
|
||||
3. Create tests with more than 1 resource to evaluate how the check behaves and if the number of findings is right.
|
||||
|
||||
## How to run Prowler tests
|
||||
|
||||
To run the Prowler test suite you need to install the testing dependencies already included in the `pyproject.toml` file. If you didn't install it yet please read the developer guide introduction [here](./introduction.md#get-the-code-and-install-all-dependencies).
|
||||
|
||||
Then in the project's root path execute `pytest -n auto -vvv -s -x` or use the `Makefile` with `make test`.
|
||||
|
||||
Other commands to run tests:
|
||||
|
||||
- Run tests for a provider: `pytest -n auto -vvv -s -x tests/providers/<provider>/services`
|
||||
- Run tests for a provider service: `pytest -n auto -vvv -s -x tests/providers/<provider>/services/<service>`
|
||||
- Run tests for a provider check: `pytest -n auto -vvv -s -x tests/providers/<provider>/services/<service>/<check>`
|
||||
|
||||
???+ note
|
||||
Refer to the [pytest documentation](https://docs.pytest.org/en/7.1.x/getting-started.html) documentation for more information.
|
||||
|
||||
## AWS
|
||||
|
||||
For the AWS provider we have ways to test a Prowler check based on the following criteria:
|
||||
|
||||
???+ note
|
||||
We use and contribute to the [Moto](https://github.com/getmoto/moto) library which allows us to easily mock out tests based on AWS infrastructure. **It's awesome!**
|
||||
|
||||
- AWS API calls covered by [Moto](https://github.com/getmoto/moto):
|
||||
- Service tests with `@mock_<service>`
|
||||
- Checks tests with `@mock_<service>`
|
||||
- AWS API calls not covered by Moto:
|
||||
- Service test with `mock_make_api_call`
|
||||
- Checks tests with [MagicMock](https://docs.python.org/3/library/unittest.mock.html#unittest.mock.MagicMock)
|
||||
- AWS API calls partially covered by Moto:
|
||||
- Service test with `@mock_<service>` and `mock_make_api_call`
|
||||
- Checks tests with `@mock_<service>` and `mock_make_api_call`
|
||||
|
||||
In the following section we are going to explain all of the above scenarios with examples. The main difference between those scenarios comes from if the [Moto](https://github.com/getmoto/moto) library covers the AWS API calls made by the service. You can check the covered API calls [here](https://github.com/getmoto/moto/blob/master/IMPLEMENTATION_COVERAGE.md).
|
||||
|
||||
An important point for the AWS testing is that in each check we MUST have a unique `audit_info` which is the key object during the AWS execution to isolate the test execution.
|
||||
|
||||
Check the [Audit Info](./audit-info.md) section to get more details.
|
||||
|
||||
```python
|
||||
# We need to import the AWS_Audit_Info and the Audit_Metadata
|
||||
# to set the audit_info to call AWS APIs
|
||||
from prowler.providers.aws.lib.audit_info.models import AWS_Audit_Info
|
||||
from prowler.providers.common.models import Audit_Metadata
|
||||
|
||||
AWS_ACCOUNT_NUMBER = "123456789012"
|
||||
|
||||
def set_mocked_audit_info(self):
|
||||
audit_info = AWS_Audit_Info(
|
||||
session_config=None,
|
||||
original_session=None,
|
||||
audit_session=session.Session(
|
||||
profile_name=None,
|
||||
botocore_session=None,
|
||||
),
|
||||
audit_config=None,
|
||||
audited_account=AWS_ACCOUNT_NUMBER,
|
||||
audited_account_arn=f"arn:aws:iam::{AWS_ACCOUNT_NUMBER}:root",
|
||||
audited_user_id=None,
|
||||
audited_partition="aws",
|
||||
audited_identity_arn=None,
|
||||
profile=None,
|
||||
profile_region=None,
|
||||
credentials=None,
|
||||
assumed_role_info=None,
|
||||
audited_regions=["us-east-1", "eu-west-1"],
|
||||
organizations_metadata=None,
|
||||
audit_resources=None,
|
||||
mfa_enabled=False,
|
||||
audit_metadata=Audit_Metadata(
|
||||
services_scanned=0,
|
||||
expected_checks=[],
|
||||
completed_checks=0,
|
||||
audit_progress=0,
|
||||
),
|
||||
)
|
||||
|
||||
return audit_info
|
||||
```
|
||||
### Checks
|
||||
|
||||
For the AWS tests examples we are going to use the tests for the `iam_password_policy_uppercase` check.
|
||||
|
||||
This section is going to be divided based on the API coverage of the [Moto](https://github.com/getmoto/moto) library.
|
||||
|
||||
#### API calls covered
|
||||
|
||||
If the [Moto](https://github.com/getmoto/moto) library covers the API calls we want to test, we can use the `@mock_<service>` decorator. This will mocked out all the API calls made to AWS keeping the state within the code decorated, in this case the test function.
|
||||
|
||||
```python
|
||||
# We need to import the unittest.mock to allow us to patch some objects
|
||||
# not to use shared ones between test, hence to isolate the test
|
||||
from unittest import mock
|
||||
|
||||
# Boto3 client and session to call the AWS APIs
|
||||
from boto3 import client, session
|
||||
|
||||
# Moto decorator for the IAM service we want to mock
|
||||
from moto import mock_iam
|
||||
|
||||
# Constants used
|
||||
AWS_ACCOUNT_NUMBER = "123456789012"
|
||||
AWS_REGION = "us-east-1"
|
||||
|
||||
|
||||
# We always name the test classes like Test_<check_name>
|
||||
class Test_iam_password_policy_uppercase:
|
||||
|
||||
# We include the Moto decorator for the service we want to use
|
||||
# You can include more than one if two or more services are
|
||||
# involved in test
|
||||
@mock_iam
|
||||
# We name the tests with test_<service>_<check_name>_<test_action>
|
||||
def test_iam_password_policy_no_uppercase_flag(self):
|
||||
# First, we have to create an IAM client
|
||||
iam_client = client("iam", region_name=AWS_REGION)
|
||||
|
||||
# Then, since all the AWS accounts have a password
|
||||
# policy we want to set to False the RequireUppercaseCharacters
|
||||
iam_client.update_account_password_policy(RequireUppercaseCharacters=False)
|
||||
|
||||
# We set a mocked audit_info for AWS not to share the same audit state
|
||||
# between checks
|
||||
current_audit_info = self.set_mocked_audit_info()
|
||||
|
||||
# The Prowler service import MUST be made within the decorated
|
||||
# code not to make real API calls to the AWS service.
|
||||
from prowler.providers.aws.services.iam.iam_service import IAM
|
||||
|
||||
# Prowler for AWS uses a shared object called `current_audit_info` where it stores
|
||||
# the audit's state, credentials and configuration.
|
||||
with mock.patch(
|
||||
"prowler.providers.aws.lib.audit_info.audit_info.current_audit_info",
|
||||
new=current_audit_info,
|
||||
),
|
||||
# We have to mock also the iam_client from the check to enforce that the iam_client used is the one
|
||||
# created within this check because patch != import, and if you execute tests in parallel some objects
|
||||
# can be already initialised hence the check won't be isolated
|
||||
mock.patch(
|
||||
"prowler.providers.aws.services.iam.iam_password_policy_uppercase.iam_password_policy_uppercase.iam_client",
|
||||
new=IAM(current_audit_info),
|
||||
):
|
||||
# We import the check within the two mocks not to initialise the iam_client with some shared information from
|
||||
# the current_audit_info or the IAM service.
|
||||
from prowler.providers.aws.services.iam.iam_password_policy_uppercase.iam_password_policy_uppercase import (
|
||||
iam_password_policy_uppercase,
|
||||
)
|
||||
|
||||
# Once imported, we only need to instantiate the check's class
|
||||
check = iam_password_policy_uppercase()
|
||||
|
||||
# And then, call the execute() function to run the check
|
||||
# against the IAM client we've set up.
|
||||
result = check.execute()
|
||||
|
||||
# Last but not least, we need to assert all the fields
|
||||
# from the check's results
|
||||
assert len(results) == 1
|
||||
assert result[0].status == "FAIL"
|
||||
assert result[0].status_extended == "IAM password policy does not require at least one uppercase letter."
|
||||
assert result[0].resource_arn == f"arn:aws:iam::{AWS_ACCOUNT_NUMBER}:root"
|
||||
assert result[0].resource_id == AWS_ACCOUNT_NUMBER
|
||||
assert result[0].resource_tags == []
|
||||
assert result[0].region == AWS_REGION
|
||||
```
|
||||
|
||||
#### API calls not covered
|
||||
|
||||
If the IAM service for the check's we want to test is not covered by Moto, we have to inject the objects in the service client using [MagicMock](https://docs.python.org/3/library/unittest.mock.html#unittest.mock.MagicMock). As we have pointed above, we cannot instantiate the service since it will make real calls to the AWS APIs.
|
||||
|
||||
???+ note
|
||||
The following example uses the IAM GetAccountPasswordPolicy which is covered by Moto but this is only for demonstration purposes.
|
||||
|
||||
The following code shows how to use MagicMock to create the service objects.
|
||||
|
||||
```python
|
||||
# We need to import the unittest.mock to allow us to patch some objects
|
||||
# not to use shared ones between test, hence to isolate the test
|
||||
from unittest import mock
|
||||
|
||||
# Constants used
|
||||
AWS_ACCOUNT_NUMBER = "123456789012"
|
||||
AWS_REGION = "us-east-1"
|
||||
|
||||
|
||||
# We always name the test classes like Test_<check_name>
|
||||
class Test_iam_password_policy_uppercase:
|
||||
|
||||
# We name the tests with test_<service>_<check_name>_<test_action>
|
||||
def test_iam_password_policy_no_uppercase_flag(self):
|
||||
# Mocked client with MagicMock
|
||||
mocked_iam_client = mock.MagicMock
|
||||
|
||||
# Since the IAM Password Policy has their own model we have to import it
|
||||
from prowler.providers.aws.services.iam.iam_service import PasswordPolicy
|
||||
|
||||
# Create the mock PasswordPolicy object
|
||||
mocked_iam_client.password_policy = PasswordPolicy(
|
||||
length=5,
|
||||
symbols=True,
|
||||
numbers=True,
|
||||
# We set the value to False to test the check
|
||||
uppercase=False,
|
||||
lowercase=True,
|
||||
allow_change=False,
|
||||
expiration=True,
|
||||
)
|
||||
|
||||
# We set a mocked audit_info for AWS not to share the same audit state
|
||||
# between checks
|
||||
current_audit_info = self.set_mocked_audit_info()
|
||||
|
||||
# In this scenario we have to mock also the IAM service and the iam_client from the check to enforce # that the iam_client used is the one created within this check because patch != import, and if you # execute tests in parallel some objects can be already initialised hence the check won't be isolated.
|
||||
# In this case we don't use the Moto decorator, we use the mocked IAM client for both objects
|
||||
with mock.patch(
|
||||
"prowler.providers.aws.services.iam.iam_service.IAM",
|
||||
new=mocked_iam_client,
|
||||
), mock.patch(
|
||||
"prowler.providers.aws.services.iam.iam_client.iam_client",
|
||||
new=mocked_iam_client,
|
||||
):
|
||||
# We import the check within the two mocks not to initialise the iam_client with some shared information from
|
||||
# the current_audit_info or the IAM service.
|
||||
from prowler.providers.aws.services.iam.iam_password_policy_uppercase.iam_password_policy_uppercase import (
|
||||
iam_password_policy_uppercase,
|
||||
)
|
||||
|
||||
# Once imported, we only need to instantiate the check's class
|
||||
check = iam_password_policy_uppercase()
|
||||
|
||||
# And then, call the execute() function to run the check
|
||||
# against the IAM client we've set up.
|
||||
result = check.execute()
|
||||
|
||||
# Last but not least, we need to assert all the fields
|
||||
# from the check's results
|
||||
assert len(results) == 1
|
||||
assert result[0].status == "FAIL"
|
||||
assert result[0].status_extended == "IAM password policy does not require at least one uppercase letter."
|
||||
assert result[0].resource_arn == f"arn:aws:iam::{AWS_ACCOUNT_NUMBER}:root"
|
||||
assert result[0].resource_id == AWS_ACCOUNT_NUMBER
|
||||
assert result[0].resource_tags == []
|
||||
assert result[0].region == AWS_REGION
|
||||
```
|
||||
|
||||
As it can be seen in the above scenarios, the check execution should always be into the context of mocked/patched objects. This way we ensure it reviews only the objects created under the scope the test.
|
||||
|
||||
#### API calls partially covered
|
||||
|
||||
If the API calls we want to use in the service are partially covered by the Moto decorator we have to create our own mocked API calls to use it in combination.
|
||||
|
||||
To do so, you need to mock the `botocore.client.BaseClient._make_api_call` function, which is the Boto3 function in charge of making the real API call to the AWS APIs, using `mock.patch <https://docs.python.org/3/library/unittest.mock.html#patch>`:
|
||||
|
||||
|
||||
```python
|
||||
|
||||
import boto3
|
||||
import botocore
|
||||
from unittest.mock import patch
|
||||
from moto import mock_iam
|
||||
|
||||
# Original botocore _make_api_call function
|
||||
orig = botocore.client.BaseClient._make_api_call
|
||||
|
||||
# Mocked botocore _make_api_call function
|
||||
def mock_make_api_call(self, operation_name, kwarg):
|
||||
# As you can see the operation_name has the get_account_password_policy snake_case form but
|
||||
# we are using the GetAccountPasswordPolicy form.
|
||||
# Rationale -> https://github.com/boto/botocore/blob/develop/botocore/client.py#L810:L816
|
||||
if operation_name == 'GetAccountPasswordPolicy':
|
||||
return {
|
||||
'PasswordPolicy': {
|
||||
'MinimumPasswordLength': 123,
|
||||
'RequireSymbols': True|False,
|
||||
'RequireNumbers': True|False,
|
||||
'RequireUppercaseCharacters': True|False,
|
||||
'RequireLowercaseCharacters': True|False,
|
||||
'AllowUsersToChangePassword': True|False,
|
||||
'ExpirePasswords': True|False,
|
||||
'MaxPasswordAge': 123,
|
||||
'PasswordReusePrevention': 123,
|
||||
'HardExpiry': True|False
|
||||
}
|
||||
}
|
||||
# If we don't want to patch the API call
|
||||
return orig(self, operation_name, kwarg)
|
||||
|
||||
# We always name the test classes like Test_<check_name>
|
||||
class Test_iam_password_policy_uppercase:
|
||||
|
||||
# We include the custom API call mock decorator for the service we want to use
|
||||
@patch("botocore.client.BaseClient._make_api_call", new=mock_make_api_call)
|
||||
# We include also the IAM Moto decorator for the API calls supported
|
||||
@mock_iam
|
||||
# We name the tests with test_<service>_<check_name>_<test_action>
|
||||
def test_iam_password_policy_no_uppercase_flag(self):
|
||||
# Check the previous section to see the check test since is the same
|
||||
```
|
||||
|
||||
Note that this does not use Moto, to keep it simple, but if you use any `moto`-decorators in addition to the patch, the call to `orig(self, operation_name, kwarg)` will be intercepted by Moto.
|
||||
|
||||
???+ note
|
||||
The above code comes from here https://docs.getmoto.org/en/latest/docs/services/patching_other_services.html
|
||||
|
||||
#### Mocking more than one service
|
||||
|
||||
If the test your are creating belongs to a check that uses more than one provider service, you should mock each of the services used. For example, the check `cloudtrail_logs_s3_bucket_access_logging_enabled` requires the CloudTrail and the S3 client, hence the service's mock part of the test will be as follows:
|
||||
|
||||
|
||||
```python
|
||||
with mock.patch(
|
||||
"prowler.providers.aws.lib.audit_info.audit_info.current_audit_info",
|
||||
new=mock_audit_info,
|
||||
), mock.patch(
|
||||
"prowler.providers.aws.services.cloudtrail.cloudtrail_logs_s3_bucket_access_logging_enabled.cloudtrail_logs_s3_bucket_access_logging_enabled.cloudtrail_client",
|
||||
new=Cloudtrail(mock_audit_info),
|
||||
), mock.patch(
|
||||
"prowler.providers.aws.services.cloudtrail.cloudtrail_logs_s3_bucket_access_logging_enabled.cloudtrail_logs_s3_bucket_access_logging_enabled.s3_client",
|
||||
new=S3(mock_audit_info),
|
||||
):
|
||||
```
|
||||
|
||||
|
||||
As you can see in the above code, it is required to mock the AWS audit info and both services used.
|
||||
|
||||
|
||||
#### Patching vs. Importing
|
||||
|
||||
This is an important topic within the Prowler check's unit testing. Due to the dynamic nature of the check's load, the process of importing the service client from a check is the following:
|
||||
|
||||
1. `<check>.py`:
|
||||
```python
|
||||
from prowler.providers.<provider>.services.<service>.<service>_client import <service>_client
|
||||
```
|
||||
2. `<service>_client.py`:
|
||||
```python
|
||||
from prowler.providers.<provider>.lib.audit_info.audit_info import audit_info
|
||||
from prowler.providers.<provider>.services.<service>.<service>_service import <SERVICE>
|
||||
|
||||
<service>_client = <SERVICE>(audit_info)
|
||||
```
|
||||
|
||||
Due to the above import path it's not the same to patch the following objects because if you run a bunch of tests, either in parallel or not, some clients can be already instantiated by another check, hence your test execution will be using another test's service instance:
|
||||
|
||||
- `<service>_client` imported at `<check>.py`
|
||||
- `<service>_client` initialised at `<service>_client.py`
|
||||
- `<SERVICE>` imported at `<service>_client.py`
|
||||
|
||||
A useful read about this topic can be found in the following article: https://stackoverflow.com/questions/8658043/how-to-mock-an-import
|
||||
|
||||
|
||||
#### Different ways to mock the service client
|
||||
|
||||
##### Mocking the service client at the service client level
|
||||
|
||||
Mocking a service client using the following code ...
|
||||
|
||||
```python title="Mocking the service_client"
|
||||
with mock.patch(
|
||||
"prowler.providers.<provider>.lib.audit_info.audit_info.audit_info",
|
||||
new=audit_info,
|
||||
), mock.patch(
|
||||
"prowler.providers.<provider>.services.<service>.<check>.<check>.<service>_client",
|
||||
new=<SERVICE>(audit_info),
|
||||
):
|
||||
```
|
||||
will cause that the service will be initialised twice:
|
||||
|
||||
1. When the `<SERVICE>(audit_info)` is mocked out using `mock.patch` to have the object ready for the patching.
|
||||
2. At the `<service>_client.py` when we are patching it since the `mock.patch` needs to go to that object an initialise it, hence the `<SERVICE>(audit_info)` will be called again.
|
||||
|
||||
Then, when we import the `<service>_client.py` at `<check>.py`, since we are mocking where the object is used, Python will use the mocked one.
|
||||
|
||||
In the [next section](./unit-testing.md#mocking-the-service-and-the-service-client-at-the-service-client-level) you will see an improved version to mock objects.
|
||||
|
||||
|
||||
##### Mocking the service and the service client at the service client level
|
||||
Mocking a service client using the following code ...
|
||||
|
||||
```python title="Mocking the service and the service_client"
|
||||
with mock.patch(
|
||||
"prowler.providers.<provider>.lib.audit_info.audit_info.audit_info",
|
||||
new=audit_info,
|
||||
), mock.patch(
|
||||
"prowler.providers.<provider>.services.<service>.<SERVICE>",
|
||||
new=<SERVICE>(audit_info),
|
||||
) as service_client, mock.patch(
|
||||
"prowler.providers.<provider>.services.<service>.<service>_client.<service>_client",
|
||||
new=service_client,
|
||||
):
|
||||
```
|
||||
will cause that the service will be initialised once, just when the `<SERVICE>(audit_info)` is mocked out using `mock.patch`.
|
||||
|
||||
Then, at the check_level when Python tries to import the client with `from prowler.providers.<provider>.services.<service>.<service>_client`, since it is already mocked out, the execution will continue using the `service_client` without getting into the `<service>_client.py`.
|
||||
|
||||
|
||||
### Services
|
||||
|
||||
For testing the AWS services we have to follow the same logic as with the AWS checks, we have to check if the AWS API calls made by the service are covered by Moto and we have to test the service `__init__` to verifiy that the information is being correctly retrieved.
|
||||
|
||||
The service tests could act as *Integration Tests* since we test how the service retrieves the information from the provider, but since Moto or the custom mock objects mocks that calls this test will fall into *Unit Tests*.
|
||||
|
||||
Please refer to the [AWS checks tests](./unit-testing.md#checks) for more information on how to create tests and check the existing services tests [here](https://github.com/prowler-cloud/prowler/tree/master/tests/providers/aws/services).
|
||||
|
||||
## GCP
|
||||
|
||||
### Checks
|
||||
|
||||
For the GCP Provider we don't have any library to mock out the API calls we use. So in this scenario we inject the objects in the service client using [MagicMock](https://docs.python.org/3/library/unittest.mock.html#unittest.mock.MagicMock).
|
||||
|
||||
The following code shows how to use MagicMock to create the service objects for a GCP check test.
|
||||
|
||||
```python
|
||||
# We need to import the unittest.mock to allow us to patch some objects
|
||||
# not to use shared ones between test, hence to isolate the test
|
||||
from unittest import mock
|
||||
|
||||
# GCP Constants
|
||||
GCP_PROJECT_ID = "123456789012"
|
||||
|
||||
# We are going to create a test for the compute_firewall_rdp_access_from_the_internet_allowed check
|
||||
class Test_compute_firewall_rdp_access_from_the_internet_allowed:
|
||||
|
||||
# We name the tests with test_<service>_<check_name>_<test_action>
|
||||
def test_compute_compute_firewall_rdp_access_from_the_internet_allowed_one_compliant_rule_with_valid_port(self):
|
||||
# Mocked client with MagicMock
|
||||
compute_client = mock.MagicMock
|
||||
|
||||
# Assign GCP client configuration
|
||||
compute_client.project_ids = [GCP_PROJECT_ID]
|
||||
compute_client.region = "global"
|
||||
|
||||
# Import the service resource model to create the mocked object
|
||||
from prowler.providers.gcp.services.compute.compute_service import Firewall
|
||||
|
||||
# Create the custom Firewall object to be tested
|
||||
firewall = Firewall(
|
||||
name="test",
|
||||
id="1234567890",
|
||||
source_ranges=["0.0.0.0/0"],
|
||||
direction="INGRESS",
|
||||
allowed_rules=[{"IPProtocol": "tcp", "ports": ["443"]}],
|
||||
project_id=GCP_PROJECT_ID,
|
||||
)
|
||||
compute_client.firewalls = [firewall]
|
||||
|
||||
# In this scenario we have to mock also the Compute service and the compute_client from the check to enforce that the compute_client used is the one created within this check because patch != import, and if you execute tests in parallel some objects can be already initialised hence the check won't be isolated.
|
||||
# In this case we don't use the Moto decorator, we use the mocked Compute client for both objects
|
||||
with mock.patch(
|
||||
"prowler.providers.gcp.services.compute.compute_service.Compute",
|
||||
new=defender_client,
|
||||
), mock.patch(
|
||||
"prowler.providers.gcp.services.compute.compute_client.compute_client",
|
||||
new=defender_client,
|
||||
):
|
||||
|
||||
# We import the check within the two mocks not to initialise the iam_client with some shared information from
|
||||
# the current_audit_info or the Compute service.
|
||||
from prowler.providers.gcp.services.compute.compute_firewall_rdp_access_from_the_internet_allowed.compute_firewall_rdp_access_from_the_internet_allowed import (
|
||||
compute_firewall_rdp_access_from_the_internet_allowed,
|
||||
)
|
||||
|
||||
# Once imported, we only need to instantiate the check's class
|
||||
check = compute_firewall_rdp_access_from_the_internet_allowed()
|
||||
|
||||
# And then, call the execute() function to run the check
|
||||
# against the IAM client we've set up.
|
||||
result = check.execute()
|
||||
|
||||
# Last but not least, we need to assert all the fields
|
||||
# from the check's results
|
||||
assert len(result) == 1
|
||||
assert result[0].status == "PASS"
|
||||
assert result[0].status_extended == f"Firewall {firewall.name} does not expose port 3389 (RDP) to the internet."
|
||||
assert result[0].resource_name = firewall.name
|
||||
assert result[0].resource_id == firewall.id
|
||||
assert result[0].project_id = GCP_PROJECT_ID
|
||||
assert result[0].location = compute_client.region
|
||||
```
|
||||
|
||||
### Services
|
||||
|
||||
Coming soon ...
|
||||
|
||||
## Azure
|
||||
|
||||
### Checks
|
||||
|
||||
For the Azure Provider we don't have any library to mock out the API calls we use. So in this scenario we inject the objects in the service client using [MagicMock](https://docs.python.org/3/library/unittest.mock.html#unittest.mock.MagicMock).
|
||||
|
||||
The following code shows how to use MagicMock to create the service objects for a Azure check test.
|
||||
|
||||
```python
|
||||
# We need to import the unittest.mock to allow us to patch some objects
|
||||
# not to use shared ones between test, hence to isolate the test
|
||||
from unittest import mock
|
||||
|
||||
from uuid import uuid4
|
||||
|
||||
# Azure Constants
|
||||
from tests.providers.azure.azure_fixtures import AZURE_SUBSCRIPTION
|
||||
|
||||
|
||||
|
||||
# We are going to create a test for the Test_defender_ensure_defender_for_arm_is_on check
|
||||
class Test_defender_ensure_defender_for_arm_is_on:
|
||||
|
||||
# We name the tests with test_<service>_<check_name>_<test_action>
|
||||
def test_defender_defender_ensure_defender_for_arm_is_on_arm_pricing_tier_not_standard(self):
|
||||
resource_id = str(uuid4())
|
||||
|
||||
# Mocked client with MagicMock
|
||||
defender_client = mock.MagicMock
|
||||
|
||||
# Import the service resource model to create the mocked object
|
||||
from prowler.providers.azure.services.defender.defender_service import Defender_Pricing
|
||||
|
||||
# Create the custom Defender object to be tested
|
||||
defender_client.pricings = {
|
||||
AZURE_SUBSCRIPTION: {
|
||||
"Arm": Defender_Pricing(
|
||||
resource_id=resource_id,
|
||||
pricing_tier="Not Standard",
|
||||
free_trial_remaining_time=0,
|
||||
)
|
||||
}
|
||||
}
|
||||
|
||||
# In this scenario we have to mock also the Defender service and the defender_client from the check to enforce that the defender_client used is the one created within this check because patch != import, and if you execute tests in parallel some objects can be already initialised hence the check won't be isolated.
|
||||
# In this case we don't use the Moto decorator, we use the mocked Defender client for both objects
|
||||
with mock.patch(
|
||||
"prowler.providers.azure.services.defender.defender_service.Defender",
|
||||
new=defender_client,
|
||||
), mock.patch(
|
||||
"prowler.providers.azure.services.defender.defender_client.defender_client",
|
||||
new=defender_client,
|
||||
):
|
||||
|
||||
# We import the check within the two mocks not to initialise the iam_client with some shared information from
|
||||
# the current_audit_info or the Defender service.
|
||||
from prowler.providers.azure.services.defender.defender_ensure_defender_for_arm_is_on.defender_ensure_defender_for_arm_is_on import (
|
||||
defender_ensure_defender_for_arm_is_on,
|
||||
)
|
||||
|
||||
# Once imported, we only need to instantiate the check's class
|
||||
check = defender_ensure_defender_for_arm_is_on()
|
||||
|
||||
# And then, call the execute() function to run the check
|
||||
# against the IAM client we've set up.
|
||||
result = check.execute()
|
||||
|
||||
# Last but not least, we need to assert all the fields
|
||||
# from the check's results
|
||||
assert len(result) == 1
|
||||
assert result[0].status == "FAIL"
|
||||
assert (
|
||||
result[0].status_extended
|
||||
== f"Defender plan Defender for ARM from subscription {AZURE_SUBSCRIPTION} is set to OFF (pricing tier not standard)"
|
||||
)
|
||||
assert result[0].subscription == AZURE_SUBSCRIPTION
|
||||
assert result[0].resource_name == "Defender plan ARM"
|
||||
assert result[0].resource_id == resource_id
|
||||
```
|
||||
|
||||
### Services
|
||||
|
||||
Coming soon ...
|
||||
@@ -1,11 +1,11 @@
|
||||
# Requirements
|
||||
|
||||
Prowler has been written in Python using the [AWS SDK (Boto3)](https://boto3.amazonaws.com/v1/documentation/api/latest/index.html#), [Azure SDK](https://azure.github.io/azure-sdk-for-python/) and [GCP API Python Client](https://github.com/googleapis/google-api-python-client/).
|
||||
Prowler has been written in Python using the [AWS SDK (Boto3)](https://boto3.amazonaws.com/v1/documentation/api/latest/index.html#) and [Azure SDK](https://learn.microsoft.com/en-us/python/api/overview/azure/?view=azure-python).
|
||||
## AWS
|
||||
|
||||
Since Prowler uses AWS Credentials under the hood, you can follow any authentication method as described [here](https://docs.aws.amazon.com/cli/latest/userguide/cli-configure-quickstart.html#cli-configure-quickstart-precedence).
|
||||
|
||||
### Authentication
|
||||
### AWS Authentication
|
||||
|
||||
Make sure you have properly configured your AWS-CLI with a valid Access Key and Region or declare AWS variables properly (or instance profile/role):
|
||||
|
||||
@@ -23,22 +23,16 @@ export AWS_SESSION_TOKEN="XXXXXXXXX"
|
||||
|
||||
Those credentials must be associated to a user or role with proper permissions to do all checks. To make sure, add the following AWS managed policies to the user or role being used:
|
||||
|
||||
- `arn:aws:iam::aws:policy/SecurityAudit`
|
||||
- `arn:aws:iam::aws:policy/job-function/ViewOnlyAccess`
|
||||
- arn:aws:iam::aws:policy/SecurityAudit
|
||||
- arn:aws:iam::aws:policy/job-function/ViewOnlyAccess
|
||||
|
||||
???+ note
|
||||
Moreover, some read-only additional permissions are needed for several checks, make sure you attach also the custom policy [prowler-additions-policy.json](https://github.com/prowler-cloud/prowler/blob/master/permissions/prowler-additions-policy.json) to the role you are using. If you want Prowler to send findings to [AWS Security Hub](https://aws.amazon.com/security-hub), make sure you also attach the custom policy [prowler-security-hub.json](https://github.com/prowler-cloud/prowler/blob/master/permissions/prowler-security-hub.json).
|
||||
> Moreover, some read-only additional permissions are needed for several checks, make sure you attach also the custom policy [prowler-additions-policy.json](https://github.com/prowler-cloud/prowler/blob/master/permissions/prowler-additions-policy.json) to the role you are using.
|
||||
|
||||
### Multi-Factor Authentication
|
||||
|
||||
If your IAM entity enforces MFA you can use `--mfa` and Prowler will ask you to input the following values to get a new session:
|
||||
|
||||
- ARN of your MFA device
|
||||
- TOTP (Time-Based One-Time Password)
|
||||
> If you want Prowler to send findings to [AWS Security Hub](https://aws.amazon.com/security-hub), make sure you also attach the custom policy [prowler-security-hub.json](https://github.com/prowler-cloud/prowler/blob/master/permissions/prowler-security-hub.json).
|
||||
|
||||
## Azure
|
||||
|
||||
Prowler for Azure supports the following authentication types:
|
||||
Prowler for azure supports the following authentication types:
|
||||
|
||||
- Service principal authentication by environment variables (Enterprise Application)
|
||||
- Current az cli credentials stored
|
||||
@@ -58,11 +52,11 @@ export AZURE_CLIENT_SECRET="XXXXXXX"
|
||||
If you try to execute Prowler with the `--sp-env-auth` flag and those variables are empty or not exported, the execution is going to fail.
|
||||
### AZ CLI / Browser / Managed Identity authentication
|
||||
|
||||
The other three cases does not need additional configuration, `--az-cli-auth` and `--managed-identity-auth` are automated options. To use `--browser-auth` the user needs to authenticate against Azure using the default browser to start the scan, also `tenant-id` is required.
|
||||
The other three cases does not need additional configuration, `--az-cli-auth` and `--managed-identity-auth` are automated options, `--browser-auth` needs the user to authenticate using the default browser to start the scan.
|
||||
|
||||
### Permissions
|
||||
|
||||
To use each one you need to pass the proper flag to the execution. Prowler for Azure handles two types of permission scopes, which are:
|
||||
To use each one you need to pass the proper flag to the execution. Prowler fro Azure handles two types of permission scopes, which are:
|
||||
|
||||
- **Azure Active Directory permissions**: Used to retrieve metadata from the identity assumed by Prowler and future AAD checks (not mandatory to have access to execute the tool)
|
||||
- **Subscription scope permissions**: Required to launch the checks against your resources, mandatory to launch the tool.
|
||||
@@ -70,59 +64,18 @@ To use each one you need to pass the proper flag to the execution. Prowler for A
|
||||
|
||||
#### Azure Active Directory scope
|
||||
|
||||
Microsoft Entra ID (AAD earlier) permissions required by the tool are the following:
|
||||
Azure Active Directory (AAD) permissions required by the tool are the following:
|
||||
|
||||
- `Directory.Read.All`
|
||||
- `Policy.Read.All`
|
||||
|
||||
The best way to assign it is through the Azure web console:
|
||||
|
||||
1. Access to Microsoft Entra ID
|
||||
2. In the left menu bar, go to "App registrations"
|
||||
3. Once there, in the menu bar click on "+ New registration" to register a new application
|
||||
4. Fill the "Name, select the "Supported account types" and click on "Register. You will be redirected to the applications page.
|
||||

|
||||
4. Select the new application
|
||||
5. In the left menu bar, select "API permissions"
|
||||
6. Then click on "+ Add a permission" and select "Microsoft Graph"
|
||||
7. Once in the "Microsoft Graph" view, select "Application permissions"
|
||||
8. Finally, search for "Directory" and "Policy" and select the following permissions:
|
||||
- `Directory.Read.All`
|
||||
- `Policy.Read.All`
|
||||

|
||||
The best way to assign it is through the azure web console:
|
||||
|
||||

|
||||
|
||||
#### Subscriptions scope
|
||||
|
||||
Regarding the subscription scope, Prowler by default scans all the subscriptions that is able to list, so it is required to add the following RBAC builtin roles per subscription to the entity that is going to be assumed by the tool:
|
||||
Regarding the subscription scope, Prowler by default scans all the subscriptions that is able to list, so it is required to add the following RBAC builtin roles per subscription to the entity that is going to be assumed by the tool:
|
||||
|
||||
- `Security Reader`
|
||||
- `Reader`
|
||||
|
||||
To assign this roles, follow the instructions:
|
||||
|
||||
1. Access your subscription, then select your subscription.
|
||||
2. Select "Access control (IAM)".
|
||||
3. In the overview, select "Roles"
|
||||

|
||||
4. Click on "+ Add" and select "Add role assignment"
|
||||
5. In the search bar, type `Security Reader`, select it and click on "Next"
|
||||
6. In the Members tab, click on "+ Select members" and add the members you want to assign this role.
|
||||
7. Click on "Review + assign" to apply the new role.
|
||||
|
||||
*Repeat these steps for `Reader` role*
|
||||
|
||||
## Google Cloud
|
||||
|
||||
### Authentication
|
||||
|
||||
Prowler will follow the same credentials search as [Google authentication libraries](https://cloud.google.com/docs/authentication/application-default-credentials#search_order):
|
||||
|
||||
1. [GOOGLE_APPLICATION_CREDENTIALS environment variable](https://cloud.google.com/docs/authentication/application-default-credentials#GAC)
|
||||
2. [User credentials set up by using the Google Cloud CLI](https://cloud.google.com/docs/authentication/application-default-credentials#personal)
|
||||
3. [The attached service account, returned by the metadata server](https://cloud.google.com/docs/authentication/application-default-credentials#attached-sa)
|
||||
|
||||
Those credentials must be associated to a user or service account with proper permissions to do all checks. To make sure, add the `Viewer` role to the member associated with the credentials.
|
||||
|
||||
???+ note
|
||||
By default, `prowler` will scan all accessible GCP Projects, use flag `--project-ids` to specify the projects to be scanned.
|
||||
|
||||
|
Before Width: | Height: | Size: 283 KiB After Width: | Height: | Size: 258 KiB |
|
Before Width: | Height: | Size: 631 KiB |
|
Before Width: | Height: | Size: 348 KiB |
|
Before Width: | Height: | Size: 11 KiB |
|
Before Width: | Height: | Size: 9.2 KiB |
|
Before Width: | Height: | Size: 11 KiB |
|
Before Width: | Height: | Size: 22 KiB |
|
Before Width: | Height: | Size: 320 KiB |
BIN
docs/img/quick-inventory.png
Normal file
|
After Width: | Height: | Size: 220 KiB |
|
Before Width: | Height: | Size: 302 KiB |
148
docs/index.md
@@ -1,13 +1,38 @@
|
||||
**Prowler** is an Open Source security tool to perform AWS, Azure and Google Cloud security best practices assessments, audits, incident response, continuous monitoring, hardening and forensics readiness. We have Prowler CLI (Command Line Interface) that we call Prowler Open Source and a service on top of it that we call <a href="https://prowler.com">Prowler SaaS</a>.
|
||||
<p href="https://github.com/prowler-cloud/prowler">
|
||||
<img align="right" src="./img/prowler-logo.png" height="100">
|
||||
</p>
|
||||
<br>
|
||||
|
||||

|
||||
# Prowler Documentation
|
||||
|
||||
**Welcome to [Prowler Open Source v3](https://github.com/prowler-cloud/prowler/) Documentation!** 📄
|
||||
|
||||
For **Prowler v2 Documentation**, please go [here](https://github.com/prowler-cloud/prowler/tree/2.12.0) to the branch and its README.md.
|
||||
|
||||
- You are currently in the **Getting Started** section where you can find general information and requirements to help you start with the tool.
|
||||
- In the [Tutorials](tutorials/overview) section you will see how to take advantage of all the features in Prowler.
|
||||
- In the [Contact Us](contact) section you can find how to reach us out in case of technical issues.
|
||||
- In the [About](about) section you will find more information about the Prowler team and license.
|
||||
|
||||
## About Prowler
|
||||
|
||||
**Prowler** is an Open Source security tool to perform AWS and Azure security best practices assessments, audits, incident response, continuous monitoring, hardening and forensics readiness.
|
||||
|
||||
It contains hundreds of controls covering CIS, PCI-DSS, ISO27001, GDPR, HIPAA, FFIEC, SOC2, AWS FTR, ENS and custom security frameworks.
|
||||
|
||||
[](https://twitter.com/prowlercloud)
|
||||
|
||||
## About ProwlerPro
|
||||
|
||||
<a href="https://prowler.pro"><img align="right" src="./img/prowler-pro-light.png" width="350"></a> **ProwlerPro** gives you the benefits of Prowler Open Source plus continuous monitoring, faster execution, personalized support, visualization of your data with dashboards, alerts and much more.
|
||||
Visit <a href="https://prowler.pro">prowler.pro</a> for more info.
|
||||
|
||||
Prowler offers hundreds of controls covering more than 25 standards and compliance frameworks like CIS, PCI-DSS, ISO27001, GDPR, HIPAA, FFIEC, SOC2, AWS FTR, ENS and custom security frameworks.
|
||||
|
||||
## Quick Start
|
||||
### Installation
|
||||
|
||||
Prowler is available as a project in [PyPI](https://pypi.org/project/prowler/), thus can be installed using pip with `Python >= 3.9`:
|
||||
Prowler is available as a project in [PyPI](https://pypi.org/project/prowler-cloud/), thus can be installed using pip with `Python >= 3.9`:
|
||||
|
||||
|
||||
=== "Generic"
|
||||
|
||||
@@ -15,7 +40,7 @@ Prowler is available as a project in [PyPI](https://pypi.org/project/prowler/),
|
||||
|
||||
* `Python >= 3.9`
|
||||
* `Python pip >= 3.9`
|
||||
* AWS, GCP and/or Azure credentials
|
||||
* AWS and/or Azure credentials
|
||||
|
||||
_Commands_:
|
||||
|
||||
@@ -29,7 +54,7 @@ Prowler is available as a project in [PyPI](https://pypi.org/project/prowler/),
|
||||
_Requirements_:
|
||||
|
||||
* Have `docker` installed: https://docs.docker.com/get-docker/.
|
||||
* AWS, GCP and/or Azure credentials
|
||||
* AWS and/or Azure credentials
|
||||
* In the command below, change `-v` to your local directory path in order to access the reports.
|
||||
|
||||
_Commands_:
|
||||
@@ -46,7 +71,7 @@ Prowler is available as a project in [PyPI](https://pypi.org/project/prowler/),
|
||||
|
||||
_Requirements for Ubuntu 20.04.3 LTS_:
|
||||
|
||||
* AWS, GCP and/or Azure credentials
|
||||
* AWS and/or Azure credentials
|
||||
* Install python 3.9 with: `sudo apt-get install python3.9`
|
||||
* Remove python 3.8 to avoid conflicts if you can: `sudo apt-get remove python3.8`
|
||||
* Make sure you have the python3 distutils package installed: `sudo apt-get install python3-distutils`
|
||||
@@ -62,29 +87,12 @@ Prowler is available as a project in [PyPI](https://pypi.org/project/prowler/),
|
||||
prowler -v
|
||||
```
|
||||
|
||||
=== "GitHub"
|
||||
|
||||
_Requirements for Developers_:
|
||||
|
||||
* AWS, GCP and/or Azure credentials
|
||||
* `git`, `Python >= 3.9`, `pip` and `poetry` installed (`pip install poetry`)
|
||||
|
||||
_Commands_:
|
||||
|
||||
```
|
||||
git clone https://github.com/prowler-cloud/prowler
|
||||
cd prowler
|
||||
poetry shell
|
||||
poetry install
|
||||
python prowler.py -v
|
||||
```
|
||||
|
||||
=== "Amazon Linux 2"
|
||||
|
||||
_Requirements_:
|
||||
|
||||
* AWS, GCP and/or Azure credentials
|
||||
* Latest Amazon Linux 2 should come with Python 3.9 already installed however it may need pip. Install Python pip 3.9 with: `sudo yum install -y python3-pip`.
|
||||
* AWS and/or Azure credentials
|
||||
* Latest Amazon Linux 2 should come with Python 3.9 already installed however it may need pip. Install Python pip 3.9 with: `sudo dnf install -y python3-pip`.
|
||||
* Make sure setuptools for python is already installed with: `pip3 install setuptools`
|
||||
|
||||
_Commands_:
|
||||
@@ -95,37 +103,32 @@ Prowler is available as a project in [PyPI](https://pypi.org/project/prowler/),
|
||||
prowler -v
|
||||
```
|
||||
|
||||
=== "Brew"
|
||||
|
||||
_Requirements_:
|
||||
|
||||
* `Brew` installed in your Mac or Linux
|
||||
* AWS, GCP and/or Azure credentials
|
||||
|
||||
_Commands_:
|
||||
|
||||
``` bash
|
||||
brew install prowler
|
||||
prowler -v
|
||||
```
|
||||
|
||||
=== "AWS CloudShell"
|
||||
|
||||
After the migration of AWS CloudShell from Amazon Linux 2 to Amazon Linux 2023 [[1]](https://aws.amazon.com/about-aws/whats-new/2023/12/aws-cloudshell-migrated-al2023/) [2](https://docs.aws.amazon.com/cloudshell/latest/userguide/cloudshell-AL2023-migration.html), there is no longer a need to manually compile Python 3.9 as it's already included in AL2023. Prowler can thus be easily installed following the Generic method of installation via pip. Follow the steps below to successfully execute Prowler v3 in AWS CloudShell:
|
||||
Prowler can be easely executed in AWS CloudShell but it has some prerequsites to be able to to so. AWS CloudShell is a container running with `Amazon Linux release 2 (Karoo)` that comes with Python 3.7, since Prowler requires Python >= 3.9 we need to first install a newer version of Python. Follow the steps below to successfully execute Prowler v3 in AWS CloudShell:
|
||||
|
||||
_Requirements_:
|
||||
|
||||
* Open AWS CloudShell `bash`.
|
||||
|
||||
* First install all dependences and then Python, in this case we need to compile it because there is not a package available at the time this document is written:
|
||||
```
|
||||
sudo yum -y install gcc openssl-devel bzip2-devel libffi-devel
|
||||
wget https://www.python.org/ftp/python/3.9.16/Python-3.9.16.tgz
|
||||
tar zxf Python-3.9.16.tgz
|
||||
cd Python-3.9.16/
|
||||
./configure --enable-optimizations
|
||||
sudo make altinstall
|
||||
python3.9 --version
|
||||
cd
|
||||
```
|
||||
_Commands_:
|
||||
|
||||
* Once Python 3.9 is available we can install Prowler from pip:
|
||||
```
|
||||
pip install prowler
|
||||
pip3.9 install prowler
|
||||
prowler -v
|
||||
```
|
||||
|
||||
???+ note
|
||||
To download the results from AWS CloudShell, select Actions -> Download File and add the full path of each file. For the CSV file it will be something like `/home/cloudshell-user/output/prowler-output-123456789012-20221220191331.csv`
|
||||
> To download the results from AWS CloudShell, select Actions -> Download File and add the full path of each file. For the CSV file it will be something like `/home/cloudshell-user/output/prowler-output-123456789012-20221220191331.csv`
|
||||
|
||||
=== "Azure CloudShell"
|
||||
|
||||
@@ -151,7 +154,7 @@ The available versions of Prowler are the following:
|
||||
The container images are available here:
|
||||
|
||||
- [DockerHub](https://hub.docker.com/r/toniblyx/prowler/tags)
|
||||
- [AWS Public ECR](https://gallery.ecr.aws/prowler-cloud/prowler)
|
||||
- [AWS Public ECR](https://gallery.ecr.aws/o4g1s5r6/prowler)
|
||||
|
||||
## High level architecture
|
||||
|
||||
@@ -160,18 +163,14 @@ You can run Prowler from your workstation, an EC2 instance, Fargate or any other
|
||||

|
||||
## Basic Usage
|
||||
|
||||
To run Prowler, you will need to specify the provider (e.g `aws`, `gcp` or `azure`):
|
||||
|
||||
???+ note
|
||||
If no provider specified, AWS will be used for backward compatibility with most of v2 options.
|
||||
To run Prowler, you will need to specify the provider (e.g aws or azure):
|
||||
> If no provider specified, AWS will be used for backward compatibility with most of v2 options.
|
||||
|
||||
```console
|
||||
prowler <provider>
|
||||
```
|
||||

|
||||
|
||||
???+ note
|
||||
Running the `prowler` command without options will use your environment variable credentials, see [Requirements](./getting-started/requirements.md) section to review the credentials settings.
|
||||
> Running the `prowler` command without options will use your environment variable credentials, see [Requirements](getting-started/requirements/) section to review the credentials settings.
|
||||
|
||||
If you miss the former output you can use `--verbose` but Prowler v3 is smoking fast, so you won't see much ;)
|
||||
|
||||
@@ -196,7 +195,6 @@ For executing specific checks or services you can use options `-c`/`checks` or `
|
||||
```console
|
||||
prowler azure --checks storage_blob_public_access_level_is_disabled
|
||||
prowler aws --services s3 ec2
|
||||
prowler gcp --services iam compute
|
||||
```
|
||||
|
||||
Also, checks and services can be excluded with options `-e`/`--excluded-checks` or `--excluded-services`:
|
||||
@@ -204,10 +202,9 @@ Also, checks and services can be excluded with options `-e`/`--excluded-checks`
|
||||
```console
|
||||
prowler aws --excluded-checks s3_bucket_public_access
|
||||
prowler azure --excluded-services defender iam
|
||||
prowler gcp --excluded-services kms
|
||||
```
|
||||
|
||||
More options and executions methods that will save your time in [Miscellaneous](tutorials/misc.md).
|
||||
More options and executions methods that will save your time in [Miscelaneous](tutorials/misc.md).
|
||||
|
||||
You can always use `-h`/`--help` to access to the usage information and all the possible options:
|
||||
|
||||
@@ -222,11 +219,7 @@ Use a custom AWS profile with `-p`/`--profile` and/or AWS regions which you want
|
||||
```console
|
||||
prowler aws --profile custom-profile -f us-east-1 eu-south-2
|
||||
```
|
||||
|
||||
???+ note
|
||||
By default, `prowler` will scan all AWS regions.
|
||||
|
||||
See more details about AWS Authentication in [Requirements](getting-started/requirements.md)
|
||||
> By default, `prowler` will scan all AWS regions.
|
||||
|
||||
### Azure
|
||||
|
||||
@@ -240,40 +233,15 @@ prowler azure --sp-env-auth
|
||||
prowler azure --az-cli-auth
|
||||
|
||||
# To use browser authentication
|
||||
prowler azure --browser-auth --tenant-id "XXXXXXXX"
|
||||
prowler azure --browser-auth
|
||||
|
||||
# To use managed identity auth
|
||||
prowler azure --managed-identity-auth
|
||||
```
|
||||
|
||||
See more details about Azure Authentication in [Requirements](getting-started/requirements.md)
|
||||
More details in [Requirements](getting-started/requirements.md)
|
||||
|
||||
Prowler by default scans all the subscriptions that is allowed to scan, if you want to scan a single subscription or various specific subscriptions you can use the following flag (using az cli auth as example):
|
||||
Prowler by default scans all the subscriptions that is allowed to scan, if you want to scan a single subscription or various concrete subscriptions you can use the following flag (using az cli auth as example):
|
||||
```console
|
||||
prowler azure --az-cli-auth --subscription-ids <subscription ID 1> <subscription ID 2> ... <subscription ID N>
|
||||
```
|
||||
|
||||
### Google Cloud
|
||||
|
||||
Prowler will use by default your User Account credentials, you can configure it using:
|
||||
|
||||
- `gcloud init` to use a new account
|
||||
- `gcloud config set account <account>` to use an existing account
|
||||
|
||||
Then, obtain your access credentials using: `gcloud auth application-default login`
|
||||
|
||||
Otherwise, you can generate and download Service Account keys in JSON format (refer to https://cloud.google.com/iam/docs/creating-managing-service-account-keys) and provide the location of the file with the following argument:
|
||||
|
||||
```console
|
||||
prowler gcp --credentials-file path
|
||||
```
|
||||
|
||||
Prowler by default scans all the GCP Projects that is allowed to scan, if you want to scan a single project or various specific projects you can use the following flag:
|
||||
```console
|
||||
prowler gcp --project-ids <Project ID 1> <Project ID 2> ... <Project ID N>
|
||||
```
|
||||
|
||||
See more details about GCP Authentication in [Requirements](getting-started/requirements.md)
|
||||
|
||||
## Prowler v2 Documentation
|
||||
For **Prowler v2 Documentation**, please check it out [here](https://github.com/prowler-cloud/prowler/blob/8818f47333a0c1c1a457453c87af0ea5b89a385f/README.md).
|
||||
|
||||
@@ -13,9 +13,9 @@ As an **AWS Partner** and we have passed the [AWS Foundation Technical Review (F
|
||||
|
||||
## Reporting Vulnerabilities
|
||||
|
||||
If you would like to report a vulnerability or have a security concern regarding Prowler Open Source or Prowler SaaS service, please submit the information by contacting to us via [**support.prowler.com**](http://support.prowler.com).
|
||||
If you would like to report a vulnerability or have a security concern regarding Prowler Open Source or ProwlerPro service, please submit the information by contacting to help@prowler.pro.
|
||||
|
||||
The information you share with the Prowler team as part of this process is kept confidential within Prowler. We will only share this information with a third party if the vulnerability you report is found to affect a third-party product, in which case we will share this information with the third-party product's author or manufacturer. Otherwise, we will only share this information as permitted by you.
|
||||
The information you share with Verica as part of this process is kept confidential within Verica and the Prowler team. We will only share this information with a third party if the vulnerability you report is found to affect a third-party product, in which case we will share this information with the third-party product's author or manufacturer. Otherwise, we will only share this information as permitted by you.
|
||||
|
||||
We will review the submitted report, and assign it a tracking number. We will then respond to you, acknowledging receipt of the report, and outline the next steps in the process.
|
||||
|
||||
|
||||
@@ -11,4 +11,4 @@
|
||||
This error is also related with a lack of system requirements. To improve performance, Prowler stores information in memory so it may need to be run in a system with more than 1GB of memory.
|
||||
|
||||
|
||||
See section [Logging](./tutorials/logging.md) for further information or [contact us](./contact.md).
|
||||
See section [Logging](/tutorials/logging/) for further information or [contact us](/contact/).
|
||||
|
||||
@@ -7,98 +7,37 @@ You can use `-w`/`--allowlist-file` with the path of your allowlist yaml file, b
|
||||
|
||||
## Allowlist Yaml File Syntax
|
||||
|
||||
### Account, Check and/or Region can be * to apply for all the cases.
|
||||
### Resources and tags are lists that can have either Regex or Keywords.
|
||||
### Tags is an optional list that matches on tuples of 'key=value' and are "ANDed" together.
|
||||
### Use an alternation Regex to match one of multiple tags with "ORed" logic.
|
||||
### For each check you can except Accounts, Regions, Resources and/or Tags.
|
||||
### Account, Check and/or Region can be * to apply for all the cases
|
||||
### Resources is a list that can have either Regex or Keywords:
|
||||
########################### ALLOWLIST EXAMPLE ###########################
|
||||
Allowlist:
|
||||
Accounts:
|
||||
"123456789012":
|
||||
Checks:
|
||||
Checks:
|
||||
"iam_user_hardware_mfa_enabled":
|
||||
Regions:
|
||||
Regions:
|
||||
- "us-east-1"
|
||||
Resources:
|
||||
Resources:
|
||||
- "user-1" # Will ignore user-1 in check iam_user_hardware_mfa_enabled
|
||||
- "user-2" # Will ignore user-2 in check iam_user_hardware_mfa_enabled
|
||||
"ec2_*":
|
||||
Regions:
|
||||
- "*"
|
||||
Resources:
|
||||
- "*" # Will ignore every EC2 check in every account and region
|
||||
"*":
|
||||
Regions:
|
||||
Regions:
|
||||
- "*"
|
||||
Resources:
|
||||
- "test"
|
||||
Tags:
|
||||
- "test=test" # Will ignore every resource containing the string "test" and the tags 'test=test' and
|
||||
- "project=test|project=stage" # either of ('project=test' OR project=stage) in account 123456789012 and every region
|
||||
Resources:
|
||||
- "test" # Will ignore every resource containing the string "test" in every account and region
|
||||
|
||||
"*":
|
||||
Checks:
|
||||
Checks:
|
||||
"s3_bucket_object_versioning":
|
||||
Regions:
|
||||
Regions:
|
||||
- "eu-west-1"
|
||||
- "us-east-1"
|
||||
Resources:
|
||||
Resources:
|
||||
- "ci-logs" # Will ignore bucket "ci-logs" AND ALSO bucket "ci-logs-replica" in specified check and regions
|
||||
- "logs" # Will ignore EVERY BUCKET containing the string "logs" in specified check and regions
|
||||
- ".+-logs" # Will ignore all buckets containing the terms ci-logs, qa-logs, etc. in specified check and regions
|
||||
"ecs_task_definitions_no_environment_secrets":
|
||||
Regions:
|
||||
- "*"
|
||||
Resources:
|
||||
- "*"
|
||||
Exceptions:
|
||||
Accounts:
|
||||
- "0123456789012"
|
||||
Regions:
|
||||
- "eu-west-1"
|
||||
- "eu-south-2" # Will ignore every resource in check ecs_task_definitions_no_environment_secrets except the ones in account 0123456789012 located in eu-south-2 or eu-west-1
|
||||
"*":
|
||||
Regions:
|
||||
- "*"
|
||||
Resources:
|
||||
- "*"
|
||||
Tags:
|
||||
- "environment=dev" # Will ignore every resource containing the tag 'environment=dev' in every account and region
|
||||
- "[[:alnum:]]+-logs" # Will ignore all buckets containing the terms ci-logs, qa-logs, etc. in specified check and regions
|
||||
|
||||
"123456789012":
|
||||
Checks:
|
||||
"*":
|
||||
Regions:
|
||||
- "*"
|
||||
Resources:
|
||||
- "*"
|
||||
Exceptions:
|
||||
Resources:
|
||||
- "test"
|
||||
Tags:
|
||||
- "environment=prod" # Will ignore every resource except in account 123456789012 except the ones containing the string "test" and tag environment=prod
|
||||
|
||||
## Allowlist specific regions
|
||||
If you want to allowlist/mute failed findings only in specific regions, create a file with the following syntax and run it with `prowler aws -w allowlist.yaml`:
|
||||
|
||||
Allowlist:
|
||||
Accounts:
|
||||
"*":
|
||||
Checks:
|
||||
"*":
|
||||
Regions:
|
||||
- "ap-southeast-1"
|
||||
- "ap-southeast-2"
|
||||
Resources:
|
||||
- "*"
|
||||
|
||||
## Default AWS Allowlist
|
||||
Prowler provides you a Default AWS Allowlist with the AWS Resources that should be allowlisted such as all resources created by AWS Control Tower when setting up a landing zone.
|
||||
You can execute Prowler with this allowlist using the following command:
|
||||
```sh
|
||||
prowler aws --allowlist prowler/config/aws_allowlist.yaml
|
||||
```
|
||||
## Supported Allowlist Locations
|
||||
|
||||
The allowlisting flag supports the following locations:
|
||||
@@ -113,8 +52,7 @@ You will need to pass the S3 URI where your Allowlist YAML file was uploaded to
|
||||
```
|
||||
prowler aws -w s3://<bucket>/<prefix>/allowlist.yaml
|
||||
```
|
||||
???+ note
|
||||
Make sure that the used AWS credentials have s3:GetObject permissions in the S3 path where the allowlist file is located.
|
||||
> Make sure that the used AWS credentials have s3:GetObject permissions in the S3 path where the allowlist file is located.
|
||||
|
||||
### AWS DynamoDB Table ARN
|
||||
|
||||
@@ -132,15 +70,10 @@ prowler aws -w arn:aws:dynamodb:<region_name>:<account_id>:table/<table_name>
|
||||
- Checks (String): This field can contain either a Prowler Check Name or an `*` (which applies to all the scanned checks).
|
||||
- Regions (List): This field contains a list of regions where this allowlist rule is applied (it can also contains an `*` to apply all scanned regions).
|
||||
- Resources (List): This field contains a list of regex expressions that applies to the resources that are wanted to be allowlisted.
|
||||
- Tags (List): -Optional- This field contains a list of tuples in the form of 'key=value' that applies to the resources tags that are wanted to be allowlisted.
|
||||
- Exceptions (Map): -Optional- This field contains a map of lists of accounts/regions/resources/tags that are wanted to be excepted in the allowlist.
|
||||
|
||||
The following example will allowlist all resources in all accounts for the EC2 checks in the regions `eu-west-1` and `us-east-1` with the tags `environment=dev` and `environment=prod`, except the resources containing the string `test` in the account `012345678912` and region `eu-west-1` with the tag `environment=prod`:
|
||||
|
||||
<img src="../img/allowlist-row.png"/>
|
||||
|
||||
???+ note
|
||||
Make sure that the used AWS credentials have `dynamodb:PartiQLSelect` permissions in the table.
|
||||
> Make sure that the used AWS credentials have `dynamodb:PartiQLSelect` permissions in the table.
|
||||
|
||||
### AWS Lambda ARN
|
||||
|
||||
@@ -168,7 +101,7 @@ generates an Allowlist:
|
||||
```
|
||||
def handler(event, context):
|
||||
checks = {}
|
||||
checks["vpc_flow_logs_enabled"] = { "Regions": [ "*" ], "Resources": [ "" ], Optional("Tags"): [ "key:value" ] }
|
||||
checks["vpc_flow_logs_enabled"] = { "Regions": [ "*" ], "Resources": [ "" ] }
|
||||
|
||||
al = { "Allowlist": { "Accounts": { "*": { "Checks": checks } } } }
|
||||
return al
|
||||
|
||||
@@ -1,42 +0,0 @@
|
||||
# AWS Authentication
|
||||
|
||||
Make sure you have properly configured your AWS-CLI with a valid Access Key and Region or declare AWS variables properly (or instance profile/role):
|
||||
|
||||
```console
|
||||
aws configure
|
||||
```
|
||||
|
||||
or
|
||||
|
||||
```console
|
||||
export AWS_ACCESS_KEY_ID="ASXXXXXXX"
|
||||
export AWS_SECRET_ACCESS_KEY="XXXXXXXXX"
|
||||
export AWS_SESSION_TOKEN="XXXXXXXXX"
|
||||
```
|
||||
|
||||
Those credentials must be associated to a user or role with proper permissions to do all checks. To make sure, add the following AWS managed policies to the user or role being used:
|
||||
|
||||
- `arn:aws:iam::aws:policy/SecurityAudit`
|
||||
- `arn:aws:iam::aws:policy/job-function/ViewOnlyAccess`
|
||||
|
||||
???+ note
|
||||
Moreover, some read-only additional permissions are needed for several checks, make sure you attach also the custom policy [prowler-additions-policy.json](https://github.com/prowler-cloud/prowler/blob/master/permissions/prowler-additions-policy.json) to the role you are using. If you want Prowler to send findings to [AWS Security Hub](https://aws.amazon.com/security-hub), make sure you also attach the custom policy [prowler-security-hub.json](https://github.com/prowler-cloud/prowler/blob/master/permissions/prowler-security-hub.json).
|
||||
|
||||
|
||||
## Profiles
|
||||
|
||||
Prowler can use your custom AWS Profile with:
|
||||
```console
|
||||
prowler <provider> -p/--profile <profile_name>
|
||||
```
|
||||
|
||||
## Multi-Factor Authentication
|
||||
|
||||
If your IAM entity enforces MFA you can use `--mfa` and Prowler will ask you to input the following values to get a new session:
|
||||
|
||||
- ARN of your MFA device
|
||||
- TOTP (Time-Based One-Time Password)
|
||||
|
||||
## STS Endpoint Region
|
||||
|
||||
If you are using Prowler in AWS regions that are not enabled by default you need to use the argument `--sts-endpoint-region` to point the AWS STS API calls `assume-role` and `get-caller-identity` to the non-default region, e.g.: `prowler aws --sts-endpoint-region eu-south-2`.
|
||||
@@ -1,9 +1,7 @@
|
||||
# Boto3 Retrier Configuration
|
||||
|
||||
Prowler's AWS Provider uses the Boto3 [Standard](https://boto3.amazonaws.com/v1/documentation/api/latest/guide/retries.html) retry mode to assist in retrying client calls to AWS services when these kinds of errors or exceptions are experienced. This mode includes the following behaviours:
|
||||
|
||||
- A default value of 3 for maximum retry attempts. This can be overwritten with the `--aws-retries-max-attempts 5` argument.
|
||||
|
||||
- Retry attempts for an expanded list of errors/exceptions:
|
||||
```
|
||||
# Transient errors/exceptions
|
||||
@@ -28,18 +26,6 @@ Prowler's AWS Provider uses the Boto3 [Standard](https://boto3.amazonaws.com/v1/
|
||||
SlowDown
|
||||
EC2ThrottledException
|
||||
```
|
||||
|
||||
- Retry attempts on nondescriptive, transient error codes. Specifically, these HTTP status codes: 500, 502, 503, 504.
|
||||
|
||||
- Any retry attempt will include an exponential backoff by a base factor of 2 for a maximum backoff time of 20 seconds.
|
||||
|
||||
## Notes for validating retry attempts
|
||||
|
||||
If you are making changes to Prowler, and want to validate if requests are being retried or given up on, you can take the following approach
|
||||
|
||||
* Run prowler with `--log-level DEBUG` and `--log-file debuglogs.txt`
|
||||
* Search for retry attempts using `grep -i 'Retry needed' debuglogs.txt`
|
||||
|
||||
This is based off of the [AWS documentation](https://boto3.amazonaws.com/v1/documentation/api/latest/guide/retries.html#checking-retry-attempts-in-your-client-logs), which states that if a retry is performed, you will see a message starting with "Retry needed".
|
||||
|
||||
You can determine the total number of calls made using `grep -i 'Sending http request' debuglogs.txt | wc -l`
|
||||
|
||||
@@ -1,26 +1,26 @@
|
||||
# AWS CloudShell
|
||||
|
||||
## Installation
|
||||
After the migration of AWS CloudShell from Amazon Linux 2 to Amazon Linux 2023 [[1]](https://aws.amazon.com/about-aws/whats-new/2023/12/aws-cloudshell-migrated-al2023/) [[2]](https://docs.aws.amazon.com/cloudshell/latest/userguide/cloudshell-AL2023-migration.html), there is no longer a need to manually compile Python 3.9 as it's already included in AL2023. Prowler can thus be easily installed following the Generic method of installation via pip. Follow the steps below to successfully execute Prowler v3 in AWS CloudShell:
|
||||
```shell
|
||||
pip install prowler
|
||||
Prowler can be easely executed in AWS CloudShell but it has some prerequsites to be able to to so. AWS CloudShell is a container running with `Amazon Linux release 2 (Karoo)` that comes with Python 3.7, since Prowler requires Python >= 3.9 we need to first install a newer version of Python. Follow the steps below to successfully execute Prowler v3 in AWS CloudShell:
|
||||
|
||||
- First install all dependences and then Python, in this case we need to compile it because there is not a package available at the time this document is written:
|
||||
```
|
||||
sudo yum -y install gcc openssl-devel bzip2-devel libffi-devel
|
||||
wget https://www.python.org/ftp/python/3.9.16/Python-3.9.16.tgz
|
||||
tar zxf Python-3.9.16.tgz
|
||||
cd Python-3.9.16/
|
||||
./configure --enable-optimizations
|
||||
sudo make altinstall
|
||||
python3.9 --version
|
||||
cd
|
||||
```
|
||||
- Once Python 3.9 is available we can install Prowler from pip:
|
||||
```
|
||||
pip3.9 install prowler
|
||||
```
|
||||
- Now enjoy Prowler:
|
||||
```
|
||||
prowler -v
|
||||
prowler
|
||||
```
|
||||
|
||||
## Download Files
|
||||
|
||||
To download the results from AWS CloudShell, select Actions -> Download File and add the full path of each file. For the CSV file it will be something like `/home/cloudshell-user/output/prowler-output-123456789012-20221220191331.csv`
|
||||
|
||||
## Clone Prowler from Github
|
||||
|
||||
The limited storage that AWS CloudShell provides for the user's home directory causes issues when installing the poetry dependencies to run Prowler from GitHub. Here is a workaround:
|
||||
```shell
|
||||
git clone https://github.com/prowler-cloud/prowler.git
|
||||
cd prowler
|
||||
pip install poetry
|
||||
mkdir /tmp/pypoetry
|
||||
poetry config cache-dir /tmp/pypoetry
|
||||
poetry shell
|
||||
poetry install
|
||||
python prowler.py -v
|
||||
```
|
||||
- To download the results from AWS CloudShell, select Actions -> Download File and add the full path of each file. For the CSV file it will be something like `/home/cloudshell-user/output/prowler-output-123456789012-20221220191331.csv`
|
||||
|
Before Width: | Height: | Size: 341 KiB |
|
Before Width: | Height: | Size: 291 KiB |
|
Before Width: | Height: | Size: 306 KiB |
|
Before Width: | Height: | Size: 346 KiB |
|
Before Width: | Height: | Size: 293 KiB |
|
Before Width: | Height: | Size: 252 KiB |
|
Before Width: | Height: | Size: 603 KiB |
|
Before Width: | Height: | Size: 273 KiB |
@@ -1,6 +1,6 @@
|
||||
# Scan Multiple AWS Accounts
|
||||
|
||||
Prowler can scan multiple accounts when it is executed from one account that can assume a role in those given accounts to scan using [Assume Role feature](role-assumption.md) and [AWS Organizations integration feature](organizations.md).
|
||||
Prowler can scan multiple accounts when it is ejecuted from one account that can assume a role in those given accounts to scan using [Assume Role feature](role-assumption.md) and [AWS Organizations integration feature](organizations.md).
|
||||
|
||||
|
||||
## Scan multiple specific accounts sequentially
|
||||
@@ -41,7 +41,7 @@ for accountId in $ACCOUNTS_LIST; do
|
||||
done
|
||||
```
|
||||
|
||||
## Scan multiple accounts from AWS Organizations in parallel
|
||||
## Scan mutiple accounts from AWS Organizations in parallel
|
||||
|
||||
- Declare a variable with all the accounts to scan. To do so, get the list of your AWS accounts in your AWS Organization by running the following command (will create a variable with all your ACTIVE accounts). Remember to run that command with the permissions needed to get that information in your AWS Organizations Management account.
|
||||
|
||||
|
||||
@@ -1,28 +1,20 @@
|
||||
# AWS Organizations
|
||||
## Get AWS Account details from your AWS Organization:
|
||||
|
||||
## Get AWS Account details from your AWS Organization
|
||||
Prowler allows you to get additional information of the scanned account in CSV and JSON outputs. When scanning a single account you get the Account ID as part of the output.
|
||||
|
||||
Prowler allows you to get additional information of the scanned account from AWS Organizations.
|
||||
If you have AWS Organizations Prowler can get your account details like Account Name, Email, ARN, Organization ID and Tags and you will have them next to every finding in the CSV and JSON outputs.
|
||||
|
||||
If you have AWS Organizations enabled, Prowler can get your account details like account name, email, ARN, organization id and tags and you will have them next to every finding's output.
|
||||
- In order to do that you can use the option `-O`/`--organizations-role <organizations_role_arn>`. See the following sample command:
|
||||
|
||||
In order to do that you can use the argument `-O`/`--organizations-role <organizations_role_arn>`. If this argument is not present Prowler will try to fetch that information automatically if the AWS account is a delegated administrator for the AWS Organization.
|
||||
|
||||
???+ note
|
||||
Refer [here](https://docs.aws.amazon.com/organizations/latest/userguide/orgs_delegate_policies.html) for more information about AWS Organizations delegated administrator.
|
||||
|
||||
See the following sample command:
|
||||
|
||||
```shell
|
||||
prowler aws \
|
||||
-O arn:aws:iam::<management_organizations_account_id>:role/<role_name>
|
||||
```
|
||||
???+ note
|
||||
Make sure the role in your AWS Organizations management account has the permissions `organizations:DescribeAccount` and `organizations:ListTagsForResource`.
|
||||
prowler aws -O arn:aws:iam::<management_organizations_account_id>:role/<role_name>
|
||||
```
|
||||
> Make sure the role in your AWS Organizatiosn management account has the permissions `organizations:ListAccounts*` and `organizations:ListTagsForResource`.
|
||||
|
||||
Prowler will scan the AWS account and get the account details from AWS Organizations.
|
||||
- In that command Prowler will scan the account and getting the account details from the AWS Organizations management account assuming a role and creating two reports with those details in JSON and CSV.
|
||||
|
||||
In the JSON output below you can see tags coded in base64 to prevent breaking CSV or JSON due to its format:
|
||||
In the JSON output below (redacted) you can see tags coded in base64 to prevent breaking CSV or JSON due to its format:
|
||||
|
||||
```json
|
||||
"Account Email": "my-prod-account@domain.com",
|
||||
@@ -32,38 +24,26 @@ In the JSON output below you can see tags coded in base64 to prevent breaking CS
|
||||
"Account tags": "\"eyJUYWdzIjpasf0=\""
|
||||
```
|
||||
|
||||
The additional fields in CSV header output are as follows:
|
||||
The additional fields in CSV header output are as follow:
|
||||
|
||||
- ACCOUNT_DETAILS_EMAIL
|
||||
- ACCOUNT_DETAILS_NAME
|
||||
- ACCOUNT_DETAILS_ARN
|
||||
- ACCOUNT_DETAILS_ORG
|
||||
- ACCOUNT_DETAILS_TAGS
|
||||
```csv
|
||||
ACCOUNT_DETAILS_EMAIL,ACCOUNT_DETAILS_NAME,ACCOUNT_DETAILS_ARN,ACCOUNT_DETAILS_ORG,ACCOUNT_DETAILS_TAGS
|
||||
```
|
||||
|
||||
## Extra: Run Prowler across all accounts in AWS Organizations by assuming roles
|
||||
## Assume Role and across all accounts in AWS Organizations or just a list of accounts:
|
||||
|
||||
If you want to run Prowler across all accounts of AWS Organizations you can do this:
|
||||
|
||||
1. First get a list of accounts that are not suspended:
|
||||
- First get a list of accounts that are not suspended:
|
||||
|
||||
```shell
|
||||
ACCOUNTS_IN_ORGS=$(aws organizations list-accounts \
|
||||
--query "Accounts[?Status=='ACTIVE'].Id" \
|
||||
--output text \
|
||||
)
|
||||
```
|
||||
```
|
||||
ACCOUNTS_IN_ORGS=$(aws organizations list-accounts --query Accounts[?Status==`ACTIVE`].Id --output text)
|
||||
```
|
||||
|
||||
2. Then run Prowler to assume a role (same in all members) per each account:
|
||||
- Then run Prowler to assume a role (same in all members) per each account, in this example it is just running one particular check:
|
||||
|
||||
```shell
|
||||
for accountId in $ACCOUNTS_IN_ORGS;
|
||||
do
|
||||
prowler aws \
|
||||
-O arn:aws:iam::<management_organizations_account_id>:role/<role_name> \
|
||||
-R arn:aws:iam::"${accountId}":role/<role_name>;
|
||||
done
|
||||
```
|
||||
```
|
||||
for accountId in $ACCOUNTS_IN_ORGS; do prowler aws -O arn:aws:iam::<management_organizations_account_id>:role/<role_name>; done
|
||||
```
|
||||
|
||||
???+ note
|
||||
Using the same for loop it can be scanned a list of accounts with a variable like:
|
||||
</br>`ACCOUNTS_LIST='11111111111 2222222222 333333333'`
|
||||
- Using the same for loop it can be scanned a list of accounts with a variable like `ACCOUNTS_LIST='11111111111 2222222222 333333333'`
|
||||
|
||||
@@ -1,93 +0,0 @@
|
||||
# AWS Regions and Partitions
|
||||
|
||||
By default Prowler is able to scan the following AWS partitions:
|
||||
|
||||
- Commercial: `aws`
|
||||
- China: `aws-cn`
|
||||
- GovCloud (US): `aws-us-gov`
|
||||
|
||||
???+ note
|
||||
To check the available regions for each partition and service please refer to the following document [aws_regions_by_service.json](https://github.com/prowler-cloud/prowler/blob/master/prowler/providers/aws/aws_regions_by_service.json)
|
||||
|
||||
It is important to take into consideration that to scan the China (`aws-cn`) or GovCloud (`aws-us-gov`) partitions it is either required to have a valid region for that partition in your AWS credentials or to specify the regions you want to audit for that partition using the `-f/--region` flag.
|
||||
|
||||
???+ note
|
||||
Please, refer to https://boto3.amazonaws.com/v1/documentation/api/latest/guide/credentials.html#configuring-credentials for more information about the AWS credentials configuration.
|
||||
|
||||
Prowler can scan specific region(s) with:
|
||||
```console
|
||||
prowler aws -f/--region eu-west-1 us-east-1
|
||||
```
|
||||
|
||||
You can get more information about the available partitions and regions in the following [Botocore](https://github.com/boto/botocore) [file](https://github.com/boto/botocore/blob/22a19ea7c4c2c4dd7df4ab8c32733cba0c7597a4/botocore/data/partitions.json).
|
||||
|
||||
|
||||
## AWS China
|
||||
|
||||
To scan your AWS account in the China partition (`aws-cn`):
|
||||
|
||||
- Using the `-f/--region` flag:
|
||||
```
|
||||
prowler aws --region cn-north-1 cn-northwest-1
|
||||
```
|
||||
- Using the region configured in your AWS profile at `~/.aws/credentials` or `~/.aws/config`:
|
||||
```
|
||||
[default]
|
||||
aws_access_key_id = XXXXXXXXXXXXXXXXXXX
|
||||
aws_secret_access_key = XXXXXXXXXXXXXXXXXXX
|
||||
region = cn-north-1
|
||||
```
|
||||
???+ note
|
||||
With this option all the partition regions will be scanned without the need of use the `-f/--region` flag
|
||||
|
||||
|
||||
## AWS GovCloud (US)
|
||||
|
||||
To scan your AWS account in the GovCloud (US) partition (`aws-us-gov`):
|
||||
|
||||
- Using the `-f/--region` flag:
|
||||
```
|
||||
prowler aws --region us-gov-east-1 us-gov-west-1
|
||||
```
|
||||
- Using the region configured in your AWS profile at `~/.aws/credentials` or `~/.aws/config`:
|
||||
```
|
||||
[default]
|
||||
aws_access_key_id = XXXXXXXXXXXXXXXXXXX
|
||||
aws_secret_access_key = XXXXXXXXXXXXXXXXXXX
|
||||
region = us-gov-east-1
|
||||
```
|
||||
???+ note
|
||||
With this option all the partition regions will be scanned without the need of use the `-f/--region` flag
|
||||
|
||||
|
||||
## AWS ISO (US & Europe)
|
||||
|
||||
For the AWS ISO partitions, which are known as "secret partitions" and are air-gapped from the Internet, there is no builtin way to scan it. If you want to audit an AWS account in one of the AWS ISO partitions you should manually update the [aws_regions_by_service.json](https://github.com/prowler-cloud/prowler/blob/master/prowler/providers/aws/aws_regions_by_service.json) and include the partition, region and services, e.g.:
|
||||
```json
|
||||
"iam": {
|
||||
"regions": {
|
||||
"aws": [
|
||||
"eu-west-1",
|
||||
"us-east-1",
|
||||
],
|
||||
"aws-cn": [
|
||||
"cn-north-1",
|
||||
"cn-northwest-1"
|
||||
],
|
||||
"aws-us-gov": [
|
||||
"us-gov-east-1",
|
||||
"us-gov-west-1"
|
||||
],
|
||||
"aws-iso": [
|
||||
"aws-iso-global",
|
||||
"us-iso-east-1",
|
||||
"us-iso-west-1"
|
||||
],
|
||||
"aws-iso-b": [
|
||||
"aws-iso-b-global",
|
||||
"us-isob-east-1"
|
||||
],
|
||||
"aws-iso-e": [],
|
||||
}
|
||||
},
|
||||
```
|
||||
@@ -5,7 +5,7 @@ Prowler uses the AWS SDK (Boto3) underneath so it uses the same authentication m
|
||||
However, there are few ways to run Prowler against multiple accounts using IAM Assume Role feature depending on each use case:
|
||||
|
||||
1. You can just set up your custom profile inside `~/.aws/config` with all needed information about the role to assume then call it with `prowler aws -p/--profile your-custom-profile`.
|
||||
- An example profile that performs role-chaining is given below. The `credential_source` can either be set to `Environment`, `Ec2InstanceMetadata`, or `EcsContainer`.
|
||||
- An example profile that performs role-chaining is given below. The `credential_source` can either be set to `Environment`, `Ec2InstanceMetadata`, or `EcsContainer`.
|
||||
- Alternatively, you could use the `source_profile` instead of `credential_source` to specify a separate named profile that contains IAM user credentials with permission to assume the target the role. More information can be found [here](https://docs.aws.amazon.com/cli/latest/userguide/cli-configure-role.html).
|
||||
```
|
||||
[profile crossaccountrole]
|
||||
@@ -23,35 +23,10 @@ prowler aws -R arn:aws:iam::<account_id>:role/<role_name>
|
||||
prowler aws -T/--session-duration <seconds> -I/--external-id <external_id> -R arn:aws:iam::<account_id>:role/<role_name>
|
||||
```
|
||||
|
||||
## Custom Role Session Name
|
||||
|
||||
Prowler can use your custom Role Session name with:
|
||||
```console
|
||||
prowler aws --role-session-name <role_session_name>
|
||||
```
|
||||
|
||||
???+ note
|
||||
It defaults to `ProwlerAssessmentSession`.
|
||||
|
||||
## STS Endpoint Region
|
||||
|
||||
If you are using Prowler in AWS regions that are not enabled by default you need to use the argument `--sts-endpoint-region` to point the AWS STS API calls `assume-role` and `get-caller-identity` to the non-default region, e.g.: `prowler aws --sts-endpoint-region eu-south-2`.
|
||||
|
||||
???+ note
|
||||
Since v3.11.0, Prowler uses a regional token in STS sessions so it can scan all AWS regions without needing the `--sts-endpoint-region` argument. Make sure that you have enabled the AWS Region you want to scan in **BOTH** AWS Accounts (assumed role account and account from which you assume the role).
|
||||
|
||||
## Role MFA
|
||||
|
||||
If your IAM Role has MFA configured you can use `--mfa` along with `-R`/`--role <role_arn>` and Prowler will ask you to input the following values to get a new temporary session for the IAM Role provided:
|
||||
|
||||
- ARN of your MFA device
|
||||
- TOTP (Time-Based One-Time Password)
|
||||
|
||||
## Create Role
|
||||
|
||||
To create a role to be assumed in one or multiple accounts you can use either as CloudFormation Stack or StackSet the following [template](https://github.com/prowler-cloud/prowler/blob/master/permissions/create_role_to_assume_cfn.yaml) and adapt it.
|
||||
|
||||
???+ note "About Session Duration"
|
||||
Depending on the amount of checks you run and the size of your infrastructure, Prowler may require more than 1 hour to finish. Use option `-T <seconds>` to allow up to 12h (43200 seconds). To allow more than 1h you need to modify _"Maximum CLI/API session duration"_ for that particular role, read more [here](https://docs.aws.amazon.com/IAM/latest/UserGuide/id_roles_use.html#id_roles_use_view-role-max-session).
|
||||
> _NOTE 1 about Session Duration_: Depending on the amount of checks you run and the size of your infrastructure, Prowler may require more than 1 hour to finish. Use option `-T <seconds>` to allow up to 12h (43200 seconds). To allow more than 1h you need to modify _"Maximum CLI/API session duration"_ for that particular role, read more [here](https://docs.aws.amazon.com/IAM/latest/UserGuide/id_roles_use.html#id_roles_use_view-role-max-session).
|
||||
|
||||
Bear in mind that if you are using roles assumed by role chaining there is a hard limit of 1 hour so consider not using role chaining if possible, read more about that, in foot note 1 below the table [here](https://docs.aws.amazon.com/IAM/latest/UserGuide/id_roles_use.html).
|
||||
> _NOTE 2 about Session Duration_: Bear in mind that if you are using roles assumed by role chaining there is a hard limit of 1 hour so consider not using role chaining if possible, read more about that, in foot note 1 below the table [here](https://docs.aws.amazon.com/IAM/latest/UserGuide/id_roles_use.html).
|
||||
|
||||
@@ -1,25 +0,0 @@
|
||||
# Send report to AWS S3 Bucket
|
||||
|
||||
To save your report in an S3 bucket, use `-B`/`--output-bucket`.
|
||||
|
||||
```sh
|
||||
prowler <provider> -B my-bucket
|
||||
```
|
||||
|
||||
If you can use a custom folder and/or filename, use `-o`/`--output-directory` and/or `-F`/`--output-filename`.
|
||||
|
||||
```sh
|
||||
prowler <provider> \
|
||||
-B my-bucket \
|
||||
--output-directory test-folder \
|
||||
--output-filename output-filename
|
||||
```
|
||||
|
||||
By default Prowler sends HTML, JSON and CSV output formats, if you want to send a custom output format or a single one of the defaults you can specify it with the `-M`/`--output-modes` flag.
|
||||
|
||||
```sh
|
||||
prowler <provider> -M csv -B my-bucket
|
||||
```
|
||||
|
||||
???+ note
|
||||
In the case you do not want to use the assumed role credentials but the initial credentials to put the reports into the S3 bucket, use `-D`/`--output-bucket-no-assume` instead of `-B`/`--output-bucket`. Make sure that the used credentials have `s3:PutObject` permissions in the S3 path where the reports are going to be uploaded.
|
||||
@@ -1,137 +1,41 @@
|
||||
# AWS Security Hub Integration
|
||||
|
||||
Prowler supports natively and as **official integration** sending findings to [AWS Security Hub](https://aws.amazon.com/security-hub). This integration allows **Prowler** to import its findings to AWS Security Hub.
|
||||
Prowler supports natively and as **official integration** sending findings to [AWS Security Hub](https://aws.amazon.com/security-hub). This integration allows Prowler to import its findings to AWS Security Hub.
|
||||
|
||||
With Security Hub, you now have a single place that aggregates, organizes, and prioritizes your security alerts, or findings, from multiple AWS services, such as Amazon GuardDuty, Amazon Inspector, Amazon Macie, AWS Identity and Access Management (IAM) Access Analyzer, and AWS Firewall Manager, as well as from AWS Partner solutions and from Prowler for free.
|
||||
|
||||
Before sending findings, you will need to enable AWS Security Hub and the **Prowler** integration.
|
||||
Before sending findings to Prowler, you will need to perform next steps:
|
||||
|
||||
## Enable AWS Security Hub
|
||||
1. Since Security Hub is a region based service, enable it in the region or regions you require. Use the AWS Management Console or using the AWS CLI with this command if you have enough permissions:
|
||||
- `aws securityhub enable-security-hub --region <region>`.
|
||||
2. Enable Prowler as partner integration integration. Use the AWS Management Console or using the AWS CLI with this command if you have enough permissions:
|
||||
- `aws securityhub enable-import-findings-for-product --region <region> --product-arn arn:aws:securityhub:<region>::product/prowler/prowler` (change region also inside the ARN).
|
||||
- Using the AWS Management Console:
|
||||

|
||||
3. Allow Prowler to import its findings to AWS Security Hub by adding the policy below to the role or user running Prowler:
|
||||
- [prowler-security-hub.json](https://github.com/prowler-cloud/prowler/blob/master/iam/prowler-security-hub.json)
|
||||
|
||||
To enable the integration you have to perform the following steps, in _at least_ one AWS region of a given AWS account, to enable **AWS Security Hub** and **Prowler** as a partner integration.
|
||||
|
||||
Since **AWS Security Hub** is a region based service, you will need to enable it in the region or regions you require. You can configure it using the AWS Management Console or the AWS CLI.
|
||||
|
||||
???+ note
|
||||
Take into account that enabling this integration will incur in costs in AWS Security Hub, please refer to its pricing [here](https://aws.amazon.com/security-hub/pricing/) for more information.
|
||||
|
||||
### Using the AWS Management Console
|
||||
|
||||
#### Enable AWS Security Hub
|
||||
|
||||
If you have currently AWS Security Hub enabled you can skip to the [next section](#enable-prowler-integration).
|
||||
|
||||
1. Open the **AWS Security Hub** console at https://console.aws.amazon.com/securityhub/.
|
||||
|
||||
2. When you open the Security Hub console for the first time make sure that you are in the region you want to enable, then choose **Go to Security Hub**.
|
||||

|
||||
|
||||
3. On the next page, the Security standards section lists the security standards that Security Hub supports. Select the check box for a standard to enable it, and clear the check box to disable it.
|
||||
|
||||
4. Choose **Enable Security Hub**.
|
||||

|
||||
|
||||
#### Enable Prowler Integration
|
||||
|
||||
If you have currently the Prowler integration enabled in AWS Security Hub you can skip to the [next section](#send-findings) and start sending findings.
|
||||
|
||||
Once **AWS Security Hub** is enabled you will need to enable **Prowler** as partner integration to allow **Prowler** to send findings to your **AWS Security Hub**.
|
||||
|
||||
1. Open the **AWS Security Hub** console at https://console.aws.amazon.com/securityhub/.
|
||||
|
||||
2. Select the **Integrations** tab in the right-side menu bar.
|
||||

|
||||
|
||||
3. Search for _Prowler_ in the text search box and the **Prowler** integration will appear.
|
||||
|
||||
4. Once there, click on **Accept Findings** to allow **AWS Security Hub** to receive findings from **Prowler**.
|
||||

|
||||
|
||||
5. A new modal will appear to confirm that you are enabling the **Prowler** integration.
|
||||

|
||||
|
||||
6. Right after click on **Accept Findings**, you will see that the integration is enabled in **AWS Security Hub**.
|
||||

|
||||
|
||||
### Using the AWS CLI
|
||||
|
||||
To enable **AWS Security Hub** and the **Prowler** integration you have to run the following commands using the AWS CLI:
|
||||
|
||||
```shell
|
||||
aws securityhub enable-security-hub --region <region>
|
||||
```
|
||||
???+ note
|
||||
For this command to work you will need the `securityhub:EnableSecurityHub` permission. You will need to set the AWS region where you want to enable AWS Security Hub.
|
||||
|
||||
Once **AWS Security Hub** is enabled you will need to enable **Prowler** as partner integration to allow **Prowler** to send findings to your AWS Security Hub. You have to run the following commands using the AWS CLI:
|
||||
|
||||
```shell
|
||||
aws securityhub enable-import-findings-for-product --region eu-west-1 --product-arn arn:aws:securityhub:<region>::product/prowler/prowler
|
||||
```
|
||||
???+ note
|
||||
You will need to set the AWS region where you want to enable the integration and also the AWS region also within the ARN. For this command to work you will need the `securityhub:securityhub:EnableImportFindingsForProduct` permission.
|
||||
|
||||
|
||||
## Send Findings
|
||||
Once it is enabled, it is as simple as running the command below (for all regions):
|
||||
|
||||
```sh
|
||||
prowler aws --security-hub
|
||||
./prowler aws -S
|
||||
```
|
||||
|
||||
or for only one filtered region like eu-west-1:
|
||||
|
||||
```sh
|
||||
prowler --security-hub --region eu-west-1
|
||||
./prowler -S -f eu-west-1
|
||||
```
|
||||
|
||||
???+ note
|
||||
It is recommended to send only fails to Security Hub and that is possible adding `-q/--quiet` to the command. You can use, instead of the `-q/--quiet` argument, the `--send-sh-only-fails` argument to save all the findings in the Prowler outputs but just to send FAIL findings to AWS Security Hub.
|
||||
> **Note 1**: It is recommended to send only fails to Security Hub and that is possible adding `-q` to the command.
|
||||
|
||||
Since Prowler perform checks to all regions by default you may need to filter by region when running Security Hub integration, as shown in the example above. Remember to enable Security Hub in the region or regions you need by calling `aws securityhub enable-security-hub --region <region>` and run Prowler with the option `-f/--region <region>` (if no region is used it will try to push findings in all regions hubs). Prowler will send findings to the Security Hub on the region where the scanned resource is located.
|
||||
> **Note 2**: Since Prowler perform checks to all regions by defauls you may need to filter by region when runing Security Hub integration, as shown in the example above. Remember to enable Security Hub in the region or regions you need by calling `aws securityhub enable-security-hub --region <region>` and run Prowler with the option `-f <region>` (if no region is used it will try to push findings in all regions hubs).
|
||||
|
||||
To have updated findings in Security Hub you have to run Prowler periodically. Once a day or every certain amount of hours.
|
||||
> **Note 3** to have updated findings in Security Hub you have to run Prowler periodically. Once a day or every certain amount of hours.
|
||||
|
||||
### See you Prowler findings in AWS Security Hub
|
||||
Once you run findings for first time you will be able to see Prowler findings in Findings section:
|
||||
|
||||
Once configured the **AWS Security Hub** in your next scan you will receive the **Prowler** findings in the AWS regions configured. To review those findings in **AWS Security Hub**:
|
||||
|
||||
1. Open the **AWS Security Hub** console at https://console.aws.amazon.com/securityhub/.
|
||||
|
||||
2. Select the **Findings** tab in the right-side menu bar.
|
||||

|
||||
|
||||
3. Use the search box filters and use the **Product Name** filter with the value _Prowler_ to see the findings sent from **Prowler**.
|
||||
|
||||
4. Then, you can click on the check **Title** to see the details and the history of a finding.
|
||||

|
||||
|
||||
As you can see in the related requirements section, in the detailed view of the findings, **Prowler** also sends compliance information related to every finding.
|
||||
|
||||
## Send findings to Security Hub assuming an IAM Role
|
||||
|
||||
When you are auditing a multi-account AWS environment, you can send findings to a Security Hub of another account by assuming an IAM role from that account using the `-R` flag in the Prowler command:
|
||||
|
||||
```sh
|
||||
prowler --security-hub --role arn:aws:iam::123456789012:role/ProwlerExecutionRole
|
||||
```
|
||||
|
||||
???+ note
|
||||
Remember that the used role needs to have permissions to send findings to Security Hub. To get more information about the permissions required, please refer to the following IAM policy [prowler-security-hub.json](https://github.com/prowler-cloud/prowler/blob/master/permissions/prowler-security-hub.json)
|
||||
|
||||
|
||||
## Send only failed findings to Security Hub
|
||||
|
||||
When using the **AWS Security Hub** integration you can send only the `FAIL` findings generated by **Prowler**. Therefore, the **AWS Security Hub** usage costs eventually would be lower. To follow that recommendation you could add the `-q/--quiet` flag to the Prowler command:
|
||||
|
||||
```sh
|
||||
prowler --security-hub --quiet
|
||||
```
|
||||
|
||||
You can use, instead of the `-q/--quiet` argument, the `--send-sh-only-fails` argument to save all the findings in the Prowler outputs but just to send FAIL findings to AWS Security Hub:
|
||||
|
||||
```sh
|
||||
prowler --security-hub --send-sh-only-fails
|
||||
```
|
||||

|
||||
|
||||
## Skip sending updates of findings to Security Hub
|
||||
|
||||
@@ -139,5 +43,5 @@ By default, Prowler archives all its findings in Security Hub that have not appe
|
||||
You can skip this logic by using the option `--skip-sh-update` so Prowler will not archive older findings:
|
||||
|
||||
```sh
|
||||
prowler --security-hub --skip-sh-update
|
||||
./prowler -S --skip-sh-update
|
||||
```
|
||||
|
||||
@@ -1,8 +1,8 @@
|
||||
# Check mapping between Prowler v3 and v2
|
||||
|
||||
Prowler v3 comes with different identifiers but we maintained the same checks that were implemented in v2. The reason for this change is because in previous versions of Prowler, check names were mostly based on CIS Benchmark for AWS. In v3 all checks are independent from any security framework and they have its own name and ID.
|
||||
Prowler v3 comes with different identifiers but we maintained the same checks that were implemented in v2. The reason for this change is because in previows versions of Prowler, check names were mostly based on CIS Benchmark for AWS. In v3 all checks are independent from any security framework and they have its own name and ID.
|
||||
|
||||
If you need more information about how new compliance implementation works in Prowler v3 see [Compliance](../compliance.md) section.
|
||||
If you need more information about how new compliance implementation works in Prowler v3 see [Compliance](../../compliance/) section.
|
||||
|
||||
```
|
||||
checks_v3_to_v2_mapping = {
|
||||
@@ -12,13 +12,13 @@ checks_v3_to_v2_mapping = {
|
||||
"account_security_questions_are_registered_in_the_aws_account": "check115",
|
||||
"acm_certificates_expiration_check": "extra730",
|
||||
"acm_certificates_transparency_logs_enabled": "extra724",
|
||||
"apigateway_restapi_authorizers_enabled": "extra746",
|
||||
"apigateway_restapi_client_certificate_enabled": "extra743",
|
||||
"apigateway_restapi_public": "extra745",
|
||||
"apigateway_restapi_logging_enabled": "extra722",
|
||||
"apigateway_restapi_waf_acl_attached": "extra744",
|
||||
"apigatewayv2_api_access_logging_enabled": "extra7156",
|
||||
"apigatewayv2_api_authorizers_enabled": "extra7157",
|
||||
"apigateway_authorizers_enabled": "extra746",
|
||||
"apigateway_client_certificate_enabled": "extra743",
|
||||
"apigateway_endpoint_public": "extra745",
|
||||
"apigateway_logging_enabled": "extra722",
|
||||
"apigateway_waf_acl_attached": "extra744",
|
||||
"apigatewayv2_access_logging_enabled": "extra7156",
|
||||
"apigatewayv2_authorizers_enabled": "extra7157",
|
||||
"appstream_fleet_default_internet_access_disabled": "extra7193",
|
||||
"appstream_fleet_maximum_session_duration": "extra7190",
|
||||
"appstream_fleet_session_disconnect_timeout": "extra7191",
|
||||
@@ -31,7 +31,7 @@ checks_v3_to_v2_mapping = {
|
||||
"awslambda_function_url_cors_policy": "extra7180",
|
||||
"awslambda_function_url_public": "extra7179",
|
||||
"awslambda_function_using_supported_runtimes": "extra762",
|
||||
"cloudformation_stack_outputs_find_secrets": "extra742",
|
||||
"cloudformation_outputs_find_secrets": "extra742",
|
||||
"cloudformation_stacks_termination_protection_enabled": "extra7154",
|
||||
"cloudfront_distributions_field_level_encryption_enabled": "extra767",
|
||||
"cloudfront_distributions_geo_restrictions_enabled": "extra732",
|
||||
@@ -84,7 +84,7 @@ checks_v3_to_v2_mapping = {
|
||||
"ec2_ebs_snapshots_encrypted": "extra740",
|
||||
"ec2_ebs_volume_encryption": "extra729",
|
||||
"ec2_elastic_ip_shodan": "extra7102",
|
||||
"ec2_elastic_ip_unassigned": "extra7146",
|
||||
"ec2_elastic_ip_unassgined": "extra7146",
|
||||
"ec2_instance_imdsv2_enabled": "extra786",
|
||||
"ec2_instance_internet_facing_with_instance_profile": "extra770",
|
||||
"ec2_instance_managed_by_ssm": "extra7124",
|
||||
@@ -113,6 +113,7 @@ checks_v3_to_v2_mapping = {
|
||||
"ec2_securitygroup_allow_wide_open_public_ipv4": "extra778",
|
||||
"ec2_securitygroup_default_restrict_traffic": "check43",
|
||||
"ec2_securitygroup_from_launch_wizard": "extra7173",
|
||||
"ec2_securitygroup_in_use_without_ingress_filtering": "extra74",
|
||||
"ec2_securitygroup_not_used": "extra75",
|
||||
"ec2_securitygroup_with_many_ingress_egress_rules": "extra777",
|
||||
"ecr_repositories_lifecycle_policy_enabled": "extra7194",
|
||||
@@ -137,6 +138,7 @@ checks_v3_to_v2_mapping = {
|
||||
"elbv2_internet_facing": "extra79",
|
||||
"elbv2_listeners_underneath": "extra7158",
|
||||
"elbv2_logging_enabled": "extra717",
|
||||
"elbv2_request_smugling": "extra7142",
|
||||
"elbv2_ssl_listeners": "extra793",
|
||||
"elbv2_waf_acl_attached": "extra7129",
|
||||
"emr_cluster_account_public_block_enabled": "extra7178",
|
||||
@@ -157,8 +159,9 @@ checks_v3_to_v2_mapping = {
|
||||
"iam_administrator_access_with_mfa": "extra71",
|
||||
"iam_avoid_root_usage": "check11",
|
||||
"iam_check_saml_providers_sts": "extra733",
|
||||
"iam_customer_attached_policy_no_administrative_privileges": "subset of check122",
|
||||
"iam_customer_unattached_policy_no_administrative_privileges": "subset of check122",
|
||||
"iam_disable_30_days_credentials": "extra774",
|
||||
"iam_disable_45_days_credentials": "extra7198",
|
||||
"iam_disable_90_days_credentials": "check13",
|
||||
"iam_no_custom_policy_permissive_role_assumption": "extra7100",
|
||||
"iam_no_expired_server_certificates_stored": "extra7199",
|
||||
"iam_no_root_access_key": "check112",
|
||||
@@ -171,12 +174,11 @@ checks_v3_to_v2_mapping = {
|
||||
"iam_password_policy_uppercase": "check15",
|
||||
"iam_policy_allows_privilege_escalation": "extra7185",
|
||||
"iam_policy_attached_only_to_group_or_roles": "check116",
|
||||
"iam_policy_no_administrative_privileges": "check122",
|
||||
"iam_root_hardware_mfa_enabled": "check114",
|
||||
"iam_root_mfa_enabled": "check113",
|
||||
"iam_rotate_access_key_90_days": "check14",
|
||||
"iam_support_role_created": "check120",
|
||||
"iam_user_accesskey_unused": "subset of check13,extra774,extra7198",
|
||||
"iam_user_console_access_unused": "subset of check13,extra774,extra7198",
|
||||
"iam_user_hardware_mfa_enabled": "extra7125",
|
||||
"iam_user_mfa_enabled_console_access": "check12",
|
||||
"iam_user_no_setup_initial_access_key": "check121",
|
||||
|
||||
@@ -18,10 +18,10 @@ prowler azure --sp-env-auth
|
||||
prowler azure --az-cli-auth
|
||||
|
||||
# To use browser authentication
|
||||
prowler azure --browser-auth --tenant-id "XXXXXXXX"
|
||||
prowler azure --browser-auth
|
||||
|
||||
# To use managed identity auth
|
||||
prowler azure --managed-identity-auth
|
||||
```
|
||||
|
||||
To use Prowler you need to set up also the permissions required to access your resources in your Azure account, to more details refer to [Requirements](../../getting-started/requirements.md)
|
||||
To use Prowler you need to set up also the permissions required to access your resources in your Azure account, to more details refer to [Requirements](/getting-started/requirements)
|
||||
|
||||
@@ -1,16 +0,0 @@
|
||||
# Use non default Azure regions
|
||||
|
||||
Microsoft provides clouds for compliance with regional laws, which are available for your use.
|
||||
By default, Prowler uses `AzureCloud` cloud which is the comercial one. (you can list all the available with `az cloud list --output table`).
|
||||
|
||||
At the time of writing this documentation the available Azure Clouds from different regions are the following:
|
||||
- AzureCloud
|
||||
- AzureChinaCloud
|
||||
- AzureUSGovernment
|
||||
- AzureGermanCloud
|
||||
|
||||
If you want to change the default one you must include the flag `--azure-region`, i.e.:
|
||||
|
||||
```console
|
||||
prowler azure --az-cli-auth --azure-region AzureChinaCloud
|
||||
```
|
||||
@@ -1,20 +0,0 @@
|
||||
# Check Aliases
|
||||
|
||||
Prowler allows you to use aliases for the checks. You only have to add the `CheckAliases` key to the check's metadata with a list of the aliases:
|
||||
```json title="check.metadata.json"
|
||||
"Provider": "<provider>",
|
||||
"CheckID": "<check_id>",
|
||||
"CheckTitle": "<check_title>",
|
||||
"CheckAliases": [
|
||||
"<check_alias_1>"
|
||||
"<check_alias_2>",
|
||||
...
|
||||
],
|
||||
...
|
||||
```
|
||||
Then, you can execute the check either with its check ID or with one of the previous aliases:
|
||||
```shell
|
||||
prowler <provider> -c/--checks <check_alias_1>
|
||||
|
||||
Using alias <check_alias_1> for check <check_id>...
|
||||
```
|
||||
@@ -8,36 +8,28 @@ prowler <provider> --list-compliance
|
||||
```
|
||||
Currently, the available frameworks are:
|
||||
|
||||
- `aws_account_security_onboarding_aws`
|
||||
- `aws_audit_manager_control_tower_guardrails_aws`
|
||||
- `aws_foundational_security_best_practices_aws`
|
||||
- `aws_well_architected_framework_reliability_pillar_aws`
|
||||
- `aws_well_architected_framework_security_pillar_aws`
|
||||
- `cis_1.4_aws`
|
||||
- `cis_1.5_aws`
|
||||
- `cis_2.0_aws`
|
||||
- `cis_2.0_gcp`
|
||||
- `cis_3.0_aws`
|
||||
- `cisa_aws`
|
||||
- `ens_rd2022_aws`
|
||||
- `aws_audit_manager_control_tower_guardrails_aws`
|
||||
- `aws_foundational_security_best_practices_aws`
|
||||
- `cisa_aws`
|
||||
- `fedramp_low_revision_4_aws`
|
||||
- `fedramp_moderate_revision_4_aws`
|
||||
- `ffiec_aws`
|
||||
- `aws_foundational_technical_review_aws`
|
||||
- `gdpr_aws`
|
||||
- `gxp_21_cfr_part_11_aws`
|
||||
- `gxp_eu_annex_11_aws`
|
||||
- `gxp_21_cfr_part_11_aws`
|
||||
- `hipaa_aws`
|
||||
- `iso27001_2013_aws`
|
||||
- `mitre_attack_aws`
|
||||
- `nist_800_171_revision_2_aws`
|
||||
- `nist_800_53_revision_4_aws`
|
||||
- `nist_800_53_revision_5_aws`
|
||||
- `nist_800_171_revision_2_aws`
|
||||
- `nist_csf_1.1_aws`
|
||||
- `pci_3.2.1_aws`
|
||||
- `rbi_cyber_security_framework_aws`
|
||||
- `soc2_aws`
|
||||
|
||||
|
||||
## List Requirements of Compliance Frameworks
|
||||
For each compliance framework, you can use option `--list-compliance-requirements` to list its requirements:
|
||||
```sh
|
||||
@@ -89,4 +81,36 @@ Standard results will be shown and additionally the framework information as the
|
||||
|
||||
## Create and contribute adding other Security Frameworks
|
||||
|
||||
This information is part of the Developer Guide and can be found here: https://docs.prowler.cloud/en/latest/tutorials/developer-guide/.
|
||||
If you want to create or contribute with your own security frameworks or add public ones to Prowler you need to make sure the checks are available if not you have to create your own. Then create a compliance file per provider like in `prowler/compliance/aws/` and name it as `<framework>_<version>_<provider>.json` then follow the following format to create yours.
|
||||
|
||||
Each file version of a framework will have the following structure at high level with the case that each framework needs to be generally identified), one requirement can be also called one control but one requirement can be linked to multiple prowler checks.:
|
||||
|
||||
- `Framework`: string. Indistiguish name of the framework, like CIS
|
||||
- `Provider`: string. Provider where the framework applies, such as AWS, Azure, OCI,...
|
||||
- `Version`: string. Version of the framework itself, like 1.4 for CIS.
|
||||
- `Requirements`: array of objects. Include all requirements or controls with the mapping to Prowler.
|
||||
- `Requirements_Id`: string. Unique identifier per each requirement in the specific framework
|
||||
- `Requirements_Description`: string. Description as in the framework.
|
||||
- `Requirements_Attributes`: array of objects. Includes all needed attributes per each requirement, like levels, sections, etc. Whatever helps to create a dedicated report with the result of the findings. Attributes would be taken as closely as possible from the framework's own terminology directly.
|
||||
- `Requirements_Checks`: array. Prowler checks that are needed to prove this requirement. It can be one or multiple checks. In case of no automation possible this can be empty.
|
||||
|
||||
```
|
||||
{
|
||||
"Framework": "<framework>-<provider>",
|
||||
"Version": "<version>",
|
||||
"Requirements": [
|
||||
{
|
||||
"Id": "<unique-id>",
|
||||
"Description": "Requiemente full description",
|
||||
"Checks": [
|
||||
"Here is the prowler check or checks that is going to be executed"
|
||||
],
|
||||
"Attributes": [
|
||||
{
|
||||
<Add here your custom attributes.>
|
||||
}
|
||||
]
|
||||
}
|
||||
```
|
||||
|
||||
Finally, to have a proper output file for your reports, your framework data model has to be created in `prowler/lib/outputs/models.py` and also the CLI table output in `prowler/lib/outputs/compliance.py`.
|
||||
|
||||
@@ -1,158 +1,76 @@
|
||||
# Configuration File
|
||||
Several Prowler's checks have user configurable variables that can be modified in a common **configuration file**. This file can be found in the following [path](https://github.com/prowler-cloud/prowler/blob/master/prowler/config/config.yaml):
|
||||
Several Prowler's checks have user configurable variables that can be modified in a common **configuration file**.
|
||||
This file can be found in the following path:
|
||||
```
|
||||
prowler/config/config.yaml
|
||||
```
|
||||
|
||||
Also you can input a custom configuration file using the `--config-file` argument.
|
||||
## Configurable Checks
|
||||
The following list includes all the checks with configurable variables that can be changed in the mentioned configuration yaml file:
|
||||
|
||||
## AWS
|
||||
1. aws.ec2_elastic_ip_shodan
|
||||
- shodan_api_key (String)
|
||||
- aws.ec2_securitygroup_with_many_ingress_egress_rules
|
||||
- max_security_group_rules (Integer)
|
||||
- aws.ec2_instance_older_than_specific_days
|
||||
- max_ec2_instance_age_in_days (Integer)
|
||||
- aws.vpc_endpoint_connections_trust_boundaries
|
||||
- trusted_account_ids (List of Strings)
|
||||
- aws.vpc_endpoint_services_allowed_principals_trust_boundaries
|
||||
- trusted_account_ids (List of Strings)
|
||||
- aws.cloudwatch_log_group_retention_policy_specific_days_enabled
|
||||
- log_group_retention_days (Integer)
|
||||
- aws.appstream_fleet_session_idle_disconnect_timeout
|
||||
- max_idle_disconnect_timeout_in_seconds (Integer)
|
||||
- aws.appstream_fleet_session_disconnect_timeout
|
||||
- max_disconnect_timeout_in_seconds (Integer)
|
||||
- aws.appstream_fleet_maximum_session_duration
|
||||
- max_session_duration_seconds (Integer)
|
||||
- aws.awslambda_function_using_supported_runtimes
|
||||
- obsolete_lambda_runtimes (List of Strings)
|
||||
|
||||
### Configurable Checks
|
||||
The following list includes all the AWS checks with configurable variables that can be changed in the configuration yaml file:
|
||||
## Config Yaml File
|
||||
|
||||
| Check Name | Value | Type |
|
||||
|---------------------------------------------------------------|--------------------------------------------------|-----------------|
|
||||
| `iam_user_accesskey_unused` | `max_unused_access_keys_days` | Integer |
|
||||
| `iam_user_console_access_unused` | `max_console_access_days` | Integer |
|
||||
| `ec2_elastic_ip_shodan` | `shodan_api_key` | String |
|
||||
| `ec2_securitygroup_with_many_ingress_egress_rules` | `max_security_group_rules` | Integer |
|
||||
| `ec2_instance_older_than_specific_days` | `max_ec2_instance_age_in_days` | Integer |
|
||||
| `vpc_endpoint_connections_trust_boundaries` | `trusted_account_ids` | List of Strings |
|
||||
| `vpc_endpoint_services_allowed_principals_trust_boundaries` | `trusted_account_ids` | List of Strings |
|
||||
| `cloudwatch_log_group_retention_policy_specific_days_enabled` | `log_group_retention_days` | Integer |
|
||||
| `appstream_fleet_session_idle_disconnect_timeout` | `max_idle_disconnect_timeout_in_seconds` | Integer |
|
||||
| `appstream_fleet_session_disconnect_timeout` | `max_disconnect_timeout_in_seconds` | Integer |
|
||||
| `appstream_fleet_maximum_session_duration` | `max_session_duration_seconds` | Integer |
|
||||
| `awslambda_function_using_supported_runtimes` | `obsolete_lambda_runtimes` | Integer |
|
||||
| `organizations_scp_check_deny_regions` | `organizations_enabled_regions` | List of Strings |
|
||||
| `organizations_delegated_administrators` | `organizations_trusted_delegated_administrators` | List of Strings |
|
||||
| `ecr_repositories_scan_vulnerabilities_in_latest_image` | `ecr_repository_vulnerability_minimum_severity` | String |
|
||||
| `trustedadvisor_premium_support_plan_subscribed` | `verify_premium_support_plans` | Boolean |
|
||||
| `config_recorder_all_regions_enabled` | `allowlist_non_default_regions` | Boolean |
|
||||
| `drs_job_exist` | `allowlist_non_default_regions` | Boolean |
|
||||
| `guardduty_is_enabled` | `allowlist_non_default_regions` | Boolean |
|
||||
| `securityhub_enabled` | `allowlist_non_default_regions` | Boolean |
|
||||
# AWS EC2 Configuration
|
||||
# aws.ec2_elastic_ip_shodan
|
||||
shodan_api_key: null
|
||||
# aws.ec2_securitygroup_with_many_ingress_egress_rules --> by default is 50 rules
|
||||
max_security_group_rules: 50
|
||||
# aws.ec2_instance_older_than_specific_days --> by default is 6 months (180 days)
|
||||
max_ec2_instance_age_in_days: 180
|
||||
|
||||
## Azure
|
||||
# AWS VPC Configuration (vpc_endpoint_connections_trust_boundaries, vpc_endpoint_services_allowed_principals_trust_boundaries)
|
||||
# Single account environment: No action required. The AWS account number will be automatically added by the checks.
|
||||
# Multi account environment: Any additional trusted account number should be added as a space separated list, e.g.
|
||||
# trusted_account_ids : ["123456789012", "098765432109", "678901234567"]
|
||||
trusted_account_ids: []
|
||||
|
||||
### Configurable Checks
|
||||
The following list includes all the Azure checks with configurable variables that can be changed in the configuration yaml file:
|
||||
# AWS Cloudwatch Configuration
|
||||
# aws.cloudwatch_log_group_retention_policy_specific_days_enabled --> by default is 365 days
|
||||
log_group_retention_days: 365
|
||||
|
||||
| Check Name | Value | Type |
|
||||
|---------------------------------------------------------------|--------------------------------------------------|-----------------|
|
||||
| `network_public_ip_shodan` | `shodan_api_key` | String |
|
||||
| `app_ensure_php_version_is_latest` | `php_latest_version` | String |
|
||||
| `app_ensure_python_version_is_latest` | `python_latest_version` | String |
|
||||
| `app_ensure_java_version_is_latest` | `java_latest_version` | String |
|
||||
# AWS AppStream Session Configuration
|
||||
# aws.appstream_fleet_session_idle_disconnect_timeout
|
||||
max_idle_disconnect_timeout_in_seconds: 600 # 10 Minutes
|
||||
# aws.appstream_fleet_session_disconnect_timeout
|
||||
max_disconnect_timeout_in_seconds: 300 # 5 Minutes
|
||||
# aws.appstream_fleet_maximum_session_duration
|
||||
max_session_duration_seconds: 36000 # 10 Hours
|
||||
|
||||
|
||||
## GCP
|
||||
|
||||
### Configurable Checks
|
||||
|
||||
## Config YAML File Structure
|
||||
|
||||
???+ note
|
||||
This is the new Prowler configuration file format. The old one without provider keys is still compatible just for the AWS provider.
|
||||
|
||||
```yaml title="config.yaml"
|
||||
# AWS Configuration
|
||||
aws:
|
||||
|
||||
# AWS Global Configuration
|
||||
# aws.allowlist_non_default_regions --> Allowlist Failed Findings in non-default regions for GuardDuty, SecurityHub, DRS and Config
|
||||
allowlist_non_default_regions: False
|
||||
|
||||
# AWS IAM Configuration
|
||||
# aws.iam_user_accesskey_unused --> CIS recommends 45 days
|
||||
max_unused_access_keys_days: 45
|
||||
# aws.iam_user_console_access_unused --> CIS recommends 45 days
|
||||
max_console_access_days: 45
|
||||
|
||||
# AWS EC2 Configuration
|
||||
# aws.ec2_elastic_ip_shodan
|
||||
shodan_api_key: null
|
||||
# aws.ec2_securitygroup_with_many_ingress_egress_rules --> by default is 50 rules
|
||||
max_security_group_rules: 50
|
||||
# aws.ec2_instance_older_than_specific_days --> by default is 6 months (180 days)
|
||||
max_ec2_instance_age_in_days: 180
|
||||
|
||||
# AWS VPC Configuration (vpc_endpoint_connections_trust_boundaries, vpc_endpoint_services_allowed_principals_trust_boundaries)
|
||||
# Single account environment: No action required. The AWS account number will be automatically added by the checks.
|
||||
# Multi account environment: Any additional trusted account number should be added as a space separated list, e.g.
|
||||
# trusted_account_ids : ["123456789012", "098765432109", "678901234567"]
|
||||
trusted_account_ids: []
|
||||
|
||||
# AWS Cloudwatch Configuration
|
||||
# aws.cloudwatch_log_group_retention_policy_specific_days_enabled --> by default is 365 days
|
||||
log_group_retention_days: 365
|
||||
|
||||
# AWS AppStream Session Configuration
|
||||
# aws.appstream_fleet_session_idle_disconnect_timeout
|
||||
max_idle_disconnect_timeout_in_seconds: 600 # 10 Minutes
|
||||
# aws.appstream_fleet_session_disconnect_timeout
|
||||
max_disconnect_timeout_in_seconds: 300 # 5 Minutes
|
||||
# aws.appstream_fleet_maximum_session_duration
|
||||
max_session_duration_seconds: 36000 # 10 Hours
|
||||
|
||||
# AWS Lambda Configuration
|
||||
# aws.awslambda_function_using_supported_runtimes
|
||||
obsolete_lambda_runtimes:
|
||||
# AWS Lambda Configuration
|
||||
# aws.awslambda_function_using_supported_runtimes
|
||||
obsolete_lambda_runtimes:
|
||||
[
|
||||
"python3.6",
|
||||
"python2.7",
|
||||
"nodejs4.3",
|
||||
"nodejs4.3-edge",
|
||||
"nodejs6.10",
|
||||
"nodejs",
|
||||
"nodejs8.10",
|
||||
"nodejs10.x",
|
||||
"dotnetcore1.0",
|
||||
"dotnetcore2.0",
|
||||
"dotnetcore2.1",
|
||||
"ruby2.5",
|
||||
"python3.6",
|
||||
"python2.7",
|
||||
"nodejs4.3",
|
||||
"nodejs4.3-edge",
|
||||
"nodejs6.10",
|
||||
"nodejs",
|
||||
"nodejs8.10",
|
||||
"nodejs10.x",
|
||||
"dotnetcore1.0",
|
||||
"dotnetcore2.0",
|
||||
"dotnetcore2.1",
|
||||
"ruby2.5",
|
||||
]
|
||||
|
||||
# AWS Organizations
|
||||
# organizations_scp_check_deny_regions
|
||||
# organizations_enabled_regions: [
|
||||
# 'eu-central-1',
|
||||
# 'eu-west-1',
|
||||
# "us-east-1"
|
||||
# ]
|
||||
organizations_enabled_regions: []
|
||||
organizations_trusted_delegated_administrators: []
|
||||
|
||||
# AWS ECR
|
||||
# ecr_repositories_scan_vulnerabilities_in_latest_image
|
||||
# CRITICAL
|
||||
# HIGH
|
||||
# MEDIUM
|
||||
ecr_repository_vulnerability_minimum_severity: "MEDIUM"
|
||||
|
||||
# AWS Trusted Advisor
|
||||
# trustedadvisor_premium_support_plan_subscribed
|
||||
verify_premium_support_plans: True
|
||||
|
||||
# Azure Configuration
|
||||
azure:
|
||||
# Azure Network Configuration
|
||||
# azure.network_public_ip_shodan
|
||||
shodan_api_key: null
|
||||
|
||||
# Azure App Configuration
|
||||
# azure.app_ensure_php_version_is_latest
|
||||
php_latest_version: "8.2"
|
||||
# azure.app_ensure_python_version_is_latest
|
||||
python_latest_version: "3.12"
|
||||
# azure.app_ensure_java_version_is_latest
|
||||
java_latest_version: "17"
|
||||
|
||||
# GCP Configuration
|
||||
gcp:
|
||||
# GCP Compute Configuration
|
||||
# gcp.compute_public_address_shodan
|
||||
shodan_api_key: null
|
||||
|
||||
```
|
||||
|
||||
@@ -1,43 +0,0 @@
|
||||
# Custom Checks Metadata
|
||||
|
||||
In certain organizations, the severity of specific checks might differ from the default values defined in the check's metadata. For instance, while `s3_bucket_level_public_access_block` could be deemed `critical` for some organizations, others might assign a different severity level.
|
||||
|
||||
The custom metadata option offers a means to override default metadata set by Prowler
|
||||
|
||||
You can utilize `--custom-checks-metadata-file` followed by the path to your custom checks metadata YAML file.
|
||||
|
||||
## Available Fields
|
||||
|
||||
The list of supported check's metadata fields that can be override are listed as follows:
|
||||
|
||||
- Severity
|
||||
|
||||
## File Syntax
|
||||
|
||||
This feature is available for all the providers supported in Prowler since the metadata format is common between all the providers. The following is the YAML format for the custom checks metadata file:
|
||||
```yaml title="custom_checks_metadata.yaml"
|
||||
CustomChecksMetadata:
|
||||
aws:
|
||||
Checks:
|
||||
s3_bucket_level_public_access_block:
|
||||
Severity: high
|
||||
s3_bucket_no_mfa_delete:
|
||||
Severity: high
|
||||
azure:
|
||||
Checks:
|
||||
storage_infrastructure_encryption_is_enabled:
|
||||
Severity: medium
|
||||
gcp:
|
||||
Checks:
|
||||
compute_instance_public_ip:
|
||||
Severity: critical
|
||||
```
|
||||
|
||||
## Usage
|
||||
|
||||
Executing the following command will assess all checks and generate a report while overriding the metadata for those checks:
|
||||
```sh
|
||||
prowler <provider> --custom-checks-metadata-file <path/to/custom/metadata>
|
||||
```
|
||||
|
||||
This customization feature enables organizations to tailor the severity of specific checks based on their unique requirements, providing greater flexibility in security assessment and reporting.
|
||||
@@ -1,26 +0,0 @@
|
||||
# GCP authentication
|
||||
|
||||
Prowler will use by default your User Account credentials, you can configure it using:
|
||||
|
||||
- `gcloud init` to use a new account
|
||||
- `gcloud config set account <account>` to use an existing account
|
||||
|
||||
Then, obtain your access credentials using: `gcloud auth application-default login`
|
||||
|
||||
Otherwise, you can generate and download Service Account keys in JSON format (refer to https://cloud.google.com/iam/docs/creating-managing-service-account-keys) and provide the location of the file with the following argument:
|
||||
|
||||
```console
|
||||
prowler gcp --credentials-file path
|
||||
```
|
||||
|
||||
???+ note
|
||||
`prowler` will scan the GCP project associated with the credentials.
|
||||
|
||||
|
||||
Prowler will follow the same credentials search as [Google authentication libraries](https://cloud.google.com/docs/authentication/application-default-credentials#search_order):
|
||||
|
||||
1. [GOOGLE_APPLICATION_CREDENTIALS environment variable](https://cloud.google.com/docs/authentication/application-default-credentials#GAC)
|
||||
2. [User credentials set up by using the Google Cloud CLI](https://cloud.google.com/docs/authentication/application-default-credentials#personal)
|
||||
3. [The attached service account, returned by the metadata server](https://cloud.google.com/docs/authentication/application-default-credentials#attached-sa)
|
||||
|
||||
Those credentials must be associated to a user or service account with proper permissions to do all checks. To make sure, add the `Viewer` role to the member associated with the credentials.
|
||||
@@ -1,71 +0,0 @@
|
||||
# Ignore Unused Services
|
||||
|
||||
???+ note
|
||||
Currently only available on the AWS provider.
|
||||
|
||||
Prowler allows you to ignore unused services findings, so you can reduce the number of findings in Prowler's reports.
|
||||
|
||||
```console
|
||||
prowler <provider> --ignore-unused-services
|
||||
```
|
||||
|
||||
## Services that can be ignored
|
||||
### AWS
|
||||
#### Athena
|
||||
When you create an AWS Account, Athena will create a default primary workgroup for you.
|
||||
Prowler will check if that workgroup is enabled and if it is being used by checking if there were queries in the last 45 days.
|
||||
If not, the findings of the following checks will not appear:
|
||||
|
||||
- `athena_workgroup_encryption`
|
||||
- `athena_workgroup_enforce_configuration`
|
||||
|
||||
#### CloudTrail
|
||||
AWS CloudTrail should have at least one trail with a data event to record all S3 object-level API operations, Prowler will check first if there are S3 buckets in your account before alerting this issue.
|
||||
|
||||
- `cloudtrail_s3_dataevents_read_enabled`
|
||||
- `cloudtrail_s3_dataevents_write_enabled`
|
||||
|
||||
#### EC2
|
||||
If EBS default encyption is not enabled, sensitive information at rest is not protected in EC2. But Prowler will only create a finding if there are EBS Volumes where this default configuration could be enforced by default.
|
||||
|
||||
- `ec2_ebs_default_encryption`
|
||||
|
||||
If your Security groups are not properly configured the attack surface is increased, nonetheless, Prowler will detect those security groups that are being used (they are attached) to only notify those that are being used. This logic applies to the 15 checks related to open ports in security groups.
|
||||
|
||||
- `ec2_securitygroup_allow_ingress_from_internet_to_port_X` (15 checks)
|
||||
|
||||
Prowler will also check for used Network ACLs to only alerts those with open ports that are being used.
|
||||
|
||||
- `ec2_networkacl_allow_ingress_X_port` (3 checks)
|
||||
|
||||
|
||||
#### Glue
|
||||
It is a best practice to encrypt both metadata and connection passwords in AWS Glue Data Catalogs, however, Prowler will detect if the service is in use by checking if there are any Data Catalog tables.
|
||||
|
||||
- `glue_data_catalogs_connection_passwords_encryption_enabled`
|
||||
- `glue_data_catalogs_metadata_encryption_enabled`
|
||||
|
||||
#### Inspector
|
||||
Amazon Inspector is a vulnerability discovery service that automates continuous scanning for security vulnerabilities within your Amazon EC2, Amazon ECR, and AWS Lambda environments. Prowler recommends to enable it and resolve all the Inspector's findings. Ignoring the unused services, Prowler will only notify you if there are any Lambda functions, EC2 instances or ECR repositories in the region where Amazon inspector should be enabled.
|
||||
|
||||
- `inspector2_is_enabled`
|
||||
|
||||
#### Macie
|
||||
Amazon Macie is a security service that uses machine learning to automatically discover, classify and protect sensitive data in S3 buckets. Prowler will only create a finding when Macie is not enabled if there are S3 buckets in your account.
|
||||
|
||||
- `macie_is_enabled`
|
||||
|
||||
#### Network Firewall
|
||||
Without a network firewall, it can be difficult to monitor and control traffic within the VPC. However, Prowler will only alert you for those VPCs that are in use, in other words, only the VPCs where you have ENIs (network interfaces).
|
||||
|
||||
- `networkfirewall_in_all_vpc`
|
||||
|
||||
#### S3
|
||||
You should enable Public Access Block at the account level to prevent the exposure of your data stored in S3. Prowler though will only check this block configuration if you have S3 buckets in your AWS account.
|
||||
|
||||
- `s3_account_level_public_access_blocks`
|
||||
|
||||
#### VPC
|
||||
VPC Flow Logs provide visibility into network traffic that traverses the VPC and can be used to detect anomalous traffic or insight during security workflows. Nevertheless, Prowler will only check if the Flow Logs are enabled for those VPCs that are in use, in other words, only the VPCs where you have ENIs (network interfaces).
|
||||
|
||||
- `vpc_flow_logs_enabled`
|
||||
|
Before Width: | Height: | Size: 94 KiB After Width: | Height: | Size: 51 KiB |
|
Before Width: | Height: | Size: 61 KiB |
|
Before Width: | Height: | Size: 67 KiB |
|
Before Width: | Height: | Size: 200 KiB |
|
Before Width: | Height: | Size: 456 KiB |
|
Before Width: | Height: | Size: 69 KiB |
@@ -1,38 +0,0 @@
|
||||
# Integrations
|
||||
|
||||
## Slack
|
||||
|
||||
Prowler can be integrated with [Slack](https://slack.com/) to send a summary of the execution having configured a Slack APP in your channel with the following command:
|
||||
|
||||
```sh
|
||||
prowler <provider> --slack
|
||||
```
|
||||
|
||||

|
||||
|
||||
???+ note
|
||||
Slack integration needs SLACK_API_TOKEN and SLACK_CHANNEL_ID environment variables.
|
||||
|
||||
### Configuration
|
||||
|
||||
To configure the Slack Integration, follow the next steps:
|
||||
|
||||
1. Create a Slack Application:
|
||||
- Go to [Slack API page](https://api.slack.com/tutorials/tracks/getting-a-token), scroll down to the *Create app* button and select your workspace:
|
||||

|
||||
|
||||
- Install the application in your selected workspaces:
|
||||

|
||||
|
||||
- Get the *Slack App OAuth Token* that Prowler needs to send the message:
|
||||

|
||||
|
||||
2. Optionally, create a Slack Channel (you can use an existing one)
|
||||
|
||||
3. Integrate the created Slack App to your Slack channel:
|
||||
- Click on the channel, go to the Integrations tab, and Add an App.
|
||||

|
||||
|
||||
4. Set the following environment variables that Prowler will read:
|
||||
- `SLACK_API_TOKEN`: the *Slack App OAuth Token* that was previously get.
|
||||
- `SLACK_CHANNEL_ID`: the name of your Slack Channel where Prowler will send the message.
|
||||
@@ -18,8 +18,7 @@ You can establish the log level of Prowler with `--log-level` option:
|
||||
prowler <provider> --log-level {DEBUG,INFO,WARNING,ERROR,CRITICAL}
|
||||
```
|
||||
|
||||
???+ note
|
||||
By default, Prowler will run with the `CRITICAL` log level, since critical errors will abort the execution.
|
||||
> By default, Prowler will run with the `CRITICAL` log level, since critical errors will abort the execution.
|
||||
|
||||
## Export Logs to File
|
||||
|
||||
@@ -46,5 +45,4 @@ An example of a log file will be the following:
|
||||
"message": "eu-west-2 -- ClientError[124]: An error occurred (UnauthorizedOperation) when calling the DescribeNetworkAcls operation: You are not authorized to perform this operation."
|
||||
}
|
||||
|
||||
???+ note
|
||||
Each finding is represented as a `json` object.
|
||||
> NOTE: Each finding is represented as a `json` object.
|
||||
|
||||
@@ -14,11 +14,6 @@ Prowler can only display the failed findings:
|
||||
```console
|
||||
prowler <provider> -q/--quiet
|
||||
```
|
||||
## Disable Exit Code 3
|
||||
Prowler does not trigger exit code 3 with failed checks:
|
||||
```console
|
||||
prowler <provider> -z/--ignore-exit-code-3
|
||||
```
|
||||
## Hide Prowler Banner
|
||||
Prowler can run without showing its banner:
|
||||
```console
|
||||
@@ -56,41 +51,15 @@ prowler <provider> -e/--excluded-checks ec2 rds
|
||||
```console
|
||||
prowler <provider> -C/--checks-file <checks_list>.json
|
||||
```
|
||||
## Custom Checks
|
||||
Prowler allows you to include your custom checks with the flag:
|
||||
|
||||
## Severities
|
||||
Each check of Prowler has a severity, there are options related with it:
|
||||
|
||||
- List the available checks in the provider:
|
||||
```console
|
||||
prowler <provider> -x/--checks-folder <custom_checks_folder>
|
||||
prowler <provider> --list-severities
|
||||
```
|
||||
|
||||
???+ note
|
||||
S3 URIs are also supported as folders for custom checks, e.g. `s3://bucket/prefix/checks_folder/`. Make sure that the used credentials have `s3:GetObject` permissions in the S3 path where the custom checks are located.
|
||||
|
||||
The custom checks folder must contain one subfolder per check, each subfolder must be named as the check and must contain:
|
||||
|
||||
- An empty `__init__.py`: to make Python treat this check folder as a package.
|
||||
- A `check_name.py` containing the check's logic.
|
||||
- A `check_name.metadata.json` containing the check's metadata.
|
||||
|
||||
???+ note
|
||||
The check name must start with the service name followed by an underscore (e.g., ec2_instance_public_ip).
|
||||
|
||||
To see more information about how to write checks see the [Developer Guide](../developer-guide/checks.md#create-a-new-check-for-a-provider).
|
||||
|
||||
???+ note
|
||||
If you want to run ONLY your custom check(s), import it with -x (--checks-folder) and then run it with -c (--checks), e.g.:
|
||||
```console
|
||||
prowler aws -x s3://bucket/prowler/providers/aws/services/s3/s3_bucket_policy/ -c s3_bucket_policy
|
||||
```
|
||||
|
||||
## Severities
|
||||
Each of Prowler's checks has a severity, which can be:
|
||||
- informational
|
||||
- low
|
||||
- medium
|
||||
- high
|
||||
- critical
|
||||
|
||||
To execute specific severity(s):
|
||||
- Execute specific severity(s):
|
||||
```console
|
||||
prowler <provider> --severity critical high
|
||||
```
|
||||
@@ -122,3 +91,16 @@ prowler <provider> --list-categories
|
||||
```console
|
||||
prowler <provider> --categories
|
||||
```
|
||||
|
||||
## AWS
|
||||
|
||||
### Scan specific AWS Region
|
||||
Prowler can scan specific region(s) with:
|
||||
```console
|
||||
prowler <provider> -f/--filter-region eu-west-1 us-east-1
|
||||
```
|
||||
### Use AWS Profile
|
||||
Prowler can use your custom AWS Profile with:
|
||||
```console
|
||||
prowler <provider> -p/--profile <profile_name>
|
||||
```
|
||||
|
||||
@@ -1,188 +0,0 @@
|
||||
# Parallel Execution
|
||||
|
||||
The strategy used here will be to execute Prowler once per service. You can modify this approach as per your requirements.
|
||||
|
||||
This can help for really large accounts, but please be aware of AWS API rate limits:
|
||||
|
||||
1. **Service-Specific Limits**: Each AWS service has its own rate limits. For instance, Amazon EC2 might have different rate limits for launching instances versus making API calls to describe instances.
|
||||
2. **API Rate Limits**: Most of the rate limits in AWS are applied at the API level. Each API call to an AWS service counts towards the rate limit for that service.
|
||||
3. **Throttling Responses**: When you exceed the rate limit for a service, AWS responds with a throttling error. In AWS SDKs, these are typically represented as `ThrottlingException` or `RateLimitExceeded` errors.
|
||||
|
||||
For information on Prowler's retrier configuration please refer to this [page](https://docs.prowler.cloud/en/latest/tutorials/aws/boto3-configuration/).
|
||||
|
||||
???+ note
|
||||
You might need to increase the `--aws-retries-max-attempts` parameter from the default value of 3. The retrier follows an exponential backoff strategy.
|
||||
|
||||
## Linux
|
||||
|
||||
Generate a list of services that Prowler supports, and populate this info into a file:
|
||||
|
||||
```bash
|
||||
prowler aws --list-services | awk -F"- " '{print $2}' | sed '/^$/d' > services
|
||||
```
|
||||
|
||||
Make any modifications for services you would like to skip scanning by modifying this file.
|
||||
|
||||
Then create a new PowerShell script file `parallel-prowler.sh` and add the following contents. Update the `$profile` variable to the AWS CLI profile you want to run Prowler with.
|
||||
|
||||
```bash
|
||||
#!/bin/bash
|
||||
|
||||
# Change these variables as needed
|
||||
profile="your_profile"
|
||||
account_id=$(aws sts get-caller-identity --profile "${profile}" --query 'Account' --output text)
|
||||
|
||||
echo "Executing in account: ${account_id}"
|
||||
|
||||
# Maximum number of concurrent processes
|
||||
MAX_PROCESSES=5
|
||||
|
||||
# Loop through the services
|
||||
while read service; do
|
||||
echo "$(date '+%Y-%m-%d %H:%M:%S'): Starting job for service: ${service}"
|
||||
|
||||
# Run the command in the background
|
||||
(prowler -p "$profile" -s "$service" -F "${account_id}-${service}" --ignore-unused-services --only-logs; echo "$(date '+%Y-%m-%d %H:%M:%S') - ${service} has completed") &
|
||||
|
||||
# Check if we have reached the maximum number of processes
|
||||
while [ $(jobs -r | wc -l) -ge ${MAX_PROCESSES} ]; do
|
||||
# Wait for a second before checking again
|
||||
sleep 1
|
||||
done
|
||||
done < ./services
|
||||
|
||||
# Wait for all background processes to finish
|
||||
wait
|
||||
echo "All jobs completed"
|
||||
```
|
||||
|
||||
Output will be stored in the `output/` folder that is in the same directory from which you executed the script.
|
||||
|
||||
## Windows
|
||||
|
||||
Generate a list of services that Prowler supports, and populate this info into a file:
|
||||
|
||||
```powershell
|
||||
prowler aws --list-services | ForEach-Object {
|
||||
# Capture lines that are likely service names
|
||||
if ($_ -match '^\- \w+$') {
|
||||
$_.Trim().Substring(2)
|
||||
}
|
||||
} | Where-Object {
|
||||
# Filter out empty or null lines
|
||||
$_ -ne $null -and $_ -ne ''
|
||||
} | Set-Content -Path "services"
|
||||
```
|
||||
|
||||
Make any modifications for services you would like to skip scanning by modifying this file.
|
||||
|
||||
Then create a new PowerShell script file `parallel-prowler.ps1` and add the following contents. Update the `$profile` variable to the AWS CLI profile you want to run prowler with.
|
||||
|
||||
Change any parameters you would like when calling prowler in the `Start-Job -ScriptBlock` section. Note that you need to keep the `--only-logs` parameter, else some encoding issue occurs when trying to render the progress-bar and prowler won't successfully execute.
|
||||
|
||||
```powershell
|
||||
$profile = "your_profile"
|
||||
$account_id = Invoke-Expression -Command "aws sts get-caller-identity --profile $profile --query 'Account' --output text"
|
||||
|
||||
Write-Host "Executing Prowler in $account_id"
|
||||
|
||||
# Maximum number of concurrent jobs
|
||||
$MAX_PROCESSES = 5
|
||||
|
||||
# Read services from a file
|
||||
$services = Get-Content -Path "services"
|
||||
|
||||
# Array to keep track of started jobs
|
||||
$jobs = @()
|
||||
|
||||
foreach ($service in $services) {
|
||||
# Start the command as a job
|
||||
$job = Start-Job -ScriptBlock {
|
||||
prowler -p ${using:profile} -s ${using:service} -F "${using:account_id}-${using:service}" --ignore-unused-services --only-logs
|
||||
$endTimestamp = Get-Date -Format "yyyy-MM-dd HH:mm:ss"
|
||||
Write-Output "${endTimestamp} - $using:service has completed"
|
||||
}
|
||||
$jobs += $job
|
||||
Write-Host "$(Get-Date -Format 'yyyy-MM-dd HH:mm:ss') - Starting job for service: $service"
|
||||
|
||||
# Check if we have reached the maximum number of jobs
|
||||
while (($jobs | Where-Object { $_.State -eq 'Running' }).Count -ge $MAX_PROCESSES) {
|
||||
Start-Sleep -Seconds 1
|
||||
# Check for any completed jobs and receive their output
|
||||
$completedJobs = $jobs | Where-Object { $_.State -eq 'Completed' }
|
||||
foreach ($completedJob in $completedJobs) {
|
||||
Receive-Job -Job $completedJob -Keep | ForEach-Object { Write-Host $_ }
|
||||
$jobs = $jobs | Where-Object { $_.Id -ne $completedJob.Id }
|
||||
Remove-Job -Job $completedJob
|
||||
}
|
||||
}
|
||||
}
|
||||
|
||||
# Check for any remaining completed jobs
|
||||
$remainingCompletedJobs = $jobs | Where-Object { $_.State -eq 'Completed' }
|
||||
foreach ($remainingJob in $remainingCompletedJobs) {
|
||||
Receive-Job -Job $remainingJob -Keep | ForEach-Object { Write-Host $_ }
|
||||
Remove-Job -Job $remainingJob
|
||||
}
|
||||
|
||||
Write-Host "$(Get-Date -Format 'yyyy-MM-dd HH:mm:ss') - All jobs completed"
|
||||
```
|
||||
|
||||
Output will be stored in `C:\Users\YOUR-USER\Documents\output\`
|
||||
|
||||
## Combining the output files
|
||||
|
||||
Guidance is provided for the CSV file format. From the ouput directory, execute either the following Bash or PowerShell script. The script will collect the output from the CSV files, only include the header from the first file, and then output the result as CombinedCSV.csv in the current working directory.
|
||||
|
||||
There is no logic implemented in terms of which CSV files it will combine. If you have additional CSV files from other actions, such as running a quick inventory, you will need to move that out of the current (or any nested) directory, or move the output you want to combine into its own folder and run the script from there.
|
||||
|
||||
```bash
|
||||
#!/bin/bash
|
||||
|
||||
# Initialize a variable to indicate the first file
|
||||
firstFile=true
|
||||
|
||||
# Find all CSV files and loop through them
|
||||
find . -name "*.csv" -print0 | while IFS= read -r -d '' file; do
|
||||
if [ "$firstFile" = true ]; then
|
||||
# For the first file, keep the header
|
||||
cat "$file" > CombinedCSV.csv
|
||||
firstFile=false
|
||||
else
|
||||
# For subsequent files, skip the header
|
||||
tail -n +2 "$file" >> CombinedCSV.csv
|
||||
fi
|
||||
done
|
||||
```
|
||||
|
||||
```powershell
|
||||
# Get all CSV files from current directory and its subdirectories
|
||||
$csvFiles = Get-ChildItem -Recurse -Filter "*.csv"
|
||||
|
||||
# Initialize a variable to track if it's the first file
|
||||
$firstFile = $true
|
||||
|
||||
# Loop through each CSV file
|
||||
foreach ($file in $csvFiles) {
|
||||
if ($firstFile) {
|
||||
# For the first file, keep the header and change the flag
|
||||
$combinedCsv = Import-Csv -Path $file.FullName
|
||||
$firstFile = $false
|
||||
} else {
|
||||
# For subsequent files, skip the header
|
||||
$tempCsv = Import-Csv -Path $file.FullName
|
||||
$combinedCsv += $tempCsv | Select-Object * -Skip 1
|
||||
}
|
||||
}
|
||||
|
||||
# Export the combined data to a new CSV file
|
||||
$combinedCsv | Export-Csv -Path "CombinedCSV.csv" -NoTypeInformation
|
||||
```
|
||||
|
||||
## TODO: Additional Improvements
|
||||
|
||||
Some services need to instantiate another service to perform a check. For instance, `cloudwatch` will instantiate Prowler's `iam` service to perform the `cloudwatch_cross_account_sharing_disabled` check. When the `iam` service is instantiated, it will perform the `__init__` function, and pull all the information required for that service. This provides an opportunity for an improvement in the above script to group related services together so that the `iam` services (or any other cross-service references) isn't repeatedily instantiated by grouping dependant services together. A complete mapping between these services still needs to be further investigated, but these are the cross-references that have been noted:
|
||||
|
||||
* inspector2 needs lambda and ec2
|
||||
* cloudwatch needs iam
|
||||
* dlm needs ec2
|
||||
@@ -6,12 +6,12 @@ Prowler has some checks that analyse pentesting risks (Secrets, Internet Exposed
|
||||
|
||||
Prowler uses `detect-secrets` library to search for any secrets that are stores in plaintext within your environment.
|
||||
|
||||
The actual checks that have this functionality are:
|
||||
The actual checks that have this funcionality are:
|
||||
|
||||
1. autoscaling_find_secrets_ec2_launch_configuration
|
||||
- awslambda_function_no_secrets_in_code
|
||||
- awslambda_function_no_secrets_in_variables
|
||||
- cloudformation_stack_outputs_find_secrets
|
||||
- cloudformation_outputs_find_secrets
|
||||
- ec2_instance_secrets_user_data
|
||||
- ecs_task_definitions_no_environment_secrets
|
||||
- ssm_document_secrets
|
||||
@@ -25,7 +25,7 @@ prowler <provider> --categories secrets
|
||||
|
||||
Several checks analyse resources that are exposed to the Internet, these are:
|
||||
|
||||
1. apigateway_restapi_public
|
||||
1. apigateway_endpoint_public
|
||||
- appstream_fleet_default_internet_access_disabled
|
||||
- awslambda_function_not_publicly_accessible
|
||||
- ec2_ami_public
|
||||
@@ -33,8 +33,9 @@ Several checks analyse resources that are exposed to the Internet, these are:
|
||||
- ec2_instance_internet_facing_with_instance_profile
|
||||
- ec2_instance_public_ip
|
||||
- ec2_networkacl_allow_ingress_any_port
|
||||
- ec2_securitygroup_allow_wide_open_public_ipv4
|
||||
- ec2_securitygroup_allow_ingress_from_internet_to_any_port
|
||||
- ec2_securitygroup_allow_wide_open_public_ipv4
|
||||
- ec2_securitygroup_in_use_without_ingress_filtering
|
||||
- ecr_repositories_not_publicly_accessible
|
||||
- eks_control_plane_endpoint_access_restricted
|
||||
- eks_endpoints_not_publicly_accessible
|
||||
@@ -50,7 +51,6 @@ Several checks analyse resources that are exposed to the Internet, these are:
|
||||
- sagemaker_notebook_instance_without_direct_internet_access_configured
|
||||
- sns_topics_not_publicly_accessible
|
||||
- sqs_queues_not_publicly_accessible
|
||||
- network_public_ip_shodan
|
||||
|
||||
...
|
||||
|
||||
@@ -62,17 +62,8 @@ prowler <provider> --categories internet-exposed
|
||||
|
||||
### Shodan
|
||||
|
||||
Prowler allows you check if any public IPs in your Cloud environments are exposed in Shodan with `-N`/`--shodan <shodan_api_key>` option:
|
||||
Prowler allows you check if any elastic ip in your AWS Account is exposed in Shodan with `-N`/`--shodan <shodan_api_key>` option:
|
||||
|
||||
For example, you can check if any of your AWS EC2 instances has an elastic IP exposed in shodan:
|
||||
```console
|
||||
prowler aws -N/--shodan <shodan_api_key> -c ec2_elastic_ip_shodan
|
||||
```
|
||||
Also, you can check if any of your Azure Subscription has an public IP exposed in shodan:
|
||||
```console
|
||||
prowler azure -N/--shodan <shodan_api_key> -c network_public_ip_shodan
|
||||
```
|
||||
And finally, you can check if any of your GCP projects has an public IP address exposed in shodan:
|
||||
```console
|
||||
prowler gcp -N/--shodan <shodan_api_key> -c compute_public_address_shodan
|
||||
prowler aws --shodan <shodan_api_key> -c ec2_elastic_ip_shodan
|
||||
```
|
||||
|
||||
@@ -1,24 +1,17 @@
|
||||
# Quick Inventory
|
||||
|
||||
Prowler allows you to execute a quick inventory to extract the number of resources in your provider.
|
||||
|
||||
???+ note
|
||||
Currently, it is only available for AWS provider.
|
||||
> Currently, it is only available for AWS provider.
|
||||
|
||||
|
||||
- You can use option `-i`/`--quick-inventory` to execute it:
|
||||
```sh
|
||||
prowler <provider> -i
|
||||
```
|
||||
|
||||
???+ note
|
||||
By default, it extracts resources from all the regions, you could use `-f`/`--filter-region` to specify the regions to execute the analysis.
|
||||
> By default, it extracts resources from all the regions, you could use `-f`/`--filter-region` to specify the regions to execute the analysis.
|
||||
|
||||
- This feature specify both the number of resources for each service and for each resource type.
|
||||
|
||||
- Also, it creates by default a CSV and JSON to see detailed information about the resources extracted.
|
||||
|
||||

|
||||
|
||||
## Objections
|
||||
The inventorying process is done with `resourcegroupstaggingapi` calls which means that only resources they have or have had tags will appear (except for the IAM and S3 resources which are done with Boto3 API calls).
|
||||

|
||||
|
||||
@@ -1,9 +1,9 @@
|
||||
# Reporting
|
||||
|
||||
By default, Prowler will generate a CSV, JSON, JSON-OCSF and a HTML report, however you could generate a JSON-ASFF (used by AWS Security Hub) report with `-M` or `--output-modes`:
|
||||
By default, Prowler will generate a CSV, JSON and a HTML report, however you could generate a JSON-ASFF (used by AWS Security Hub) report with `-M` or `--output-modes`:
|
||||
|
||||
```console
|
||||
prowler <provider> -M csv json json-ocsf json-asff html
|
||||
prowler <provider> -M csv json json-asff html
|
||||
```
|
||||
|
||||
## Custom Output Flags
|
||||
@@ -19,14 +19,21 @@ prowler <provider> -M csv json json-asff html -F <custom_report_name>
|
||||
```console
|
||||
prowler <provider> -M csv json json-asff html -o <custom_report_directory>
|
||||
```
|
||||
???+ note
|
||||
Both flags can be used simultaneously to provide a custom directory and filename.
|
||||
```console
|
||||
prowler <provider> -M csv json json-asff html \
|
||||
-F <custom_report_name> -o <custom_report_directory>
|
||||
```
|
||||
## Output timestamp format
|
||||
By default, the timestamp format of the output files is ISO 8601. This can be changed with the flag `--unix-timestamp` generating the timestamp fields in pure unix timestamp format.
|
||||
> Both flags can be used simultainously to provide a custom directory and filename.
|
||||
```console
|
||||
prowler <provider> -M csv json json-asff html -F <custom_report_name> -o <custom_report_directory>
|
||||
```
|
||||
## Send report to AWS S3 Bucket
|
||||
|
||||
To save your report in an S3 bucket, use `-B`/`--output-bucket` to define a custom output bucket along with `-M` to define the output format that is going to be uploaded to S3:
|
||||
|
||||
```sh
|
||||
prowler <provider> -M csv -B my-bucket/folder/
|
||||
```
|
||||
|
||||
> In the case you do not want to use the assumed role credentials but the initial credentials to put the reports into the S3 bucket, use `-D`/`--output-bucket-no-assume` instead of `-B`/`--output-bucket.
|
||||
|
||||
> Make sure that the used credentials have s3:PutObject permissions in the S3 path where the reports are going to be uploaded.
|
||||
|
||||
## Output Formats
|
||||
|
||||
@@ -34,87 +41,18 @@ Prowler supports natively the following output formats:
|
||||
|
||||
- CSV
|
||||
- JSON
|
||||
- JSON-OCSF
|
||||
- JSON-ASFF
|
||||
- HTML
|
||||
|
||||
Hereunder is the structure for each of the supported report formats by Prowler:
|
||||
|
||||
### HTML
|
||||

|
||||
|
||||
### CSV
|
||||
|
||||
CSV format has a set of common columns for all the providers, and then provider specific columns.
|
||||
The common columns are the following:
|
||||
|
||||
- ASSESSMENT_START_TIME
|
||||
- FINDING_UNIQUE_ID
|
||||
- PROVIDER
|
||||
- CHECK_ID
|
||||
- CHECK_TITLE
|
||||
- CHECK_TYPE
|
||||
- STATUS
|
||||
- STATUS_EXTENDED
|
||||
- SERVICE_NAME
|
||||
- SUBSERVICE_NAME
|
||||
- SEVERITY
|
||||
- RESOURCE_TYPE
|
||||
- RESOURCE_DETAILS
|
||||
- RESOURCE_TAGS
|
||||
- DESCRIPTION
|
||||
- RISK
|
||||
- RELATED_URL
|
||||
- REMEDIATION_RECOMMENDATION_TEXT
|
||||
- REMEDIATION_RECOMMENDATION_URL
|
||||
- REMEDIATION_RECOMMENDATION_CODE_NATIVEIAC
|
||||
- REMEDIATION_RECOMMENDATION_CODE_TERRAFORM
|
||||
- REMEDIATION_RECOMMENDATION_CODE_CLI
|
||||
- REMEDIATION_RECOMMENDATION_CODE_OTHER
|
||||
- COMPLIANCE
|
||||
- CATEGORIES
|
||||
- DEPENDS_ON
|
||||
- RELATED_TO
|
||||
- NOTES
|
||||
|
||||
And then by the provider specific columns:
|
||||
|
||||
#### AWS
|
||||
|
||||
- PROFILE
|
||||
- ACCOUNT_ID
|
||||
- ACCOUNT_NAME
|
||||
- ACCOUNT_EMAIL
|
||||
- ACCOUNT_ARN
|
||||
- ACCOUNT_ORG
|
||||
- ACCOUNT_TAGS
|
||||
- REGION
|
||||
- RESOURCE_ID
|
||||
- RESOURCE_ARN
|
||||
|
||||
#### AZURE
|
||||
|
||||
- TENANT_DOMAIN
|
||||
- SUBSCRIPTION
|
||||
- RESOURCE_ID
|
||||
- RESOURCE_NAME
|
||||
|
||||
#### GCP
|
||||
|
||||
- PROJECT_ID
|
||||
- LOCATION
|
||||
- RESOURCE_ID
|
||||
- RESOURCE_NAME
|
||||
|
||||
|
||||
???+ note
|
||||
Since Prowler v3 the CSV column delimiter is the semicolon (`;`)
|
||||
| ASSESSMENT_START_TIME | FINDING_UNIQUE_ID | PROVIDER | PROFILE | ACCOUNT_ID | ACCOUNT_NAME | ACCOUNT_EMAIL | ACCOUNT_ARN | ACCOUNT_ORG | ACCOUNT_TAGS | REGION | CHECK_ID | CHECK_TITLE | CHECK_TYPE | STATUS | STATUS_EXTENDED | SERVICE_NAME | SUBSERVICE_NAME | SEVERITY | RESOURCE_ID | RESOURCE_ARN | RESOURCE_TYPE | RESOURCE_DETAILS | RESOURCE_TAGS | DESCRIPTION | RISK | RELATED_URL | REMEDIATION_RECOMMENDATION_TEXT | REMEDIATION_RECOMMENDATION_URL | REMEDIATION_RECOMMENDATION_CODE_NATIVEIAC | REMEDIATION_RECOMMENDATION_CODE_TERRAFORM | REMEDIATION_RECOMMENDATION_CODE_CLI | REMEDIATION_RECOMMENDATION_CODE_OTHER | CATEGORIES | DEPENDS_ON | RELATED_TO | NOTES |
|
||||
| ------- | ----------- | ------ | -------- | ------------ | ----------- | ---------- | ---------- | --------------------- | -------------------------- | -------------- | ----------------- | ------------------------ | --------------- | ---------- | ----------------- | --------- | -------------- | ----------------- | ------------------ | --------------------- | -------------------- | ------------------- | ------------------- | -------------------- | -------------------- | -------------------- | -------------------- | -------------------- | -------------------- | -------------------- | -------------------- | -------------------- | -------------------- | -------------------- | -------------------- | -------------------- |
|
||||
|
||||
### JSON
|
||||
|
||||
The following code is an example output of the JSON format:
|
||||
|
||||
```json
|
||||
```
|
||||
[{
|
||||
"AssessmentStartTime": "2022-12-01T14:16:57.354413",
|
||||
"FindingUniqueId": "",
|
||||
@@ -133,10 +71,6 @@ The following code is an example output of the JSON format:
|
||||
"Severity": "low",
|
||||
"ResourceId": "rds-instance-id",
|
||||
"ResourceArn": "",
|
||||
"ResourceTags": {
|
||||
"test": "test",
|
||||
"enironment": "dev"
|
||||
},
|
||||
"ResourceType": "AwsRdsDbInstance",
|
||||
"ResourceDetails": "",
|
||||
"Description": "Ensure RDS instances have minor version upgrade enabled.",
|
||||
@@ -155,17 +89,8 @@ The following code is an example output of the JSON format:
|
||||
}
|
||||
},
|
||||
"Categories": [],
|
||||
"Notes": "",
|
||||
"Compliance": {
|
||||
"CIS-1.4": [
|
||||
"1.20"
|
||||
],
|
||||
"CIS-1.5": [
|
||||
"1.20"
|
||||
]
|
||||
}
|
||||
},
|
||||
{
|
||||
"Notes": ""
|
||||
},{
|
||||
"AssessmentStartTime": "2022-12-01T14:16:57.354413",
|
||||
"FindingUniqueId": "",
|
||||
"Provider": "aws",
|
||||
@@ -184,7 +109,7 @@ The following code is an example output of the JSON format:
|
||||
"ResourceId": "rds-instance-id",
|
||||
"ResourceArn": "",
|
||||
"ResourceType": "AwsRdsDbInstance",
|
||||
"ResourceTags": {},
|
||||
"ResourceDetails": "",
|
||||
"Description": "Ensure RDS instances have minor version upgrade enabled.",
|
||||
"Risk": "Auto Minor Version Upgrade is a feature that you can enable to have your database automatically upgraded when a new minor database engine version is available. Minor version upgrades often patch security vulnerabilities and fix bugs and therefore should be applied.",
|
||||
"RelatedUrl": "https://aws.amazon.com/blogs/database/best-practices-for-upgrading-amazon-rds-to-major-and-minor-versions-of-postgresql/",
|
||||
@@ -201,281 +126,15 @@ The following code is an example output of the JSON format:
|
||||
}
|
||||
},
|
||||
"Categories": [],
|
||||
"Notes": "",
|
||||
"Compliance": {}
|
||||
"Notes": ""
|
||||
}]
|
||||
```
|
||||
|
||||
???+ note
|
||||
Each finding is a `json` object within a list. This has changed in v3 since in v2 the format used was [ndjson](http://ndjson.org/).
|
||||
|
||||
|
||||
### JSON-OCSF
|
||||
|
||||
Based on [Open Cybersecurity Schema Framework Security Finding v1.0.0-rc.3](https://schema.ocsf.io/1.0.0-rc.3/classes/security_finding?extensions=)
|
||||
|
||||
```json
|
||||
[{
|
||||
"finding": {
|
||||
"title": "Check if ACM Certificates are about to expire in specific days or less",
|
||||
"desc": "Check if ACM Certificates are about to expire in specific days or less",
|
||||
"supporting_data": {
|
||||
"Risk": "Expired certificates can impact service availability.",
|
||||
"Notes": ""
|
||||
},
|
||||
"remediation": {
|
||||
"kb_articles": [
|
||||
"https://docs.aws.amazon.com/config/latest/developerguide/acm-certificate-expiration-check.html"
|
||||
],
|
||||
"desc": "Monitor certificate expiration and take automated action to renew; replace or remove. Having shorter TTL for any security artifact is a general recommendation; but requires additional automation in place. If not longer required delete certificate. Use AWS config using the managed rule: acm-certificate-expiration-check."
|
||||
},
|
||||
"types": [
|
||||
"Data Protection"
|
||||
],
|
||||
"src_url": "https://docs.aws.amazon.com/config/latest/developerguide/acm-certificate-expiration-check.html",
|
||||
"uid": "prowler-aws-acm_certificates_expiration_check-012345678912-eu-west-1-*.xxxxxxxxxxxxxx",
|
||||
"related_events": []
|
||||
},
|
||||
"resources": [
|
||||
{
|
||||
"group": {
|
||||
"name": "acm"
|
||||
},
|
||||
"region": "eu-west-1",
|
||||
"name": "xxxxxxxxxxxxxx",
|
||||
"uid": "arn:aws:acm:eu-west-1:012345678912:certificate/xxxxxxxxxxxxxx",
|
||||
"labels": [
|
||||
{
|
||||
"Key": "project",
|
||||
"Value": "prowler-pro"
|
||||
},
|
||||
{
|
||||
"Key": "environment",
|
||||
"Value": "dev"
|
||||
},
|
||||
{
|
||||
"Key": "terraform",
|
||||
"Value": "true"
|
||||
},
|
||||
{
|
||||
"Key": "terraform_state",
|
||||
"Value": "aws"
|
||||
}
|
||||
],
|
||||
"type": "AwsCertificateManagerCertificate",
|
||||
"details": ""
|
||||
}
|
||||
],
|
||||
"status_detail": "ACM Certificate for xxxxxxxxxxxxxx expires in 111 days.",
|
||||
"compliance": {
|
||||
"status": "Success",
|
||||
"requirements": [
|
||||
"CISA: ['your-data-2']",
|
||||
"SOC2: ['cc_6_7']",
|
||||
"MITRE-ATTACK: ['T1040']",
|
||||
"GDPR: ['article_32']",
|
||||
"HIPAA: ['164_308_a_4_ii_a', '164_312_e_1']",
|
||||
"AWS-Well-Architected-Framework-Security-Pillar: ['SEC09-BP01']",
|
||||
"NIST-800-171-Revision-2: ['3_13_1', '3_13_2', '3_13_8', '3_13_11']",
|
||||
"NIST-800-53-Revision-4: ['ac_4', 'ac_17_2', 'sc_12']",
|
||||
"NIST-800-53-Revision-5: ['sc_7_12', 'sc_7_16']",
|
||||
"NIST-CSF-1.1: ['ac_5', 'ds_2']",
|
||||
"RBI-Cyber-Security-Framework: ['annex_i_1_3']",
|
||||
"FFIEC: ['d3-pc-im-b-1']",
|
||||
"FedRamp-Moderate-Revision-4: ['ac-4', 'ac-17-2', 'sc-12']",
|
||||
"FedRAMP-Low-Revision-4: ['ac-17', 'sc-12']"
|
||||
],
|
||||
"status_detail": "ACM Certificate for xxxxxxxxxxxxxx expires in 111 days."
|
||||
},
|
||||
"message": "ACM Certificate for xxxxxxxxxxxxxx expires in 111 days.",
|
||||
"severity_id": 4,
|
||||
"severity": "High",
|
||||
"cloud": {
|
||||
"account": {
|
||||
"name": "",
|
||||
"uid": "012345678912"
|
||||
},
|
||||
"region": "eu-west-1",
|
||||
"org": {
|
||||
"uid": "",
|
||||
"name": ""
|
||||
},
|
||||
"provider": "aws",
|
||||
"project_uid": ""
|
||||
},
|
||||
"time": "2023-06-30 10:28:55.297615",
|
||||
"metadata": {
|
||||
"original_time": "2023-06-30T10:28:55.297615",
|
||||
"profiles": [
|
||||
"dev"
|
||||
],
|
||||
"product": {
|
||||
"language": "en",
|
||||
"name": "Prowler",
|
||||
"version": "3.6.1",
|
||||
"vendor_name": "Prowler/ProwlerPro",
|
||||
"feature": {
|
||||
"name": "acm_certificates_expiration_check",
|
||||
"uid": "acm_certificates_expiration_check",
|
||||
"version": "3.6.1"
|
||||
}
|
||||
},
|
||||
"version": "1.0.0-rc.3"
|
||||
},
|
||||
"state_id": 0,
|
||||
"state": "New",
|
||||
"status_id": 1,
|
||||
"status": "Success",
|
||||
"type_uid": 200101,
|
||||
"type_name": "Security Finding: Create",
|
||||
"impact_id": 0,
|
||||
"impact": "Unknown",
|
||||
"confidence_id": 0,
|
||||
"confidence": "Unknown",
|
||||
"activity_id": 1,
|
||||
"activity_name": "Create",
|
||||
"category_uid": 2,
|
||||
"category_name": "Findings",
|
||||
"class_uid": 2001,
|
||||
"class_name": "Security Finding"
|
||||
},{
|
||||
"finding": {
|
||||
"title": "Check if ACM Certificates are about to expire in specific days or less",
|
||||
"desc": "Check if ACM Certificates are about to expire in specific days or less",
|
||||
"supporting_data": {
|
||||
"Risk": "Expired certificates can impact service availability.",
|
||||
"Notes": ""
|
||||
},
|
||||
"remediation": {
|
||||
"kb_articles": [
|
||||
"https://docs.aws.amazon.com/config/latest/developerguide/acm-certificate-expiration-check.html"
|
||||
],
|
||||
"desc": "Monitor certificate expiration and take automated action to renew; replace or remove. Having shorter TTL for any security artifact is a general recommendation; but requires additional automation in place. If not longer required delete certificate. Use AWS config using the managed rule: acm-certificate-expiration-check."
|
||||
},
|
||||
"types": [
|
||||
"Data Protection"
|
||||
],
|
||||
"src_url": "https://docs.aws.amazon.com/config/latest/developerguide/acm-certificate-expiration-check.html",
|
||||
"uid": "prowler-aws-acm_certificates_expiration_check-012345678912-eu-west-1-xxxxxxxxxxxxx",
|
||||
"related_events": []
|
||||
},
|
||||
"resources": [
|
||||
{
|
||||
"group": {
|
||||
"name": "acm"
|
||||
},
|
||||
"region": "eu-west-1",
|
||||
"name": "xxxxxxxxxxxxx",
|
||||
"uid": "arn:aws:acm:eu-west-1:012345678912:certificate/3ea965a0-368d-4d13-95eb-5042a994edc4",
|
||||
"labels": [
|
||||
{
|
||||
"Key": "name",
|
||||
"Value": "prowler-pro-saas-dev-acm-internal-wildcard"
|
||||
},
|
||||
{
|
||||
"Key": "project",
|
||||
"Value": "prowler-pro-saas"
|
||||
},
|
||||
{
|
||||
"Key": "environment",
|
||||
"Value": "dev"
|
||||
},
|
||||
{
|
||||
"Key": "terraform",
|
||||
"Value": "true"
|
||||
},
|
||||
{
|
||||
"Key": "terraform_state",
|
||||
"Value": "aws/saas/base"
|
||||
}
|
||||
],
|
||||
"type": "AwsCertificateManagerCertificate",
|
||||
"details": ""
|
||||
}
|
||||
],
|
||||
"status_detail": "ACM Certificate for xxxxxxxxxxxxx expires in 119 days.",
|
||||
"compliance": {
|
||||
"status": "Success",
|
||||
"requirements": [
|
||||
"CISA: ['your-data-2']",
|
||||
"SOC2: ['cc_6_7']",
|
||||
"MITRE-ATTACK: ['T1040']",
|
||||
"GDPR: ['article_32']",
|
||||
"HIPAA: ['164_308_a_4_ii_a', '164_312_e_1']",
|
||||
"AWS-Well-Architected-Framework-Security-Pillar: ['SEC09-BP01']",
|
||||
"NIST-800-171-Revision-2: ['3_13_1', '3_13_2', '3_13_8', '3_13_11']",
|
||||
"NIST-800-53-Revision-4: ['ac_4', 'ac_17_2', 'sc_12']",
|
||||
"NIST-800-53-Revision-5: ['sc_7_12', 'sc_7_16']",
|
||||
"NIST-CSF-1.1: ['ac_5', 'ds_2']",
|
||||
"RBI-Cyber-Security-Framework: ['annex_i_1_3']",
|
||||
"FFIEC: ['d3-pc-im-b-1']",
|
||||
"FedRamp-Moderate-Revision-4: ['ac-4', 'ac-17-2', 'sc-12']",
|
||||
"FedRAMP-Low-Revision-4: ['ac-17', 'sc-12']"
|
||||
],
|
||||
"status_detail": "ACM Certificate for xxxxxxxxxxxxx expires in 119 days."
|
||||
},
|
||||
"message": "ACM Certificate for xxxxxxxxxxxxx expires in 119 days.",
|
||||
"severity_id": 4,
|
||||
"severity": "High",
|
||||
"cloud": {
|
||||
"account": {
|
||||
"name": "",
|
||||
"uid": "012345678912"
|
||||
},
|
||||
"region": "eu-west-1",
|
||||
"org": {
|
||||
"uid": "",
|
||||
"name": ""
|
||||
},
|
||||
"provider": "aws",
|
||||
"project_uid": ""
|
||||
},
|
||||
"time": "2023-06-30 10:28:55.297615",
|
||||
"metadata": {
|
||||
"original_time": "2023-06-30T10:28:55.297615",
|
||||
"profiles": [
|
||||
"dev"
|
||||
],
|
||||
"product": {
|
||||
"language": "en",
|
||||
"name": "Prowler",
|
||||
"version": "3.6.1",
|
||||
"vendor_name": "Prowler/ProwlerPro",
|
||||
"feature": {
|
||||
"name": "acm_certificates_expiration_check",
|
||||
"uid": "acm_certificates_expiration_check",
|
||||
"version": "3.6.1"
|
||||
}
|
||||
},
|
||||
"version": "1.0.0-rc.3"
|
||||
},
|
||||
"state_id": 0,
|
||||
"state": "New",
|
||||
"status_id": 1,
|
||||
"status": "Success",
|
||||
"type_uid": 200101,
|
||||
"type_name": "Security Finding: Create",
|
||||
"impact_id": 0,
|
||||
"impact": "Unknown",
|
||||
"confidence_id": 0,
|
||||
"confidence": "Unknown",
|
||||
"activity_id": 1,
|
||||
"activity_name": "Create",
|
||||
"category_uid": 2,
|
||||
"category_name": "Findings",
|
||||
"class_uid": 2001,
|
||||
"class_name": "Security Finding"
|
||||
}]
|
||||
```
|
||||
|
||||
???+ note
|
||||
Each finding is a `json` object.
|
||||
> NOTE: Each finding is a `json` object.
|
||||
|
||||
### JSON-ASFF
|
||||
|
||||
The following code is an example output of the [JSON-ASFF](https://docs.aws.amazon.com/securityhub/latest/userguide/securityhub-findings-format-syntax.html) format:
|
||||
|
||||
```json
|
||||
```
|
||||
[{
|
||||
"SchemaVersion": "2018-10-08",
|
||||
"Id": "prowler-rds_instance_minor_version_upgrade_enabled-ACCOUNT_ID-eu-west-1-b1ade474a",
|
||||
@@ -507,30 +166,7 @@ The following code is an example output of the [JSON-ASFF](https://docs.aws.amaz
|
||||
],
|
||||
"Compliance": {
|
||||
"Status": "PASSED",
|
||||
"RelatedRequirements": [
|
||||
"CISA your-systems-2 booting-up-thing-to-do-first-3",
|
||||
"CIS-1.5 2.3.2",
|
||||
"AWS-Foundational-Security-Best-Practices rds",
|
||||
"RBI-Cyber-Security-Framework annex_i_6",
|
||||
"FFIEC d3-cc-pm-b-1 d3-cc-pm-b-3"
|
||||
],
|
||||
"AssociatedStandards": [
|
||||
{
|
||||
"StandardsId": "CISA"
|
||||
},
|
||||
{
|
||||
"StandardsId": "CIS-1.5"
|
||||
},
|
||||
{
|
||||
"StandardsId": "AWS-Foundational-Security-Best-Practices"
|
||||
},
|
||||
{
|
||||
"StandardsId": "RBI-Cyber-Security-Framework"
|
||||
},
|
||||
{
|
||||
"StandardsId": "FFIEC"
|
||||
}
|
||||
]
|
||||
"RelatedRequirements": []
|
||||
},
|
||||
"Remediation": {
|
||||
"Recommendation": {
|
||||
@@ -569,30 +205,7 @@ The following code is an example output of the [JSON-ASFF](https://docs.aws.amaz
|
||||
],
|
||||
"Compliance": {
|
||||
"Status": "PASSED",
|
||||
"RelatedRequirements": [
|
||||
"CISA your-systems-2 booting-up-thing-to-do-first-3",
|
||||
"CIS-1.5 2.3.2",
|
||||
"AWS-Foundational-Security-Best-Practices rds",
|
||||
"RBI-Cyber-Security-Framework annex_i_6",
|
||||
"FFIEC d3-cc-pm-b-1 d3-cc-pm-b-3"
|
||||
],
|
||||
"AssociatedStandards": [
|
||||
{
|
||||
"StandardsId": "CISA"
|
||||
},
|
||||
{
|
||||
"StandardsId": "CIS-1.5"
|
||||
},
|
||||
{
|
||||
"StandardsId": "AWS-Foundational-Security-Best-Practices"
|
||||
},
|
||||
{
|
||||
"StandardsId": "RBI-Cyber-Security-Framework"
|
||||
},
|
||||
{
|
||||
"StandardsId": "FFIEC"
|
||||
}
|
||||
]
|
||||
"RelatedRequirements": []
|
||||
},
|
||||
"Remediation": {
|
||||
"Recommendation": {
|
||||
@@ -603,5 +216,4 @@ The following code is an example output of the [JSON-ASFF](https://docs.aws.amaz
|
||||
}]
|
||||
```
|
||||
|
||||
???+ note
|
||||
Each finding is a `json` object within a list.
|
||||
> NOTE: Each finding is a `json` object.
|
||||
|
||||
53
mkdocs.yml
@@ -1,15 +1,15 @@
|
||||
# Project information
|
||||
site_name: Prowler Open Source Documentation
|
||||
site_url: https://docs.prowler.com/
|
||||
site_name: Prowler Documentation
|
||||
site_url: https://docs.prowler.pro/
|
||||
site_description: >-
|
||||
Prowler Open Source Documentation
|
||||
Prowler Documentation Site
|
||||
|
||||
# Theme Configuration
|
||||
theme:
|
||||
language: en
|
||||
logo: img/prowler-logo-white.png
|
||||
logo: img/prowler-logo.png
|
||||
name: material
|
||||
favicon: favicon.ico
|
||||
favicon: img/ProwlerPro-icon.svg
|
||||
features:
|
||||
- navigation.tabs
|
||||
- navigation.tabs.sticky
|
||||
@@ -19,11 +19,6 @@ theme:
|
||||
primary: black
|
||||
accent: green
|
||||
|
||||
plugins:
|
||||
- search
|
||||
- git-revision-date-localized:
|
||||
enable_creation_date: true
|
||||
|
||||
edit_uri: "https://github.com/prowler-cloud/prowler/tree/master/docs"
|
||||
# Prowler OSS Repository
|
||||
repo_url: https://github.com/prowler-cloud/prowler/
|
||||
@@ -38,24 +33,15 @@ nav:
|
||||
- Reporting: tutorials/reporting.md
|
||||
- Compliance: tutorials/compliance.md
|
||||
- Quick Inventory: tutorials/quick-inventory.md
|
||||
- Slack Integration: tutorials/integrations.md
|
||||
- Configuration File: tutorials/configuration_file.md
|
||||
- Logging: tutorials/logging.md
|
||||
- Allowlist: tutorials/allowlist.md
|
||||
- Check Aliases: tutorials/check-aliases.md
|
||||
- Custom Metadata: tutorials/custom-checks-metadata.md
|
||||
- Ignore Unused Services: tutorials/ignore-unused-services.md
|
||||
- Pentesting: tutorials/pentesting.md
|
||||
- Parallel Execution: tutorials/parallel-execution.md
|
||||
- Developer Guide: developer-guide/introduction.md
|
||||
- AWS:
|
||||
- Authentication: tutorials/aws/authentication.md
|
||||
- Assume Role: tutorials/aws/role-assumption.md
|
||||
- AWS Security Hub: tutorials/aws/securityhub.md
|
||||
- AWS Organizations: tutorials/aws/organizations.md
|
||||
- AWS Regions and Partitions: tutorials/aws/regions-and-partitions.md
|
||||
- Scan Multiple AWS Accounts: tutorials/aws/multiaccount.md
|
||||
- Send reports to AWS S3: tutorials/aws/s3.md
|
||||
- AWS CloudShell: tutorials/aws/cloudshell.md
|
||||
- Checks v2 to v3 Mapping: tutorials/aws/v2_to_v3_checks_mapping.md
|
||||
- Tag-based Scan: tutorials/aws/tag-based-scan.md
|
||||
@@ -63,29 +49,12 @@ nav:
|
||||
- Boto3 Configuration: tutorials/aws/boto3-configuration.md
|
||||
- Azure:
|
||||
- Authentication: tutorials/azure/authentication.md
|
||||
- Non default clouds: tutorials/azure/use-non-default-cloud.md
|
||||
- Subscriptions: tutorials/azure/subscriptions.md
|
||||
- Google Cloud:
|
||||
- Authentication: tutorials/gcp/authentication.md
|
||||
- Developer Guide:
|
||||
- Introduction: developer-guide/introduction.md
|
||||
- Audit Info: developer-guide/audit-info.md
|
||||
- Services: developer-guide/services.md
|
||||
- Checks: developer-guide/checks.md
|
||||
- Documentation: developer-guide/documentation.md
|
||||
- Compliance: developer-guide/security-compliance-framework.md
|
||||
- Outputs: developer-guide/outputs.md
|
||||
- Integrations: developer-guide/integrations.md
|
||||
- Testing:
|
||||
- Unit Tests: developer-guide/unit-testing.md
|
||||
- Integration Tests: developer-guide/integration-testing.md
|
||||
- Debugging: developer-guide/debugging.md
|
||||
- Security: security.md
|
||||
- Contact Us: contact.md
|
||||
- Troubleshooting: troubleshooting.md
|
||||
- About: about.md
|
||||
- Prowler SaaS: https://prowler.com
|
||||
|
||||
- ProwlerPro: https://prowler.pro
|
||||
# Customization
|
||||
extra:
|
||||
consent:
|
||||
@@ -109,15 +78,11 @@ extra:
|
||||
link: https://twitter.com/prowlercloud
|
||||
|
||||
# Copyright
|
||||
copyright: >
|
||||
Copyright © <script>document.write(new Date().getFullYear())</script> Toni de la Fuente, Maintained by the Prowler Team at ProwlerPro, Inc.</a>
|
||||
</br><a href="#__consent">Change cookie settings</a>
|
||||
copyright: Copyright © 2022 Toni de la Fuente, Maintained by the Prowler Team at Verica, Inc.</a>
|
||||
|
||||
markdown_extensions:
|
||||
- abbr
|
||||
- admonition
|
||||
- pymdownx.details
|
||||
- pymdownx.superfences
|
||||
- attr_list
|
||||
- def_list
|
||||
- footnotes
|
||||
@@ -131,8 +96,8 @@ markdown_extensions:
|
||||
- pymdownx.caret
|
||||
- pymdownx.details
|
||||
- pymdownx.emoji:
|
||||
emoji_index: !!python/name:material.extensions.emoji.twemoji
|
||||
emoji_generator: !!python/name:material.extensions.emoji.to_svg
|
||||
emoji_generator: !!python/name:materialx.emoji.to_svg
|
||||
emoji_index: !!python/name:materialx.emoji.twemoji
|
||||
- pymdownx.highlight:
|
||||
anchor_linenums: true
|
||||
- pymdownx.inlinehilite
|
||||
|
||||
@@ -4,7 +4,7 @@ AWSTemplateFormatVersion: '2010-09-09'
|
||||
# aws cloudformation create-stack \
|
||||
# --capabilities CAPABILITY_IAM --capabilities CAPABILITY_NAMED_IAM \
|
||||
# --template-body "file://create_role_to_assume_cfn.yaml" \
|
||||
# --stack-name "ProwlerScanRole" \
|
||||
# --stack-name "ProwlerExecRole" \
|
||||
# --parameters "ParameterKey=AuthorisedARN,ParameterValue=arn:aws:iam::123456789012:root"
|
||||
#
|
||||
Description: |
|
||||
@@ -13,7 +13,7 @@ Description: |
|
||||
account to assume that role. The role name and the ARN of the trusted user can all be passed
|
||||
to the CloudFormation stack as parameters. Then you can run Prowler to perform a security
|
||||
assessment with a command like:
|
||||
prowler --role ProwlerScanRole.ARN
|
||||
./prowler -A <THIS_ACCOUNT_ID> -R ProwlerExecRole
|
||||
Parameters:
|
||||
AuthorisedARN:
|
||||
Description: |
|
||||
@@ -22,12 +22,12 @@ Parameters:
|
||||
Type: String
|
||||
ProwlerRoleName:
|
||||
Description: |
|
||||
Name of the IAM role that will have these policies attached. Default: ProwlerScanRole
|
||||
Name of the IAM role that will have these policies attached. Default: ProwlerExecRole
|
||||
Type: String
|
||||
Default: 'ProwlerScanRole'
|
||||
Default: 'ProwlerExecRole'
|
||||
|
||||
Resources:
|
||||
ProwlerScanRole:
|
||||
ProwlerExecRole:
|
||||
Type: AWS::IAM::Role
|
||||
Properties:
|
||||
AssumeRolePolicyDocument:
|
||||
@@ -42,50 +42,31 @@ Resources:
|
||||
# Bool:
|
||||
# 'aws:MultiFactorAuthPresent': true
|
||||
# This is 12h that is maximum allowed, Minimum is 3600 = 1h
|
||||
# to take advantage of this use -T like in './prowler --role ProwlerScanRole.ARN -T 43200'
|
||||
# to take advantage of this use -T like in './prowler -A <ACCOUNT_ID_TO_ASSUME> -R ProwlerExecRole -T 43200 -M text,html'
|
||||
MaxSessionDuration: 43200
|
||||
ManagedPolicyArns:
|
||||
- 'arn:aws:iam::aws:policy/SecurityAudit'
|
||||
- 'arn:aws:iam::aws:policy/job-function/ViewOnlyAccess'
|
||||
RoleName: !Sub ${ProwlerRoleName}
|
||||
Policies:
|
||||
- PolicyName: ProwlerScanRoleAdditionalViewPrivileges
|
||||
- PolicyName: ProwlerExecRoleAdditionalViewPrivileges
|
||||
PolicyDocument:
|
||||
Version : '2012-10-17'
|
||||
Statement:
|
||||
- Effect: Allow
|
||||
Action:
|
||||
- 'account:Get*'
|
||||
- 'appstream:Describe*'
|
||||
- 'appstream:List*'
|
||||
- 'codeartifact:List*'
|
||||
- 'codebuild:BatchGet*'
|
||||
- 'dlm:Get*'
|
||||
- 'ds:Get*'
|
||||
- 'ds:Describe*'
|
||||
- 'ds:List*'
|
||||
- 'ds:ListAuthorizedApplications'
|
||||
- 'ec2:GetEbsEncryptionByDefault'
|
||||
- 'ecr:Describe*'
|
||||
- 'elasticfilesystem:DescribeBackupPolicy'
|
||||
- 'glue:GetConnections'
|
||||
- 'glue:GetSecurityConfiguration*'
|
||||
- 'glue:GetSecurityConfiguration'
|
||||
- 'glue:SearchTables'
|
||||
- 'lambda:GetFunction*'
|
||||
- 'macie2:GetMacieSession'
|
||||
- 'lambda:GetFunction'
|
||||
- 's3:GetAccountPublicAccessBlock'
|
||||
- 'shield:DescribeProtection'
|
||||
- 'shield:GetSubscriptionState'
|
||||
- 'securityhub:BatchImportFindings'
|
||||
- 'securityhub:GetFindings'
|
||||
- 'ssm:GetDocument'
|
||||
- 'support:Describe*'
|
||||
- 'tag:GetTagKeys'
|
||||
Resource: '*'
|
||||
- PolicyName: ProwlerScanRoleAdditionalViewPrivilegesApiGateway
|
||||
PolicyDocument:
|
||||
Version : '2012-10-17'
|
||||
Statement:
|
||||
- Effect: Allow
|
||||
Action:
|
||||
- 'apigateway:GET'
|
||||
Resource: 'arn:aws:apigateway:*::/restapis/*'
|
||||
|
||||
@@ -3,38 +3,26 @@
|
||||
"Statement": [
|
||||
{
|
||||
"Action": [
|
||||
"account:Get*",
|
||||
"appstream:Describe*",
|
||||
"appstream:List*",
|
||||
"backup:List*",
|
||||
"cloudtrail:GetInsightSelectors",
|
||||
"codeartifact:List*",
|
||||
"codebuild:BatchGet*",
|
||||
"dlm:Get*",
|
||||
"drs:Describe*",
|
||||
"ds:Get*",
|
||||
"ds:Describe*",
|
||||
"ds:Get*",
|
||||
"ds:List*",
|
||||
"ec2:GetEbsEncryptionByDefault",
|
||||
"ecr:Describe*",
|
||||
"ecr:GetRegistryScanningConfiguration",
|
||||
"elasticfilesystem:DescribeBackupPolicy",
|
||||
"glue:GetConnections",
|
||||
"glue:GetSecurityConfiguration*",
|
||||
"glue:SearchTables",
|
||||
"lambda:GetFunction*",
|
||||
"logs:FilterLogEvents",
|
||||
"macie2:GetMacieSession",
|
||||
"s3:GetAccountPublicAccessBlock",
|
||||
"shield:DescribeProtection",
|
||||
"shield:GetSubscriptionState",
|
||||
"securityhub:BatchImportFindings",
|
||||
"securityhub:GetFindings",
|
||||
"ssm:GetDocument",
|
||||
"ssm-incidents:List*",
|
||||
"support:Describe*",
|
||||
"tag:GetTagKeys",
|
||||
"wellarchitected:List*"
|
||||
"tag:GetTagKeys"
|
||||
],
|
||||
"Resource": "*",
|
||||
"Effect": "Allow",
|
||||
@@ -46,8 +34,7 @@
|
||||
"apigateway:GET"
|
||||
],
|
||||
"Resource": [
|
||||
"arn:aws:apigateway:*::/restapis/*",
|
||||
"arn:aws:apigateway:*::/apis/*"
|
||||
"arn:aws:apigateway:*::/restapis/*"
|
||||
]
|
||||
}
|
||||
]
|
||||
|
||||